





Help Center
Find product manuals, troubleshooting help, and answers to common questions.
Product Support
BLUETTI AC200MAX- PORTABLE SOLAR GENERATOR
Manuals & Downloads
Frequently Asked Questions
Please read the USER MANUAL carefully. A detailed explanation is given on how to use it.
You can find the user manuals below
Watch this video for a quick start :
https://www.youtube.com/watch?v=tk1oAASkuSU
More information is available in the USER MANUAL
Please watch this video :
https://www.youtube.com/watch?v=Fl2f6yzv1NY
From 0.00 to 0.38 : Connecting 1 panel to the AC200 Max
From 0.38 to 1.04 : Connecting several panels to the AC200 Max
In case you want to connect the easy solar kit to your Bluetti generator, you can do it as described below.
If you want to use the Easy Solar Kit without the Bluetti generator, please check the FAQ on HOW TO USE MY EASY SOLAR KIT - QUICK INSTALLATION.
The first step below is in case you have already installed the Easy Solar Kit and plugged it into your wall socket.
In case the Easy Solar Kit is not installed yet, please go directly to the second step.


No matching questions found.
BLUETTI AC300- PORTABLE SOLAR GENERATOR
Manuals & Downloads
Frequently Asked Questions
Please read the USER MANUAL carefully. A detailed explanation is given on how to use it.
You can find the user manuals below
Watch these videos for a quick start :
https://www.youtube.com/watch?v=kGKZG_HOFKQ
Please watch this video :
https://www.youtube.com/watch?v=Fl2f6yzv1NY
From 0.00 to 0.38 : Connecting 1 panel to the AC200 Max
From 0.38 to 1.04 : Connecting several panels to the AC200 Max
In case you want to connect the easy solar kit to your Bluetti generator, you can do it as described below.
If you want to use the Easy Solar Kit without the Bluetti generator, please check the FAQ on HOW TO USE MY EASY SOLAR KIT - QUICK INSTALLATION.
The first step below is in case you have already installed the Easy Solar Kit and plugged it into your wall socket.
In case the Easy Solar Kit is not installed yet, please go directly to the second step.

1. Go to "settings" then "next" and confirm that the "Max Grid Input Current" is set to "15A".
2. Click on the central button and look at what it is to check that the central unit is detecting your B230 or B300 batteries in "battery information".
3. Navigate to "Alarm" and check that there is no current problem detected.
4. Navigate to "Data" and then "Alarm History" and check if there has been a recent problem recorded
These checks will allow you to establish whether something is wrong with the battery or if the problem lies somehwere else. After proceeding to these checks, if the problem persists, please contact us.
No matching questions found.
BLUETTI B230 - POWER PACK
Manuals & Downloads
Frequently Asked Questions
Please read the USER MANUAL carefully. A detailed explanation is given on how to use it.
You can find the user manuals below
No matching questions found.
BLUETTI B300 - POWER PACK
Manuals & Downloads
Frequently Asked Questions
Please read the USER MANUAL carefully. A detailed explanation is given on how to use it.
You can find the user manuals below
No matching questions found.
BLUETTI EP500 PRO - SOLAR GENERATOR
Manuals & Downloads
Frequently Asked Questions
Please read the USER MANUAL carefully. A detailed explanation is given on how to use it.
You can find the user manuals below


No matching questions found.
CYCLOTRON
Manuals & Downloads
Frequently Asked Questions
Please read the USER MANUAL carefully. A detailed explanation is given on how to use it.
You can find the user manuals below
The Cyclotron allows wireless charging. How to use it ?
- First, place your phone on the Cyclotron, into the brackets.
- Push the POWER button to activate the wireless charging function.
- Your phone will start charging wirelessly.

In case it does not work , please check the following aspects :
- Be sure your phone allows wireless charging. Please refer to its user manual.
If your phone allows wireless charging :
- If your phone has a protective case, remove it and try again.
- If a metal plate is stuck to the back of your phone, remove it and try again.
- If the blue LED lights still do not turn on, please ensure you have pushed the POWER button on the right side of the Cyclotron.
The Cyclotron allows smartphones with dimensions :
Width : 70 to 105 mm
Length : no limit
Thickness : 1 to 12 mm
No matching questions found.
EASY SOLAR KIT
Manuals & Downloads
Frequently Asked Questions
Please read the USER MANUAL carefully. A detailed explanation is given on how to use it.
You can find the user manuals below
The Easy Solar Kit has been designed in order to reduce the electricity bill of our Sunslice customers. It is a plug and play solar kit, very easy to install and to use.
The Easy Solar Kit on its own cannot store the energy that it produces. This energy is injected on the home-grid and needs to be consumed instantaneously by the devices connected to the grid. If no device is connected or if too much electricity is produced compared to the electricity that is consumed, this (surplus) energy is reinjected (for free) on the main grid.
So, which solution do we have to store this surplus energy ?
There is no automatic solution for this.
Though we can suggest a manual solution that will make you able to store the energy produced by the solar panel into a power station when you want (for example when you are away for a long time or when you want to store back up power in case of possible power outage)
The Bluetti power stations can store from 2kWh to 12.3 kWh energy. It is very easy to connect the Easy Solar Kits to these power stations.
How ?
1. Install your Easy Solar Kit in the initial setup (kit connected to the home-grid) : the user manual can be found here.
2. Disconnect the plug from the grid and also the MC4-cables from the micro-inverter.
3. Connect the MC4-cables to the Bluetti power station.
All the energy produced by the solar panel of the Easy Solar Kit will be stored into the power station.
When you want, you can connect your devices to the power station and you can also reconnect the Easy Solar Kit to the grid.
You can find a quick electronics installation guide for the Easy Solar Kit below.
Please also refer to the User Manual included in the packaging to set up the Easy Solar Kit .
No matching questions found.
ELECTRON
Manuals & Downloads
Frequently Asked Questions
No questions have been added for this product yet.
No matching questions found.
EMPERION 45 MINI
Manuals & Downloads
Frequently Asked Questions
No questions have been added for this product yet.
No matching questions found.
EMPERION 65 PRO
Manuals & Downloads
Frequently Asked Questions
No questions have been added for this product yet.
No matching questions found.
FLIGHT CASE
Manuals & Downloads
Frequently Asked Questions
No questions have been added for this product yet.
No matching questions found.
FUSION 100
Manuals & Downloads
Frequently Asked Questions
Please read the USER MANUAL carefully. A detailed explanation is given on how to use it.
You can find the user manuals below
No matching questions found.
FUSION 150
Manuals & Downloads
Frequently Asked Questions
No questions have been added for this product yet.
No matching questions found.
FUSION 200
Manuals & Downloads
Frequently Asked Questions
No questions have been added for this product yet.
No matching questions found.
FUSION 40
Manuals & Downloads
Frequently Asked Questions
No questions have been added for this product yet.
No matching questions found.
FUSION 440
Manuals & Downloads
Frequently Asked Questions
No questions have been added for this product yet.
No matching questions found.
FUSION 60
Manuals & Downloads
Frequently Asked Questions
No questions have been added for this product yet.
No matching questions found.
FUSION CORE 10
Manuals & Downloads
Frequently Asked Questions
No questions have been added for this product yet.
No matching questions found.
FUSION CORE 22
Manuals & Downloads
Frequently Asked Questions
No questions have been added for this product yet.
No matching questions found.
FUSION FLEX 12
Manuals & Downloads
Frequently Asked Questions
Please read the USER MANUAL carefully. A detailed explanation is given on how to use it.
You can find the user manuals below
No matching questions found.
FUSION FLEX 18
Manuals & Downloads
Frequently Asked Questions
Please read the USER MANUAL carefully. A detailed explanation is given on how to use it.
You can find the user manuals below
No matching questions found.
FUSION FLEX 24
Manuals & Downloads
Frequently Asked Questions
Please read the USER MANUAL carefully. A detailed explanation is given on how to use it.
You can find the user manuals below
The Fusion FLEX 24 can charge different products.
Hereunder is a table that explains the different compatibilities of the Fusion Flex 24.
Please consider the compatibility of the USB-C port is different than the compatibility of the USB-A port.

You need to use the USB-C to USB-A cable. Plug the USB-A end into the Fusion Flex 24 and then the USB-C end into the USB-C port of the Gravity 100. Please do NOT use the USB-C to USB-C cable supplied with the Gravity 100 to charge the Gravity 100 from the Fusion Flex 24's USB-C port. You can use it to charge the Gravity 100 with the Emperion fast charger or any other USB-C charger.
This image shows the setup :


No matching questions found.
FUSION FLEX 48
Manuals & Downloads
Frequently Asked Questions
Please read the USER MANUAL carefully. A detailed explanation is given on how to use it.
You can find the user manuals below
The Fusion FLEX 48 can charge different products.
Hereunder is a table that explains the different compatibilities of the Fusion Flex 48.
Please consider the compatibility of the USB-C port is different than the compatibility of the USB-A ports and the DC 5521 port.
The DC 5521 is a non regulated output port that can mainly charge powerstations such as the Sunslice Gravity 144 and Sunslice Gravity 432.

You need to use the USB-C to USB-A cable. Plug the USB-A end into the Fusion Flex 48 and then the USB-C end into the USB-C port of the Gravity 100. Please do NOT use the USB-C to USB-C cable supplied with the Gravity 100 to charge the Gravity 100 from the Fusion Flex 48's USB-C port. You can use it to charge the Gravity 100 with the Emperion fast charger or any other USB-C charger.
This image shows the setup :

No matching questions found.
FUSION FLEX 6
Manuals & Downloads
Frequently Asked Questions
Please read the USER MANUAL carefully. A detailed explanation is given on how to use it.
You can find the user manuals below
No matching questions found.
GRAVITY 10
Manuals & Downloads
Frequently Asked Questions
Please read the USER MANUAL carefully. A detailed explanation is given on how to use it.
You can find the user manuals below
No matching questions found.
GRAVITY 10 EXTREME
Manuals & Downloads
Frequently Asked Questions
No questions have been added for this product yet.
No matching questions found.
GRAVITY 100
Manuals & Downloads
Frequently Asked Questions
Please read the USER MANUAL carefully. A detailed explanation is given on how to use it.
You can find the user manuals below
You can order the Gravity 100 with an adaptor set. This adaptor set will allow a universal compatibility with all laptops.
The adaptor set is available on the Gravity 100 product page (dropdown menu).
No matching questions found.
GRAVITY 1024
Manuals & Downloads
Frequently Asked Questions
No questions have been added for this product yet.
No matching questions found.
GRAVITY 144
Manuals & Downloads
Frequently Asked Questions
Please read the USER MANUAL carefully. A detailed explanation is given on how to use it.
You can find the user manuals below
No matching questions found.
GRAVITY 20
Manuals & Downloads
Frequently Asked Questions
Please read the USER MANUAL carefully. A detailed explanation is given on how to use it.
You can find the user manuals below
No matching questions found.
GRAVITY 20 EXTREME PRO
Manuals & Downloads
Frequently Asked Questions
No questions have been added for this product yet.
No matching questions found.
GRAVITY 2048
Manuals & Downloads
Frequently Asked Questions
No questions have been added for this product yet.
No matching questions found.
GRAVITY 2232
Manuals & Downloads
Frequently Asked Questions
No questions have been added for this product yet.
No matching questions found.
GRAVITY 27
Manuals & Downloads
Frequently Asked Questions
No questions have been added for this product yet.
No matching questions found.
GRAVITY 27 PRO
Manuals & Downloads
Frequently Asked Questions
No questions have been added for this product yet.
No matching questions found.
GRAVITY 40
Manuals & Downloads
Frequently Asked Questions
No questions have been added for this product yet.
No matching questions found.
GRAVITY 432
Manuals & Downloads
Frequently Asked Questions
Please read the USER MANUAL carefully. A detailed explanation is given on how to use it.
You can find the user manuals below
No matching questions found.
GRAVITY 486
Manuals & Downloads
Frequently Asked Questions
No questions have been added for this product yet.
No matching questions found.
GRAVITY 5
Manuals & Downloads
Frequently Asked Questions
Please read the USER MANUAL carefully. A detailed explanation is given on how to use it.
You can find the user manuals below
No matching questions found.
GRAVITY 756
Manuals & Downloads
Frequently Asked Questions
Please read the USER MANUAL carefully. A detailed explanation is given on how to use it.
You can find the user manuals below
Quick Diagnosis :
You may not have activated the AC function (function that activates the sockets on the back). To do this, you need to press the G button for 3 seconds as indicated in the user manual. The necessary information about this are circled in green in the pictures below:
You will find the schematic on page 4 of the user manual.


If it still does not work, please read the user manual again carefully before contacting us.
No matching questions found.
HADRON
Manuals & Downloads
Frequently Asked Questions
Please read the USER MANUAL carefully. A detailed explanation is given on how to use it.
You can find the user manuals below
The Hadron automatically includes an EU plug . In case you need a US, CH or GB plug, please reach out to us at service@sunslice-solar.com .
In any case, the Hadron can be charged via its USB-C input with a standard USB-C cable.
No matching questions found.
JUNCTION BOX
Manuals & Downloads
Frequently Asked Questions
No questions have been added for this product yet.
No matching questions found.
LINKPOWER BACKPACK
Manuals & Downloads
Frequently Asked Questions
No questions have been added for this product yet.
No matching questions found.
LINKPOWER MINI FLIGHTCASE
Manuals & Downloads
Frequently Asked Questions
No questions have been added for this product yet.
No matching questions found.
LINKPOWER PRO FLIGHTCASE
Manuals & Downloads
Frequently Asked Questions
No questions have been added for this product yet.
No matching questions found.
PHOTON
Manuals & Downloads
Frequently Asked Questions
Please read the USER MANUAL of the Photon carefully. A detailed explanation is given on how to use the Photon.
You can find the user manuals below
If you're experiencing trouble using your Photon to charge your phone, please follow the following instructions:
0. Press the POWER button
Connect your device to the Photon. If your device does not start charging automatically, please press the POWER button on the edge of the Photon.

1. Check if the battery works
First make sure the battery has some charge. Start by pressing the POWER button once on the side of the battery to see if some blue lights turn on.
If the battery doesn't turn on, try plugging it into a USB charger using the USB-C input, and check if the battery turns on. If you see little blue lights at some point, the battery works fine. If not, it could be an issue with your Sunslice cable. Please try with another USB-C cable (or make sure your Sunslice cable works well) before proceeding to the next step.
If despite these steps no lights appear at all, then please contact us at service@sunslice-solar.com and make sure notifying us you read carefully the FAQ before contacting us. We will help you further.
2. Cable position
Make sure the cable is inserted correctly in the USB port. It can happen that the USB port is more centered than it should be. The cable must be placed in the lower part of the receptacle, as shown in the picture below. The cable's metallic data pins should face upwards. Please look at the drawings carefully and replicate this with your Photon.

3. For iPhone users
Check that the cable is inserted correctly in your phone. If you have an iPhone, please note that the cable only works one way around. It is necessary as the other side of the cable charges micro-USB inputs. You may need to turn your phone over for it to charge.

4. Check if it works with a different cable
If you have tried using the Sunslice cable both ways following all the instructions above, please try using a different charging cable. If the phone now charges with your cable, it means your Sunslice cable is defaulting. If it still does not work, your device is defaulting and will be changed. Please contact us at service©sunslice-solar.com
The Photon has a little loop to secure the Sunslice cable on its side and avoid losing it. This loop has been specifically reinforced to serve as an attachement point for a backpack. You can easily slip a carabiner or a rope to fix it on your backpack or to other places.
A second loop has been added at the other side of the Photon that can be used as a second attachment point to stabilize the Photon.

The Photon is equipped with a standard USB output. That means that, essentially, if your device can be charged using a USB cable, it will work with the Photon.
We provide a complementary 3-in-1 cable that can charge any device with a USB-C, Lightning and Micro-USB port (Max 5V).
If you have any other type of port, you will have to use your own cable (Mini-USB, iPod, Nokia 3.5 etc.). Be aware that the Photon is limited to a 5V voltage.
In case you're not sure, send us a picture of your device and the charging ports, and we will get back to you as soon as possible !
Optimal solar charge experience can be obtained by :
- opening the Photon completely towards the sun
- no shading on any of the solar cells
- tilting the Photon perpendicularly to the sun
- static conditions. Hanging the Photon on your backpack whilst hiking is a handy charging solution but will reduce the charging speed as the Photon will move and the solar exposure will fluctuate a lot.
- perfect sun conditions (summer time, no clouds, +-15°C)
- not placing the Photon behind a window (this can reduce the solar charging speed up to 90%)
- allowing ventilation around the product in order to keep the temperature low (high temperatures affect the efficiency of the solar cells)
When charging the Photon in the Sun :
The time required to accumulate a phone equivalent charge in the Photon's battery may vary depending on the phone to be charged. Here are a few examples.
Please note that the charging speed of the Photon in the sun can vary greatly with charging conditions. The above charging times are given for optimal tilt and at an ambient temperature of 25°C.
In the case of excessive heat, one or more shaded cells, movement, positioning behind glass, ... these performances can be greatly reduced. Please refer to FAQ question "How can I get the optimal charge experience ?"
When charging your device with the Photon (if the Photon is pre-charged) :
The charging time needed to charge your device with the Photon (if the Photon is already 100% pre-charged) will also vary according to your device. One can assume an approximate 1h30 / 2'000 mAh charging speed.

The Photon has 5 charging indicator LEDs as depicted below.

Please be aware that the first 4 BLUE LED lights (on the left) indicate the charge status of the Photon's integrated powerbank. The fifth GREEN LED light (on the right) indicates that the Photon is charging in the sun.
When the 4 blue LED lights are on, it means the Photon is 100% charged.
To summarise (approximate figures) :
- 0 LED : 0%
- 1 LED : 1%-29%
- 2 LED : 30% - 69%
- 3 LED : 70%-99%
- 4 LED : 100%
The fourth LED light can take more time to light on as the charging speed slows down at the end of the charging cycle. Please consider this when charging in the sun as the fourth LED light can take a long time before going on.
Yes,
you do not have to worry about the strength of the leather attachment loop of the Photon. We have tested it and it withstands a 9kg traction without breaking. Click here to watch the test.
We are sorry for that. It occurs sometimes that one looses the part of the Photon's 3-in-1 universal cable.
You can still use your Photon with any other USB cable. In case you want to re-order a cable, you can order directly on our website by clicking here .
The universal 3-in-1 cable, included with the Photon, cannot charge all iPads®. By iPad®, one means the tablets from the Apple® brand.
In case this happens to your iPad®, please try with your usual cable.
In case your Photon presents a distortion (swelling, puncture, crack in the battery), please isolate it from other ingnitable products and contact us at service@sunslice-solar.com .
We will explain you how to get rid of it safely and ecologically.
No matching questions found.
Produit Test Geoff
Manuals & Downloads
Frequently Asked Questions
Please read the USER MANUAL carefully. A detailed explanation is given on how to use it.
You can find the user manuals below
No matching questions found.
PV200 - FOLDABLE SOLAR PANEL 200 WATTS
Manuals & Downloads
Frequently Asked Questions
No questions have been added for this product yet.
No matching questions found.
VOLTA WALLET
Manuals & Downloads
Frequently Asked Questions
No questions have been added for this product yet.
No matching questions found.
ZENITH
Manuals & Downloads
Frequently Asked Questions
Please read the USER MANUAL carefully. A detailed explanation is given on how to use it.
You can find the user manuals below
No matching questions found.
ELECTRON
Manuals & Downloads
Product Questions & Troubleshooting
No additional product-specific questions are currently listed.
No matching information found for this product.
EMPERION 45 MINI
Manuals & Downloads
Product Questions & Troubleshooting
No additional product-specific questions are currently listed.
No matching information found for this product.
EMPERION 65 PRO
Manuals & Downloads
Product Questions & Troubleshooting
No additional product-specific questions are currently listed.
No matching information found for this product.
PHOTON
Manuals & Downloads
Product Questions & Troubleshooting
Please read the USER MANUAL of the Photon carefully. A detailed explanation is given on how to use the Photon.
You can find the user manuals below
If you're experiencing trouble using your Photon to charge your phone, please follow the following instructions:
0. Press the POWER button
Connect your device to the Photon. If your device does not start charging automatically, please press the POWER button on the edge of the Photon.
1. Check if the battery works
First make sure the battery has some charge. Start by pressing the POWER button once on the side of the battery to see if some blue lights turn on.
If the battery doesn't turn on, try plugging it into a USB charger using the USB-C input, and check if the battery turns on. If you see little blue lights at some point, the battery works fine. If not, it could be an issue with your Sunslice cable. Please try with another USB-C cable (or make sure your Sunslice cable works well) before proceeding to the next step.
If despite these steps no lights appear at all, then please contact us at service@sunslice-solar.com and make sure notifying us you read carefully the FAQ before contacting us. We will help you further.
2. Cable position
Make sure the cable is inserted correctly in the USB port. It can happen that the USB port is more centered than it should be. The cable must be placed in the lower part of the receptacle, as shown in the picture below. The cable's metallic data pins should face upwards. Please look at the drawings carefully and replicate this with your Photon.
3. For iPhone users
Check that the cable is inserted correctly in your phone. If you have an iPhone, please note that the cable only works one way around. It is necessary as the other side of the cable charges micro-USB inputs. You may need to turn your phone over for it to charge.
4. Check if it works with a different cable
If you have tried using the Sunslice cable both ways following all the instructions above, please try using a different charging cable. If the phone now charges with your cable, it means your Sunslice cable is defaulting. If it still does not work, your device is defaulting and will be changed. Please contact us at service©sunslice-solar.com
The Photon has a little loop to secure the Sunslice cable on its side and avoid losing it. This loop has been specifically reinforced to serve as an attachement point for a backpack. You can easily slip a carabiner or a rope to fix it on your backpack or to other places.
A second loop has been added at the other side of the Photon that can be used as a second attachment point to stabilize the Photon.
The Photon is equipped with a standard USB output. That means that, essentially, if your device can be charged using a USB cable, it will work with the Photon.
We provide a complementary 3-in-1 cable that can charge any device with a USB-C, Lightning and Micro-USB port (Max 5V).
If you have any other type of port, you will have to use your own cable (Mini-USB, iPod, Nokia 3.5 etc.). Be aware that the Photon is limited to a 5V voltage.
In case you're not sure, send us a picture of your device and the charging ports, and we will get back to you as soon as possible !
Optimal solar charge experience can be obtained by :
- opening the Photon completely towards the sun
- no shading on any of the solar cells
- tilting the Photon perpendicularly to the sun
- static conditions. Hanging the Photon on your backpack whilst hiking is a handy charging solution but will reduce the charging speed as the Photon will move and the solar exposure will fluctuate a lot.
- perfect sun conditions (summer time, no clouds, +-15°C)
- not placing the Photon behind a window (this can reduce the solar charging speed up to 90%)
- allowing ventilation around the product in order to keep the temperature low (high temperatures affect the efficiency of the solar cells)
When charging the Photon in the Sun :
The time required to accumulate a phone equivalent charge in the Photon's battery may vary depending on the phone to be charged. Here are a few examples.
Please note that the charging speed of the Photon in the sun can vary greatly with charging conditions. The above charging times are given for optimal tilt and at an ambient temperature of 25°C.
In the case of excessive heat, one or more shaded cells, movement, positioning behind glass, ... these performances can be greatly reduced. Please refer to FAQ question "How can I get the optimal charge experience ?"
When charging your device with the Photon (if the Photon is pre-charged) :
The charging time needed to charge your device with the Photon (if the Photon is already 100% pre-charged) will also vary according to your device. One can assume an approximate 1h30 / 2'000 mAh charging speed.
The Photon has 5 charging indicator LEDs as depicted below.
Please be aware that the first 4 BLUE LED lights (on the left) indicate the charge status of the Photon's integrated powerbank. The fifth GREEN LED light (on the right) indicates that the Photon is charging in the sun.
When the 4 blue LED lights are on, it means the Photon is 100% charged.
To summarise (approximate figures) :
- 0 LED : 0%
- 1 LED : 1%-29%
- 2 LED : 30% - 69%
- 3 LED : 70%-99%
- 4 LED : 100%
The fourth LED light can take more time to light on as the charging speed slows down at the end of the charging cycle. Please consider this when charging in the sun as the fourth LED light can take a long time before going on.
Yes,
you do not have to worry about the strength of the leather attachment loop of the Photon. We have tested it and it withstands a 9kg traction without breaking. Click here to watch the test.
We are sorry for that. It occurs sometimes that one looses the part of the Photon's 3-in-1 universal cable.
You can still use your Photon with any other USB cable. In case you want to re-order a cable, you can order directly on our website by clicking here .
The universal 3-in-1 cable, included with the Photon, cannot charge all iPads®. By iPad®, one means the tablets from the Apple® brand.
In case this happens to your iPad®, please try with your usual cable.
In case your Photon presents a distortion (swelling, puncture, crack in the battery), please isolate it from other ingnitable products and contact us at service@sunslice-solar.com .
We will explain you how to get rid of it safely and ecologically.
No matching information found for this product.
FUSION FLEX 6
Manuals & Downloads
Product Questions & Troubleshooting
Please read the USER MANUAL carefully. A detailed explanation is given on how to use it.
You can find the user manuals below
No matching information found for this product.
FUSION FLEX 12
Manuals & Downloads
Product Questions & Troubleshooting
Please read the USER MANUAL carefully. A detailed explanation is given on how to use it.
You can find the user manuals below
No matching information found for this product.
FUSION FLEX 18
Manuals & Downloads
Product Questions & Troubleshooting
Please read the USER MANUAL carefully. A detailed explanation is given on how to use it.
You can find the user manuals below
No matching information found for this product.
FUSION FLEX 24
Manuals & Downloads
Product Questions & Troubleshooting
Please read the USER MANUAL carefully. A detailed explanation is given on how to use it.
You can find the user manuals below
The Fusion FLEX 24 can charge different products.
Hereunder is a table that explains the different compatibilities of the Fusion Flex 24.
Please consider the compatibility of the USB-C port is different than the compatibility of the USB-A port.
You need to use the USB-C to USB-A cable. Plug the USB-A end into the Fusion Flex 24 and then the USB-C end into the USB-C port of the Gravity 100. Please do NOT use the USB-C to USB-C cable supplied with the Gravity 100 to charge the Gravity 100 from the Fusion Flex 24's USB-C port. You can use it to charge the Gravity 100 with the Emperion fast charger or any other USB-C charger.
This image shows the setup :
No matching information found for this product.
FUSION FLEX 48
Manuals & Downloads
Product Questions & Troubleshooting
Please read the USER MANUAL carefully. A detailed explanation is given on how to use it.
You can find the user manuals below
The Fusion FLEX 48 can charge different products.
Hereunder is a table that explains the different compatibilities of the Fusion Flex 48.
Please consider the compatibility of the USB-C port is different than the compatibility of the USB-A ports and the DC 5521 port.
The DC 5521 is a non regulated output port that can mainly charge powerstations such as the Sunslice Gravity 144 and Sunslice Gravity 432.
You need to use the USB-C to USB-A cable. Plug the USB-A end into the Fusion Flex 48 and then the USB-C end into the USB-C port of the Gravity 100. Please do NOT use the USB-C to USB-C cable supplied with the Gravity 100 to charge the Gravity 100 from the Fusion Flex 48's USB-C port. You can use it to charge the Gravity 100 with the Emperion fast charger or any other USB-C charger.
This image shows the setup :
No matching information found for this product.
FUSION CORE 10
Manuals & Downloads
Product Questions & Troubleshooting
No additional product-specific questions are currently listed.
No matching information found for this product.
FUSION CORE 22
Manuals & Downloads
Product Questions & Troubleshooting
No additional product-specific questions are currently listed.
No matching information found for this product.
FUSION 40
Manuals & Downloads
Product Questions & Troubleshooting
No additional product-specific questions are currently listed.
No matching information found for this product.
FUSION 60
Manuals & Downloads
Product Questions & Troubleshooting
No additional product-specific questions are currently listed.
No matching information found for this product.
FUSION 100
Manuals & Downloads
Product Questions & Troubleshooting
Please read the USER MANUAL carefully. A detailed explanation is given on how to use it.
You can find the user manuals below
No matching information found for this product.
FUSION 150
Manuals & Downloads
Product Questions & Troubleshooting
No additional product-specific questions are currently listed.
No matching information found for this product.
FUSION 200
Manuals & Downloads
Product Questions & Troubleshooting
No additional product-specific questions are currently listed.
No matching information found for this product.
FUSION 440
Manuals & Downloads
Product Questions & Troubleshooting
No additional product-specific questions are currently listed.
No matching information found for this product.
JUNCTION BOX
Manuals & Downloads
Product Questions & Troubleshooting
No additional product-specific questions are currently listed.
No matching information found for this product.
ZENITH
Manuals & Downloads
Product Questions & Troubleshooting
Please read the USER MANUAL carefully. A detailed explanation is given on how to use it.
You can find the user manuals below
No matching information found for this product.
CYCLOTRON
Manuals & Downloads
Product Questions & Troubleshooting
Please read the USER MANUAL carefully. A detailed explanation is given on how to use it.
You can find the user manuals below
The Cyclotron allows wireless charging. How to use it ?
- First, place your phone on the Cyclotron, into the brackets.
- Push the POWER button to activate the wireless charging function.
- Your phone will start charging wirelessly.
In case it does not work , please check the following aspects :
- Be sure your phone allows wireless charging. Please refer to its user manual.
If your phone allows wireless charging :
- If your phone has a protective case, remove it and try again.
- If a metal plate is stuck to the back of your phone, remove it and try again.
- If the blue LED lights still do not turn on, please ensure you have pushed the POWER button on the right side of the Cyclotron.
The Cyclotron allows smartphones with dimensions :
Width : 70 to 105 mm
Length : no limit
Thickness : 1 to 12 mm
No matching information found for this product.
HADRON
Manuals & Downloads
Product Questions & Troubleshooting
Please read the USER MANUAL carefully. A detailed explanation is given on how to use it.
You can find the user manuals below
The Hadron automatically includes an EU plug . In case you need a US, CH or GB plug, please reach out to us at service@sunslice-solar.com .
In any case, the Hadron can be charged via its USB-C input with a standard USB-C cable.
No matching information found for this product.
GRAVITY 5
Manuals & Downloads
Product Questions & Troubleshooting
Please read the USER MANUAL carefully. A detailed explanation is given on how to use it.
You can find the user manuals below
No matching information found for this product.
GRAVITY 10
Manuals & Downloads
Product Questions & Troubleshooting
Please read the USER MANUAL carefully. A detailed explanation is given on how to use it.
You can find the user manuals below
No matching information found for this product.
GRAVITY 20
Manuals & Downloads
Product Questions & Troubleshooting
Please read the USER MANUAL carefully. A detailed explanation is given on how to use it.
You can find the user manuals below
No matching information found for this product.
GRAVITY 10 EXTREME
Manuals & Downloads
Product Questions & Troubleshooting
No additional product-specific questions are currently listed.
No matching information found for this product.
GRAVITY 20 EXTREME PRO
Manuals & Downloads
Product Questions & Troubleshooting
No additional product-specific questions are currently listed.
No matching information found for this product.
GRAVITY 100
Manuals & Downloads
Product Questions & Troubleshooting
Please read the USER MANUAL carefully. A detailed explanation is given on how to use it.
You can find the user manuals below
You can order the Gravity 100 with an adaptor set. This adaptor set will allow a universal compatibility with all laptops.
The adaptor set is available on the Gravity 100 product page (dropdown menu).
No matching information found for this product.
GRAVITY 27
Manuals & Downloads
Product Questions & Troubleshooting
No additional product-specific questions are currently listed.
No matching information found for this product.
GRAVITY 27 PRO
Manuals & Downloads
Product Questions & Troubleshooting
No additional product-specific questions are currently listed.
No matching information found for this product.
GRAVITY 40
Manuals & Downloads
Product Questions & Troubleshooting
No additional product-specific questions are currently listed.
No matching information found for this product.
GRAVITY 144
Manuals & Downloads
Product Questions & Troubleshooting
Please read the USER MANUAL carefully. A detailed explanation is given on how to use it.
You can find the user manuals below
No matching information found for this product.
GRAVITY 486
Manuals & Downloads
Product Questions & Troubleshooting
No additional product-specific questions are currently listed.
No matching information found for this product.
GRAVITY 432
Manuals & Downloads
Product Questions & Troubleshooting
Please read the USER MANUAL carefully. A detailed explanation is given on how to use it.
You can find the user manuals below
No matching information found for this product.
GRAVITY 756
Manuals & Downloads
Product Questions & Troubleshooting
Please read the USER MANUAL carefully. A detailed explanation is given on how to use it.
You can find the user manuals below
Quick Diagnosis :
You may not have activated the AC function (function that activates the sockets on the back). To do this, you need to press the G button for 3 seconds as indicated in the user manual. The necessary information about this are circled in green in the pictures below:
You will find the schematic on page 4 of the user manual.
If it still does not work, please read the user manual again carefully before contacting us.
No matching information found for this product.
LINKPOWER BACKPACK
Manuals & Downloads
Product Questions & Troubleshooting
No additional product-specific questions are currently listed.
No matching information found for this product.
LINKPOWER MINI FLIGHTCASE
Manuals & Downloads
Product Questions & Troubleshooting
No additional product-specific questions are currently listed.
No matching information found for this product.
LINKPOWER PRO FLIGHTCASE
Manuals & Downloads
Product Questions & Troubleshooting
No additional product-specific questions are currently listed.
No matching information found for this product.
FLIGHT CASE
Manuals & Downloads
Product Questions & Troubleshooting
No additional product-specific questions are currently listed.
No matching information found for this product.
VOLTA WALLET
Manuals & Downloads
Product Questions & Troubleshooting
No additional product-specific questions are currently listed.
No matching information found for this product.
GRAVITY 2232
Manuals & Downloads
Product Questions & Troubleshooting
No additional product-specific questions are currently listed.
No matching information found for this product.
BLUETTI AC200MAX- PORTABLE SOLAR GENERATOR
Manuals & Downloads
As an official distributor of Bluetti in Europe, Sunslice engineers have translated the official Bluetti manuals in French for the convenience of our french speaking clients.
This manual is available on demand, exclusively for Sunslice clients having purchased the corresponding Bluetti product.
Please contact us at contact@sunslice-solar.com with your order number, we will be happy to send you your copy.
Watch this video for a quick start :
https://www.youtube.com/watch?v=tk1oAASkuSU
More information is available in the USER MANUAL
Product Questions & Troubleshooting
Please read the USER MANUAL carefully. A detailed explanation is given on how to use it.
You can find the user manuals below
Please watch this video :
https://www.youtube.com/watch?v=Fl2f6yzv1NY
From 0.00 to 0.38 : Connecting 1 panel to the AC200 Max
From 0.38 to 1.04 : Connecting several panels to the AC200 Max
In case you want to connect the easy solar kit to your Bluetti generator, you can do it as described below.
If you want to use the Easy Solar Kit without the Bluetti generator, please check the FAQ on HOW TO USE MY EASY SOLAR KIT - QUICK INSTALLATION.
The first step below is in case you have already installed the Easy Solar Kit and plugged it into your wall socket.
In case the Easy Solar Kit is not installed yet, please go directly to the second step.
No matching information found for this product.
BLUETTI AC300- PORTABLE SOLAR GENERATOR
Manuals & Downloads
As an official distributor of Bluetti in Europe, Sunslice engineers have translated the official Bluetti manuals in French for the convenience of our french speaking clients.
This manual is available on demand, exclusively for Sunslice clients having purchased the corresponding Bluetti product.
Please contact us at contact@sunslice-solar.com with your order number, we will be happy to send you your copy.
Watch these videos for a quick start :
https://www.youtube.com/watch?v=kGKZG_HOFKQ
Product Questions & Troubleshooting
Please read the USER MANUAL carefully. A detailed explanation is given on how to use it.
You can find the user manuals below
Please watch this video :
https://www.youtube.com/watch?v=Fl2f6yzv1NY
From 0.00 to 0.38 : Connecting 1 panel to the AC200 Max
From 0.38 to 1.04 : Connecting several panels to the AC200 Max
In case you want to connect the easy solar kit to your Bluetti generator, you can do it as described below.
If you want to use the Easy Solar Kit without the Bluetti generator, please check the FAQ on HOW TO USE MY EASY SOLAR KIT - QUICK INSTALLATION.
The first step below is in case you have already installed the Easy Solar Kit and plugged it into your wall socket.
In case the Easy Solar Kit is not installed yet, please go directly to the second step.
1. Go to "settings" then "next" and confirm that the "Max Grid Input Current" is set to "15A".
2. Click on the central button and look at what it is to check that the central unit is detecting your B230 or B300 batteries in "battery information".
3. Navigate to "Alarm" and check that there is no current problem detected.
4. Navigate to "Data" and then "Alarm History" and check if there has been a recent problem recorded
These checks will allow you to establish whether something is wrong with the battery or if the problem lies somehwere else. After proceeding to these checks, if the problem persists, please contact us.
No matching information found for this product.
BLUETTI B230 - POWER PACK
Manuals & Downloads
Product Questions & Troubleshooting
Please read the USER MANUAL carefully. A detailed explanation is given on how to use it.
You can find the user manuals below
No matching information found for this product.
BLUETTI B300 - POWER PACK
Manuals & Downloads
Product Questions & Troubleshooting
Please read the USER MANUAL carefully. A detailed explanation is given on how to use it.
You can find the user manuals below
No matching information found for this product.
BLUETTI EP500 PRO - SOLAR GENERATOR
Manuals & Downloads
As an official distributor of Bluetti in Europe, Sunslice engineers have translated the official Bluetti manuals in French for the convenience of our french speaking clients.
This manual is available on demand, exclusively for Sunslice clients having purchased the corresponding Bluetti product.
Please contact us at contact@sunslice-solar.com with your order number, we will be happy to send you your copy.
Product Questions & Troubleshooting
Please read the USER MANUAL carefully. A detailed explanation is given on how to use it.
You can find the user manuals below
No matching information found for this product.
EASY SOLAR KIT
Manuals & Downloads
Product Questions & Troubleshooting
Please read the USER MANUAL carefully. A detailed explanation is given on how to use it.
You can find the user manuals below
The Easy Solar Kit has been designed in order to reduce the electricity bill of our Sunslice customers. It is a plug and play solar kit, very easy to install and to use.
The Easy Solar Kit on its own cannot store the energy that it produces. This energy is injected on the home-grid and needs to be consumed instantaneously by the devices connected to the grid. If no device is connected or if too much electricity is produced compared to the electricity that is consumed, this (surplus) energy is reinjected (for free) on the main grid.
So, which solution do we have to store this surplus energy ?
There is no automatic solution for this.
Though we can suggest a manual solution that will make you able to store the energy produced by the solar panel into a power station when you want (for example when you are away for a long time or when you want to store back up power in case of possible power outage)
The Bluetti power stations can store from 2kWh to 12.3 kWh energy. It is very easy to connect the Easy Solar Kits to these power stations.
How ?
1. Install your Easy Solar Kit in the initial setup (kit connected to the home-grid) : the user manual can be found here.
2. Disconnect the plug from the grid and also the MC4-cables from the micro-inverter.
3. Connect the MC4-cables to the Bluetti power station.
All the energy produced by the solar panel of the Easy Solar Kit will be stored into the power station.
When you want, you can connect your devices to the power station and you can also reconnect the Easy Solar Kit to the grid.
You can find a quick electronics installation guide for the Easy Solar Kit below.
Please also refer to the User Manual included in the packaging to set up the Easy Solar Kit .
No matching information found for this product.
PV200 - FOLDABLE SOLAR PANEL 200 WATTS
Manuals & Downloads
Product Questions & Troubleshooting
No additional product-specific questions are currently listed.
No matching information found for this product.
GRAVITY 1024
Manuals & Downloads
Product Questions & Troubleshooting
No additional product-specific questions are currently listed.
No matching information found for this product.
GRAVITY 2048
Manuals & Downloads
Product Questions & Troubleshooting
No additional product-specific questions are currently listed.
No matching information found for this product.
General Questions & Answers
Billing & Invoices
You should have received a link to your online invoice in your order confirmation email:
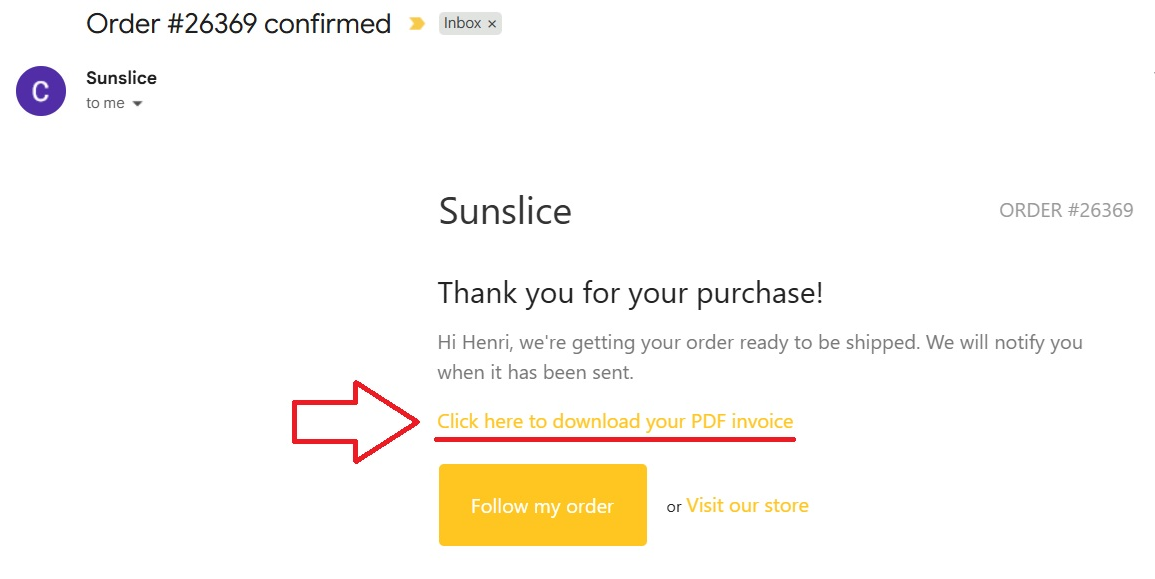
If you cannot find the confirmation email :
- check your spam folder
- be sure which email you used when checking out on our website
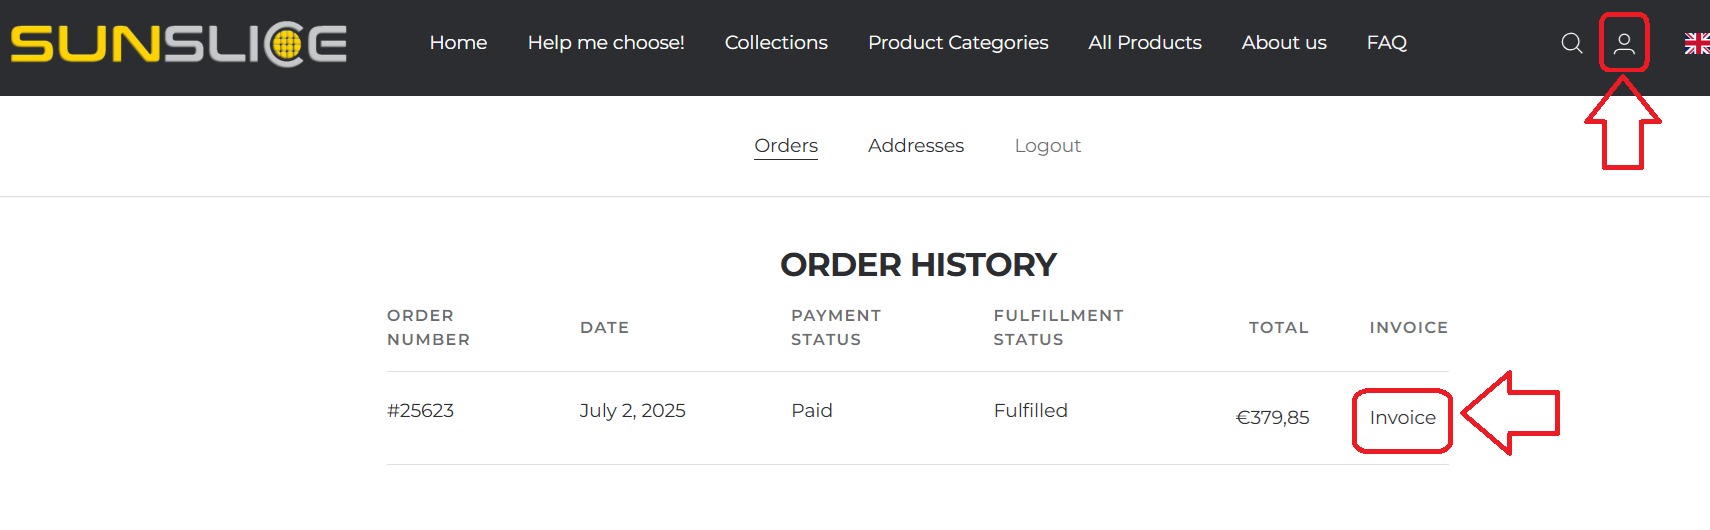
You can also download your invoice directly from our website if you have created a customer account:
Please, write your VAT Number after your company name (in the same field), separated by a "-" .
For example :
Name company : "Sunslice SRL - BE0680474695"
Please contact us at : sales@sunslice-solar.com
with following information :
- Your order (products, color)
- Company details (company name + person of contact , VAT number, address)
- Normal or express shipping
We will send you an invoice by email. Your order can be paid on receipt of the invoice.
Indeed, this can happen.
Usually, two kind of taxes can be requested on receipt :
- VAT
- Import duties
Before placing your order, please contact us at sales@sunslice-solar.com before proceeding to your order with following information :
- Your order (products, color)
- Company details (company name + person of contact , VAT number, address)
- Normal or express shipping
We will send you a Belgian VAT-exempt invoice.
Please note VAT (with the rate of your own country) and import duties will still be requested at the reception of your order.
Our website allows :
- Credit card payments (VISA / MASTERCARD)
- Bancontact
- Paypal . Can we kindly ask to first consider the two options above before proceeding to Paypal payment. Indeed, a very high transaction fee is charged to us for Paypal payments... Thank you very much !
For bank transaction, please contact us at sales@sunslice-solar.com before proceeding to your order with following information :
- Your order (products, color)
- Company details (company name + person of contact , VAT number, address)
- Normal or express shipping
We will send you an invoice by email. Your order can be paid on receipt of the invoice.
General Questions
You want to charge a specific device but you do not know what Sunslice product (solar charger, generator, powerbank, ...) you should buy to be able to do so ?
No worries :
1. Please have a look at the technical specifications of the products on their product pages
2. Check if you can find the answer to your question in this FAQ
3. If you still do not know, you can send us an email at contact@sunslice-solar.com
PLEASE add a picture of the charger(s) of the device(s) you want to be able to power. Your charger will look like this for example and we need to be able to read clearly the written specifications on the charger.

Generally, all Sunslice products are water-resistant. This means they can be used in rainy conditions during a reasonable time.
None of our products can be legally classified as waterproof (IP67) as we usually not have passed the needed tests to obtain these certificates. Why not ? Because of the expensive budget we prefer allow to R&D to effectively improve water-resistancy of our products. However, our products can be used in rainy conditions if not stipulated differently in its user manual.
Generally speaking :
- Products containing a battery
- Must not be drowned into water. In case this happens and you manage to get back your product, please dry it completely before turning it on or using it again. In case the charger continues working after the drying process, the devices you will charge with the Sunslice charger will not incur damages. The longevity of the Sunslice charger could be affected, though.
- Can be used in rainy conditions, so do not worry if your device is hanging on your backpack for a while when hiking in the rain. Please consider drying the product afterwards to preserve its longevity.
- Products without battery
- Do not fear water conditions. Please consider drying the products afterwards to preserve their longevity.
In case your device takes more time to be charged up 100% by a Sunslice charger, this can either be due to a defaulting charger or because of inherent technical specifications of your device.
A smartphone with a larger battery, for example, will take longer to be charged, than a smartphone with a small battery. With time, smartphones integrate larger and larger batteries, which causes longer charging times for recent smartphones.
We constantly try, through enhanced R&D, to make our products evolve with the electronic developments on the market.
The quantitative features claimed by Sunslice about its products use standard devices (smartphones, cameras, tablets, ...) for comparison, like most of the actors in the charging industry do.
Be aware that some (more recent) devices can differ slightly or more significantly from the comparison devices. For example, iPhones will have other specifications than Android devices, according to their integrated battery, the energy consumption when using the phone, the charging speed, etc. Different models within the same brand will also differ on this specifications.
This table gives an idea of the amount of phone charges that can be obtained for a 4'000 mAh (e.g. the Photon) powerbank, depending on the phone model.

Be aware that some recent smartphone will not be able to be charged up 100% by the Photon as they have a very high internal battery capacity.
If a scratch appears on you solar panel, do not worry. Most of the scratches do not affect the solar charging speed.
In case you notice a drastic change in the solar performances, you can contact us at service@sunslice-solar.com .
It depends.
We avoid providing useless cables as this contributes to electronic waste. So if it is not explicitely mentioned a cable is included when placing the order or on the product page, no cable will be added to your order.
In case you buy a specific cable on our website, we of course will add it to your order.
The differences between the nominal and actual capacity of a power bank are due to several technical and practical factors:
1. Voltage conversion : The nominal capacity of a battery is usually indicated in milliampere-hours (mAh) at a specific voltage (often 3.7V, which is the standard voltage for lithium-ion cells). However, to charge devices, this voltage must be converted to 5V, which is the standard output voltage for USB ports. This conversion causes energy losses, reducing the effectively available capacity.
2. Conversion efficiency : The internal circuits of the power bank convert the battery’s energy from 3.7V to 5V. This conversion is not 100% efficient and leads to an energy loss of 5-15%, or more for lower-quality models.
3. Internal resistance : The internal components of the power bank, including cables and connectors, lead to energy losses due to electrical resistance, especially when the current is high. This reduces the energy available for the device being charged.
4. Temperature : During charging or discharging, the battery can heat up, causing additional energy loss, particularly if the power bank is used in a very hot or cold environment.
5. Natural battery degradation: Over time, battery cells degrade, reducing their maximum capacity. An older power bank will therefore have a lower actual capacity than its initial nominal capacity.
These factors make the actual capacity often lower than the indicated nominal capacity.
- Always store charged
- Charge at least every 3 months to prevent battery damage
- In a dry place at ambient temperature
Understanding Solar Charging Times
When charging a device with a portable solar panel, several factors influence the total charging time. Our calculations consider the solar panel’s output, environmental conditions, and the charging characteristics of each device. Below is an overview of the key elements that affect solar charging performance.
0. Perfect theoretical conditions
In a perfect and theoretical world, the calculation of charging time is very simple :
Charging Time = Capacity (Wh) / Solar Power.
with Capacity (Wh) = Capacity (Ah) * 3.7V (example for smartphone : 3(000 m)Ah * 3.7V = 11.Wh
But be aware that even if this is a very quick way to have an estimation of the charging time, it is not correct because we are not living in a perfect theoretical world :-)To avoid this error, and more importantly to explain as best as possible why this is not correct, we have written this small article below. Don't panic if you are not able to calculate charging times yourself despite reading the article : estimation charging times are displayed below the article.
1. Solar Panel Power Output
Each solar panel has a peak power rating (e.g., 18W), but the actual power delivered to a device depends on real-world conditions. The key limiting factors include:
Sunlight Efficiency Losses
Not all the sunlight that reaches Earth is converted into usable power. Losses occur due to:
- Atmospheric filtering: The angle of the sun, the ozone layer, and other atmospheric effects reduce the sunlight intensity. We estimate a 10% loss.
- Internal inefficiencies: Power is further reduced due to USB conversion (8% loss) and cable resistance (2% loss).
Since these losses are multiplicative, the total efficiency factor is:
(1−0.10)×(1−0.08)×(1−0.02)=0.81(1 - 0.10) \times (1 - 0.08) \times (1 - 0.02) = 0.81(1−0.10)×(1−0.08)×(1−0.02)=0.81
This means the effective power available from the solar panel is:
Peak Power×0.81\text{Peak Power} \times 0.81Peak Power×0.81
Cloud Cover Losses
On cloudy days, less sunlight reaches the panel, further reducing efficiency. We estimate a 50% loss due to clouds, which combines with internal inefficiencies:
(1−0.50)×(1−0.08)×(1−0.02)=0.44(1 - 0.50) \times (1 - 0.08) \times (1 - 0.02) = 0.44(1−0.50)×(1−0.08)×(1−0.02)=0.44
So the effective power available under cloudy conditions is:
Peak Power×0.44\text{Peak Power} \times 0.44Peak Power×0.44
2. Device Charging Limitations
Each device has a maximum input power rating, meaning it can only accept a certain amount of power at once.
- A GoPro with a 1,500mAh battery (5.5Wh) has a maximum input of 5W. Even if the solar panel provides more power, the GoPro will not charge faster than 5W.
- A smartphone may accept up to 10-18W, depending on its fast-charging capabilities.
- USB Port Output Limitation: Even if a solar panel has a high overall wattage, each USB port has a maximum output. For example, the Fusion Flex 18 has two USB-A outputs, each limited to 13.5W (5V/2.7A). A device requiring more power than this will be limited by the port’s output.
3. Practical Charging Example
Example 1 : Charging a GoPro
Let’s take the Fusion Flex 18 solar panel (18W) charging a GoPro with a 1,500mAh battery (5.5Wh) and a maximum input allowed by the GoPro of 5W.
Step 1: Calculate Actual Solar Power After Sunlight Efficiency Losses
The total losses from sunlight efficiency include:
- Atmospheric filtering losses: 10%
- Internal inefficiencies (USB conversion + cable resistance): 8% and 2%
Since these losses are multiplicative rather than additive, the total efficiency factor is:
(1−0.10)×(1−0.08)×(1−0.02)=0.81% --> 19% losses.
This means the effective solar power is:
18W × 0.81 = 14.58W
Step 2: Check USB Port Output Limitation
- Each USB-A port on the Fusion Flex 18 has a maximum output of 13.5W.
- Since 14.58W > 13.5W, the actual available power per USB port is limited to 13.5W.
Step 3: Determine Charging Power for the GoPro
- The GoPro has a maximum charging input of 5W, meaning it cannot charge faster than 5W.
- Since 5W is lower than the available 13.5W, the GoPro will charge at 5W.
Step 4: Calculate Charging Time
- Charging time in full sunlight: 5.5Wh/5W=1.1 hours5.5Wh / 5W = 1.1 \text{ hours}5.5Wh/5W=1.1 hours
Step 5: Adjust for Cloudy Conditions
Cloud cover introduces additional 50% losses, which combine with internal inefficiencies. The total efficiency factor becomes:
(1−0.50)×(1−0.08)×(1−0.02)=0.44
Effective solar power in cloudy conditions=18W×0.44=7.92W
- The USB port limitation of 13.5W still applies, but since 7.92W < 13.5W, the effective available power is 7.92W.
- Since 7.92W > 5W, the GoPro still charges at 5W.
- Charging time remains: ~1.1 hours.
Example 2 : Charging a Smartphone
Now, let’s take the Fusion Flex 12 (12W) charging a smartphone with a 3,000mAh battery (11.1Wh) and a maximum charging input of 18W.
Step 1: Calculate Actual Solar Power After Sunlight Efficiency Losses
The Fusion Flex 12 has a peak power of 12W. Applying the total efficiency factor of 0.81 (accounting for atmospheric and internal losses):
Effective solar power=12W×0.81=9.72W
Step 2: Check USB Port Output Limitation
- Each USB-A port on the Fusion Flex 12 has a maximum output of 12W (5V/2.4A).
- Since 9.72W < 12W, the actual available power remains 9.72W (limited by sunlight efficiency, not the port).
Step 3: Determine Charging Power for the Smartphone
- The smartphone has a maximum charging input of 18W, meaning it can charge at up to 18W if enough power is available.
- The available power is only 9.72W, which is lower than the 18W the smartphone can accept.
- Final charging power: 9.72W (limited by available solar power).
Step 4: Calculate Charging Time
- Charging time in full sunlight: 11.1Wh / 9.72W = 1.14 hours
Step 5: Adjust for Cloudy Conditions
Using the total efficiency factor of 0.44 (cloud cover + internal losses):
Effective solar power=12W×0.44=5.28W
-
The USB port limitation (12W) still applies, but since 5.28W < 12W, the effective available power is 5.28W.
-
The smartphone can accept more than 5.28W, so it charges at 5.28W.
-
Charging time in cloudy conditions:
11.1Wh / 5.28W = 2.1 hours
Since the sun conditions are never really 100%, one can suppose the charging time for a smartphone will be between 1.14 and 2.1 hours.
Shipping
We can ship worldwide thanks to BPOST, our trusted distribution partner.
Please note that different areas are subject to different shipping tarifs and that import taxes may apply.
Afghanistan, Åland Islands, Albania, Algeria, American Samoa, Andorra, Angola, Anguilla, Antarctica, Antigua and Barbuda, Argentina, Armenia, Aruba, Ascension, Asia/Middle East, Asia/Middle East/North Africa, Australia, Austria, Azerbaijan, Bahamas, Bahrain, Bangladesh, Barbados, Belarus, Belgium, Belize, Benin, Bermuda, Bhutan, Bolivia, Bonaire, Saint Eustatius and Saba, Bosnia and Herzegovina, Botswana, Bouvet Island, Brazil, British Indian Ocean Territory, Brunei Darussalam, Bulgaria, Burkina Faso, Burundi, Cambodia, Cameroon, Canada, Canary Islands, Cape Verde, Cayman Islands, Central African Republic, Ceuta, Chad, Chile, China, Christmas Island, Cocos (Keeling) Islands, Colombia, Comoros, Congo, Congo. The Democratic Republic of the, Cook Islands, Costa rica, Croatia, Cuba, Curaçao, Cyprus, Czech Republic, Denmark, Djibouti, Dominica, Dominican Republic, Ecuador, Egypt, El Salvador, Equatorial Guinea, Eritrea, Estonia, Ethiopia, European Union, Falkland Islands (Malvinas), Faroe Islands, Fiji, Finland, France, French Guiana, French Polynesia, French Southern Territories, Gabon, Gambia, Georgia, Germany, Ghana, Gibraltar, Great Britain, Greece, Greenland, Grenada, Guadeloupe, Guam, Guatemala, Guernsey, Guinea, Guinea-Bissau, Guyana, Haiti, Heard Island and McDonald Islands, Holy See (Vatican City State), Honduras, Hong-kong, Hungary, Iceland, India, Indonesia, Iran, Iraq, Ireland, Isle of Man, Israel, Italy, Ivory Coast, Jamaica, Japan, Jersey, Jordan, Kazakhstan, Kenya, Kiribati, Korea (North), Korea (South), Kosovo, Kuwait, Kyrgyzstan, Lao. People's Democratic Republic, Latvia, Lebanon, Lesotho, Liberia, Libyan Arab Jamahiriya, Liechtenstein, Lithuania, Livigno, Luxembourg, Macao, Macedonia, Madagascar, Malawi, Malaysia, Maldives, Mali, Malta, Marshall Islands, Martinique, Mauritania, Mauritius, Mayotte, Melilla, Mexico, Micronesia. Federated States of, Moldova, Monaco, Mongolia, Montenegro, Montserrat, Morocco, Mozambique, Myanmar, Namibia, Nauru, Nepal, Netherlands, Netherlands Antilles, New Caledonia, New Zealand, Nicaragua, Niger, Nigeria, Niue, Non European Union, Norfolk Island, North Africa, Northern Mariana Islands, Norway, Oman, Pakistan, Palau, Palestinian Territory. occupied, Panama, Papua New Guinea, Paraguay, Peru, Philippines, Pitcairn, Poland, Portugal, Puerto Rico, Qatar, Rest Of Africa, Rest of Europe, Rest of the world, Reunion, Romania, Russia, Rwanda, Saint Helena, Saint Kitts and Nevis, Saint lucia, Saint Martin, Saint Pierre and Miquelon, Saint Vincent and the Grenadines, Samoa, San Marino, Sao Tome and Principe, Saudi Arabia, Senegal, Serbia, Seychelles, Sierra Leone, Singapore, Slovakia, Slovenia, Solomon Islands, Somalia, South Africa, South Georgia and the South Sandwich Islands, Spain, Sri lanka, Sudan, Sudan (South), Suriname, Svalbard and Jan Mayen, Swaziland, Sweden, Switzerland, Syrian Arab Republic, Taiwan. Province of China, Tajikistan, Tanzania. United Republic OF, Thailand, Timor-Leste, Togo, Tokelau, Tonga, Trinidad and Tobago, Tunisia, Turkey, Turkmenistan, Turks and Caicos Islands, Tuvalu, Uganda, Ukraine, United Arab Emirates, United States, United States Minor Outlying Islands, Uruguay, Uzbekistan, Vanuatu, Venezuela, Viet nam, Virgin Islands. British, Virgin Islands. U.S., Wallis and Futuna, Western Sahara, Yemen, Zambia, Zimbabwe
We do our best to ship you your orders as fast as possible!
For deliveries to Belgium, it usually takes between 24 and 72 hours.
For other European countries, delays vary between 3 to 7 days depending on the speed of the local services.
To the USA, delays usually take between 4 to 7 days.
Please note delays due to postal services can occur and are out of our control despite our best efforts!
During peak season (end of year especially), delays may be longer due to high volumes handling by our logistics partners and transporters.
To offer our customers the most advantageous shipping rates, we are mainly using BPost International mailing service. For express shipping or "exact deadline shipping" , please select "UPS express delivery" or "accelerated shipping" in the checkout settings.
After placing your order, you should have received an automatic confirmation email from us.
In this email, you can click the link "Follow my order" to get access to your order status and tracking updates.
We are very sorry for the delay.
Please consider waiting 2-3 days before worrying. We usually ship out within 24h after receiving an order, but sometimes some additional time can be needed.
Please first check the tracking link that is included in the confirmation email you should have received when we shipped out your order. It also could be in another email, sent by us or by our transporter or logistic partner.
Please check your spams in case you cannot find any email with tracking link.
In case your order tracking link indicates that the shipment has not moved from a stage to another since more that 10 business days, please contact us at service@sunslice-solar.com .
No matching questions found.
Still need help?
Contact the Sunslice team and we'll be happy to help.