


Help Center
Find product manuals, troubleshooting help, and answers to common questions.
Product Support
BLUETTI AC200MAX- PORTABLE SOLAR GENERATOR
Manuals & Downloads
Frequently Asked Questions
Lees de GEBRUIKERSHANDLEIDING zorgvuldig door. Er wordt een gedetailleerde uitleg gegeven over hoe u het moet gebruiken.
U kunt de gebruikershandleidingen hieronder vinden
Bekijk deze video voor een snelle start:
https://www.youtube.com/watch?v=tk1oAASkuSU
Meer informatie is beschikbaar in de GEBRUIKERSHANDLEIDING
Bekijk alstublieft deze video:
https://www.youtube.com/watch?v=Fl2f6yzv1NY
Van 0.00 tot 0.38: Aansluiten van 1 paneel op de AC200 Max
Van 0.38 tot 1.04: Aansluiten van meerdere panelen op de AC200 Max
Als je de Easy Solar Kit op je Bluetti-generator wilt aansluiten, kun je dat doen zoals hieronder beschreven.
Als je de Easy Solar Kit zonder de Bluetti-generator wilt gebruiken, bekijk dan de FAQ over HOE GEBRUIK IK MIJN EASY SOLAR KIT - SNELLE INSTALLATIE.
De eerste stap hieronder is voor het geval je de Easy Solar Kit al hebt geïnstalleerd en in het stopcontact hebt gestoken.
Als de Easy Solar Kit nog niet is geïnstalleerd, ga dan direct door naar de tweede stap.


No matching questions found.
BLUETTI AC300- PORTABLE SOLAR GENERATOR
Manuals & Downloads
Frequently Asked Questions
Lees de GEBRUIKERSHANDLEIDING zorgvuldig door. Er wordt een gedetailleerde uitleg gegeven over hoe u het moet gebruiken.
U kunt de gebruikershandleidingen hieronder vinden
Bekijk deze video's voor een snelle start:
https://www.youtube.com/watch?v=kGKZG_HOFKQ
Bekijk alstublieft deze video:
https://www.youtube.com/watch?v=Fl2f6yzv1NY
Van 0.00 tot 0.38: Aansluiten van 1 paneel op de AC200 Max
Van 0.38 tot 1.04: Aansluiten van meerdere panelen op de AC200 Max
Als je de Easy Solar Kit op je Bluetti-generator wilt aansluiten, kun je dat doen zoals hieronder beschreven.
Als je de Easy Solar Kit zonder de Bluetti-generator wilt gebruiken, bekijk dan de FAQ over HOE GEBRUIK IK MIJN EASY SOLAR KIT - SNELLE INSTALLATIE.
De eerste stap hieronder is voor het geval je de Easy Solar Kit al hebt geïnstalleerd en in het stopcontact hebt gestoken.
Als de Easy Solar Kit nog niet is geïnstalleerd, ga dan direct door naar de tweede stap.

1. Ga naar "instellingen", vervolgens "volgende" en bevestig dat de "Maximale netinvoerstroom" is ingesteld op "15A".
2. Klik op de centrale knop en kijk wat er wordt weergegeven om te controleren of de centrale eenheid uw B230- of B300-batterijen detecteert onder "batterij-informatie".
3. Navigeer naar "Alarm" en controleer of er geen huidige problemen zijn gedetecteerd.
4. Navigeer naar "Gegevens" en vervolgens "Alarmgeschiedenis" en controleer of er recent een probleem is geregistreerd.
Met deze controles kunt u vaststellen of er iets mis is met de batterij of dat het probleem ergens anders ligt. Als het probleem na deze controles blijft bestaan, neem dan contact met ons op.
No matching questions found.
BLUETTI B230 - POWER PACK
Manuals & Downloads
Frequently Asked Questions
Lees de GEBRUIKERSHANDLEIDING zorgvuldig door. Er wordt een gedetailleerde uitleg gegeven over hoe u het moet gebruiken.
U kunt de gebruikershandleidingen hieronder vinden
No matching questions found.
BLUETTI B300 - POWER PACK
Manuals & Downloads
Frequently Asked Questions
Lees de GEBRUIKERSHANDLEIDING zorgvuldig door. Er wordt een gedetailleerde uitleg gegeven over hoe u het moet gebruiken.
U kunt de gebruikershandleidingen hieronder vinden
No matching questions found.
BLUETTI EP500 PRO - SOLAR GENERATOR
Manuals & Downloads
Frequently Asked Questions
Lees de GEBRUIKERSHANDLEIDING zorgvuldig door. Er wordt een gedetailleerde uitleg gegeven over hoe u het moet gebruiken.
U kunt de gebruikershandleidingen hieronder vinden


No matching questions found.
CYCLOTRON
Manuals & Downloads
Frequently Asked Questions
Lees de GEBRUIKERSHANDLEIDING zorgvuldig door. Er wordt een gedetailleerde uitleg gegeven over hoe u het moet gebruiken.
U kunt de gebruikershandleidingen hieronder vinden
De Cyclotron ondersteunt draadloos opladen. Hoe gebruikt u het?
- Plaats eerst uw telefoon in de beugels op de Cyclotron.
- Druk op de POWER-knop om de draadloze oplaadfunctie te activeren.
- Uw telefoon begint draadloos op te laden.

Als het niet werkt, controleer dan het volgende:
- Zorg ervoor dat uw telefoon draadloos opladen ondersteunt. Raadpleeg hiervoor de gebruikershandleiding.
Als uw telefoon draadloos opladen ondersteunt:
- Als uw telefoon een beschermhoes heeft, verwijder deze dan en probeer het opnieuw.
- Als er een metalen plaatje aan de achterkant van uw telefoon vastzit, verwijder dit dan en probeer het opnieuw.
- Als het blauwe LED-lampje nog steeds niet aangaat, zorg er dan voor dat u op de POWER-knop aan de rechterkant van de Cyclotron hebt gedrukt.
De Cyclotron is geschikt voor smartphones met de volgende afmetingen:
Breedte: 70 tot 105 mm
Lengte: geen limiet
Dikte: 1 tot 12 mm
No matching questions found.
EASY SOLAR KIT
Manuals & Downloads
Frequently Asked Questions
Lees de GEBRUIKERSHANDLEIDING zorgvuldig door. Er wordt een gedetailleerde uitleg gegeven over hoe u het moet gebruiken.
U kunt de gebruikershandleidingen hieronder vinden
De Easy Solar Kit is ontworpen om de elektriciteitsrekening van onze Sunslice-klanten te verlagen. Het is een plug-and-play zonne-energiesysteem, zeer eenvoudig te installeren en te gebruiken.
De Easy Solar Kit kan op zichzelf de geproduceerde energie niet opslaan. Deze energie wordt geïnjecteerd in het elektriciteitsnet van het huis en moet direct worden verbruikt door de apparaten die op het net zijn aangesloten. Als er geen apparaat is aangesloten of als er te veel elektriciteit wordt geproduceerd in vergelijking met het verbruik, wordt deze (overschot)energie gratis teruggeleverd aan het hoofdnet.
Dus, welke oplossing hebben we om dit overschot aan energie op te slaan?
Er is geen automatische oplossing voor.
We kunnen echter een handmatige oplossing voorstellen waarmee je de door het zonnepaneel geproduceerde energie kunt opslaan in een powerstation wanneer je dat wilt (bijvoorbeeld als je lange tijd weg bent of als je back-up stroom wilt opslaan voor het geval er een stroomstoring optreedt).
De Bluetti powerstations kunnen tussen 2 kWh en 12,3 kWh energie opslaan. Het is heel eenvoudig om de Easy Solar Kits op deze powerstations aan te sluiten.
Hoe?
1. Installeer je Easy Solar Kit in de initiële opstelling (kit aangesloten op het elektriciteitsnet): de gebruikershandleiding vind je hier.
2. Koppel de stekker los van het net en ook de MC4-kabels van de micro-omvormer.
3. Sluit de MC4-kabels aan op het Bluetti powerstation.
Alle energie die door het zonnepaneel van de Easy Solar Kit wordt geproduceerd, wordt opgeslagen in het powerstation.
Wanneer je wilt, kun je je apparaten op het powerstation aansluiten en kun je de Easy Solar Kit ook weer op het net aansluiten.
Hieronder vindt u een snelle installatiehandleiding voor de Easy Solar Kit.
Raadpleeg ook de gebruikershandleiding die bij de verpakking is inbegrepen om de Easy Solar Kit in te stellen.
No matching questions found.
ELECTRON
Manuals & Downloads
Frequently Asked Questions
No questions have been added for this product yet.
No matching questions found.
EMPERION 45 MINI
Manuals & Downloads
Frequently Asked Questions
No questions have been added for this product yet.
No matching questions found.
EMPERION 65 PRO
Manuals & Downloads
Frequently Asked Questions
No questions have been added for this product yet.
No matching questions found.
FLIGHT CASE
Manuals & Downloads
Frequently Asked Questions
No questions have been added for this product yet.
No matching questions found.
FUSION 100
Manuals & Downloads
Frequently Asked Questions
Lees de GEBRUIKERSHANDLEIDING zorgvuldig door. Er wordt een gedetailleerde uitleg gegeven over hoe u het moet gebruiken.
U kunt de gebruikershandleidingen hieronder vinden
No matching questions found.
FUSION 150
Manuals & Downloads
Frequently Asked Questions
No questions have been added for this product yet.
No matching questions found.
FUSION 200
Manuals & Downloads
Frequently Asked Questions
No questions have been added for this product yet.
No matching questions found.
FUSION 40
Manuals & Downloads
Frequently Asked Questions
No questions have been added for this product yet.
No matching questions found.
FUSION 440
Manuals & Downloads
Frequently Asked Questions
No questions have been added for this product yet.
No matching questions found.
FUSION 60
Manuals & Downloads
Frequently Asked Questions
No questions have been added for this product yet.
No matching questions found.
FUSION CORE 10
Manuals & Downloads
Frequently Asked Questions
No questions have been added for this product yet.
No matching questions found.
FUSION CORE 22
Manuals & Downloads
Frequently Asked Questions
No questions have been added for this product yet.
No matching questions found.
FUSION FLEX 12
Manuals & Downloads
Frequently Asked Questions
Lees de GEBRUIKERSHANDLEIDING zorgvuldig door. Er wordt een gedetailleerde uitleg gegeven over hoe u het moet gebruiken.
U kunt de gebruikershandleidingen hieronder vinden
No matching questions found.
FUSION FLEX 18
Manuals & Downloads
Frequently Asked Questions
Lees de GEBRUIKERSHANDLEIDING zorgvuldig door. Er wordt een gedetailleerde uitleg gegeven over hoe u het moet gebruiken.
U kunt de gebruikershandleidingen hieronder vinden
No matching questions found.
FUSION FLEX 24
Manuals & Downloads
Frequently Asked Questions
Lees de GEBRUIKERSHANDLEIDING zorgvuldig door. Er wordt een gedetailleerde uitleg gegeven over hoe u het moet gebruiken.
U kunt de gebruikershandleidingen hieronder vinden
De Fusion FLEX 24 kan verschillende producten opladen.
Hieronder staat een tabel die de verschillende compatibiliteiten van de Fusion Flex 24 uitlegt.
Houd er rekening mee dat de compatibiliteit van de USB-C-poort anders is dan die van de USB-A-poort.

Je moet de USB-C naar USB-A kabel gebruiken. Steek het USB-A uiteinde in de Fusion Flex 24 en vervolgens het USB-C uiteinde in de USB-C poort van de Gravity 100. Gebruik ALSTUBLIEFT NIET de USB-C naar USB-C kabel die bij de Gravity 100 wordt geleverd om de Gravity 100 op te laden vanaf de USB-C poort van de Fusion Flex 24. Je kunt deze kabel wel gebruiken om de Gravity 100 op te laden met de Emperion snellader of een andere USB-C lader.
Deze afbeelding toont de opstelling:


No matching questions found.
FUSION FLEX 48
Manuals & Downloads
Frequently Asked Questions
Lees de GEBRUIKERSHANDLEIDING zorgvuldig door. Er wordt een gedetailleerde uitleg gegeven over hoe u het moet gebruiken.
U kunt de gebruikershandleidingen hieronder vinden
De Fusion FLEX 48 kan verschillende producten opladen.
Hieronder staat een tabel die de verschillende compatibiliteiten van de Fusion Flex 48 uitlegt.
Houd er rekening mee dat de compatibiliteit van de USB-C-poort anders is dan die van de USB-A-poorten en de DC 5521-poort.
De DC 5521 is een niet-gestuurde uitgangspoort die voornamelijk powerstations kan opladen, zoals de Sunslice Gravity 144 en Sunslice Gravity 432.

Je moet de USB-C naar USB-A kabel gebruiken. Steek het USB-A uiteinde in de Fusion Flex 48 en vervolgens het USB-C uiteinde in de USB-C poort van de Gravity 100. Gebruik NIET de USB-C naar USB-C kabel die bij de Gravity 100 wordt geleverd om de Gravity 100 op te laden vanaf de USB-C poort van de Fusion Flex 48. Je kunt deze kabel wel gebruiken om de Gravity 100 op te laden met de Emperion snellader of een andere USB-C lader.
Deze afbeelding toont de opstelling:

No matching questions found.
FUSION FLEX 6
Manuals & Downloads
Frequently Asked Questions
Lees de GEBRUIKERSHANDLEIDING zorgvuldig door. Er wordt een gedetailleerde uitleg gegeven over hoe u het moet gebruiken.
U kunt de gebruikershandleidingen hieronder vinden
No matching questions found.
GRAVITY 10
Manuals & Downloads
Frequently Asked Questions
Lees de GEBRUIKERSHANDLEIDING zorgvuldig door. Er wordt een gedetailleerde uitleg gegeven over hoe u het moet gebruiken.
U kunt de gebruikershandleidingen hieronder vinden
No matching questions found.
GRAVITY 10 EXTREME
Manuals & Downloads
Frequently Asked Questions
No questions have been added for this product yet.
No matching questions found.
GRAVITY 100
Manuals & Downloads
Frequently Asked Questions
Lees de GEBRUIKERSHANDLEIDING zorgvuldig door. Er wordt een gedetailleerde uitleg gegeven over hoe u het moet gebruiken.
U kunt de gebruikershandleidingen hieronder vinden
U kunt de Gravity 100 bestellen met een adapterset. Deze adapterset zorgt voor universele compatibiliteit met alle laptops.
De adapterset is beschikbaar op de productpagina van de Gravity 100 (keuzemenu).
No matching questions found.
GRAVITY 1024
Manuals & Downloads
Frequently Asked Questions
No questions have been added for this product yet.
No matching questions found.
GRAVITY 144
Manuals & Downloads
Frequently Asked Questions
Lees de GEBRUIKERSHANDLEIDING zorgvuldig door. Er wordt een gedetailleerde uitleg gegeven over hoe u het moet gebruiken.
U kunt de gebruikershandleidingen hieronder vinden
No matching questions found.
GRAVITY 20
Manuals & Downloads
Frequently Asked Questions
Lees de GEBRUIKERSHANDLEIDING zorgvuldig door. Er wordt een gedetailleerde uitleg gegeven over hoe u het moet gebruiken.
U kunt de gebruikershandleidingen hieronder vinden
No matching questions found.
GRAVITY 20 EXTREME PRO
Manuals & Downloads
Frequently Asked Questions
No questions have been added for this product yet.
No matching questions found.
GRAVITY 2048
Manuals & Downloads
Frequently Asked Questions
No questions have been added for this product yet.
No matching questions found.
GRAVITY 2232
Manuals & Downloads
Frequently Asked Questions
No questions have been added for this product yet.
No matching questions found.
GRAVITY 27
Manuals & Downloads
Frequently Asked Questions
No questions have been added for this product yet.
No matching questions found.
GRAVITY 27 PRO
Manuals & Downloads
Frequently Asked Questions
No questions have been added for this product yet.
No matching questions found.
GRAVITY 40
Manuals & Downloads
Frequently Asked Questions
No questions have been added for this product yet.
No matching questions found.
GRAVITY 432
Manuals & Downloads
Frequently Asked Questions
Lees de GEBRUIKERSHANDLEIDING zorgvuldig door. Er wordt een gedetailleerde uitleg gegeven over hoe u het moet gebruiken.
U kunt de gebruikershandleidingen hieronder vinden
No matching questions found.
GRAVITY 486
Manuals & Downloads
Frequently Asked Questions
No questions have been added for this product yet.
No matching questions found.
GRAVITY 5
Manuals & Downloads
Frequently Asked Questions
Lees de GEBRUIKERSHANDLEIDING zorgvuldig door. Er wordt een gedetailleerde uitleg gegeven over hoe u het moet gebruiken.
U kunt de gebruikershandleidingen hieronder vinden
No matching questions found.
GRAVITY 756
Manuals & Downloads
Frequently Asked Questions
Lees de GEBRUIKERSHANDLEIDING zorgvuldig door. Er wordt een gedetailleerde uitleg gegeven over hoe u het moet gebruiken.
U kunt de gebruikershandleidingen hieronder vinden
Snelle diagnose:
U heeft mogelijk de AC-functie niet geactiveerd (functie die de stopcontacten aan de achterkant activeert). Om dit te doen, moet u de G-knop 3 seconden ingedrukt houden zoals aangegeven in de gebruiksaanwijzing. De benodigde informatie hierover is groen omcirkeld in de onderstaande afbeeldingen:
U vindt het schema op pagina 4 van de gebruiksaanwijzing.


Als het nog steeds niet werkt, lees dan de gebruiksaanwijzing opnieuw zorgvuldig door voordat u contact met ons opneemt.
No matching questions found.
HADRON
Manuals & Downloads
Frequently Asked Questions
Lees de GEBRUIKERSHANDLEIDING zorgvuldig door. Er wordt een gedetailleerde uitleg gegeven over hoe u het moet gebruiken.
U kunt de gebruikershandleidingen hieronder vinden
De Hadron wordt standaard geleverd met een EU-stekker. Als u een US-, CH- of GB-stekker nodig heeft, neem dan contact met ons op via service@sunslice-solar.com.
In elk geval kan de Hadron worden opgeladen via de USB-C ingang met een standaard USB-C kabel.
No matching questions found.
JUNCTION BOX
Manuals & Downloads
Frequently Asked Questions
No questions have been added for this product yet.
No matching questions found.
LINKPOWER BACKPACK
Manuals & Downloads
Frequently Asked Questions
No questions have been added for this product yet.
No matching questions found.
LINKPOWER MINI FLIGHTCASE
Manuals & Downloads
Frequently Asked Questions
No questions have been added for this product yet.
No matching questions found.
LINKPOWER PRO FLIGHTCASE
Manuals & Downloads
Frequently Asked Questions
No questions have been added for this product yet.
No matching questions found.
PHOTON
Manuals & Downloads
Frequently Asked Questions
Lees de GEBRUIKERSHANDLEIDING van de Photon zorgvuldig door. Er wordt een gedetailleerde uitleg gegeven over hoe u de Photon gebruikt.
U kunt de gebruikershandleidingen hieronder vinden
Als je problemen ondervindt bij het gebruik van je Photon om je telefoon op te laden, volg dan de volgende instructies:
0. Druk op de POWER-knop
Sluit je apparaat aan op de Photon. Als je apparaat niet automatisch begint met opladen, druk dan op de POWER-knop aan de rand van de Photon.

1. Controleer of de batterij werkt
Zorg er eerst voor dat de batterij enige lading heeft. Druk eenmaal op de POWER-knop aan de zijkant van de batterij om te zien of er blauwe lampjes oplichten.
Als de batterij niet aangaat, probeer deze dan op te laden met een USB-oplader via de USB-C ingang en controleer of de batterij dan wel aangaat. Als je op enig moment blauwe lampjes ziet, werkt de batterij goed. Zo niet, dan kan het probleem bij je Sunslice-kabel liggen. Probeer een andere USB-C-kabel (of controleer of je Sunslice-kabel goed werkt) voordat je verdergaat met de volgende stap.
Als er ondanks deze stappen helemaal geen lampjes verschijnen, neem dan contact met ons op via service@sunslice-solar.com en vermeld dat je de FAQ zorgvuldig hebt gelezen voordat je contact opneemt. We helpen je graag verder.
2. Kabelpositie
Zorg ervoor dat de kabel correct in de USB-poort is gestoken. Het kan voorkomen dat de USB-poort meer gecentreerd is dan zou moeten. De kabel moet in het onderste deel van de aansluiting geplaatst worden, zoals te zien is op de onderstaande afbeelding. De metalen dataspinnen van de kabel moeten naar boven wijzen. Bekijk de tekeningen goed en pas dit toe op je Photon.

3. Voor iPhone-gebruikers
Controleer of de kabel correct in je telefoon is gestoken. Als je een iPhone hebt, houd er dan rekening mee dat de kabel maar één kant op werkt. Dit is nodig omdat de andere kant van de kabel micro-USB-ingangen oplaadt. Mogelijk moet je je telefoon omdraaien om hem op te laden.

4. Controleer of het werkt met een andere kabel
Als je de Sunslice-kabel op beide manieren hebt geprobeerd volgens alle bovenstaande instructies, probeer dan een andere oplaadkabel te gebruiken. Als je telefoon nu wel oplaadt met je kabel, betekent dit dat je Sunslice-kabel defect is. Als het nog steeds niet werkt, is je apparaat defect en zal het worden vervangen. Neem contact met ons op via service@sunslice-solar.com
De Photon heeft een kleine lus om de Sunslice-kabel aan de zijkant vast te zetten en te voorkomen dat je deze kwijtraakt. Deze lus is speciaal versterkt om te dienen als bevestigingspunt voor een rugzak. Je kunt er eenvoudig een karabijnhaak of touw doorheen schuiven om hem aan je rugzak of op andere plekken vast te maken.
Aan de andere kant van de Photon is een tweede lus toegevoegd die kan worden gebruikt als een tweede bevestigingspunt om de Photon te stabiliseren.

De Photon is uitgerust met een standaard USB-uitgang. Dat betekent dat, in principe, als je apparaat kan worden opgeladen met een USB-kabel, het zal werken met de Photon.
We leveren een gratis 3-in-1 kabel mee die elk apparaat kan opladen met een USB-C, Lightning en Micro-USB poort (maximaal 5V).
Als je een ander type poort hebt, moet je je eigen kabel gebruiken (Mini-USB, iPod, Nokia 3.5, enz.). Houd er rekening mee dat de Photon beperkt is tot een spanning van 5V.
Als je het niet zeker weet, stuur ons dan een foto van je apparaat en de oplaadpoorten, dan nemen we zo snel mogelijk contact met je op!
Optimale zonne-oplaadervaring wordt bereikt door:
- de Photon volledig naar de zon te richten
- geen schaduw op enkele van de zonnecellen
- de Photon loodrecht op de zon te kantelen
- statische omstandigheden. De Photon aan je rugzak hangen tijdens het wandelen is een handige oplaadoplossing, maar zal de oplaadsnelheid verminderen omdat de Photon beweegt en de blootstelling aan zonlicht sterk fluctueert.
- perfecte zoncondities (zomertijd, geen wolken, ongeveer 15°C)
- de Photon niet achter een raam plaatsen (dit kan de oplaadsnelheid met tot wel 90% verminderen)
- ventilatie rondom het product toestaan om de temperatuur laag te houden (hoge temperaturen beïnvloeden de efficiëntie van de zonnecellen)
Bij het opladen van de Photon in de zon:
De tijd die nodig is om een equivalente lading van een telefoon in de batterij van de Photon op te bouwen, kan variëren afhankelijk van de telefoon die wordt opgeladen. Hier zijn een paar voorbeelden.
Houd er rekening mee dat de oplaadsnelheid van de Photon in de zon sterk kan variëren afhankelijk van de oplaadomstandigheden. De bovenstaande oplaadtijden zijn gegeven bij een optimale hellingshoek en een omgevingstemperatuur van 25°C.
Bij overmatige hitte, één of meer beschaduwde cellen, beweging, plaatsing achter glas, ... kunnen deze prestaties aanzienlijk verminderen. Raadpleeg de FAQ-vraag "Hoe kan ik de optimale oplaadervaring krijgen?"
Bij het opladen van uw apparaat met de Photon (als de Photon vooraf is opgeladen):
De oplaadtijd die nodig is om uw apparaat op te laden met de Photon (als de Photon al 100% vooraf is opgeladen) varieert ook afhankelijk van uw apparaat. Men kan uitgaan van een geschatte oplaadsnelheid van ongeveer 1u30 / 2.000 mAh.

De Photon heeft 5 laadindicator-LED's zoals hieronder afgebeeld.

Houd er rekening mee dat de eerste 4 BLAUWE LED-lampjes (aan de linkerkant) de laadstatus van de geïntegreerde powerbank van de Photon aangeven. Het vijfde GROENE LED-lampje (aan de rechterkant) geeft aan dat de Photon in de zon wordt opgeladen.
Wanneer de 4 blauwe LED-lampjes branden, betekent dit dat de Photon 100% is opgeladen.
Samengevat (bij benadering) :
- 0 LED : 0%
- 1 LED : 1%-29%
- 2 LED : 30% - 69%
- 3 LED : 70%-99%
- 4 LED : 100%
Het vierde LED-lampje kan langer nodig hebben om op te lichten omdat de laadsnelheid aan het einde van de laadcyclus vertraagt. Houd hier rekening mee bij het opladen in de zon, aangezien het vierde LED-lampje lang kan duren voordat het aangaat.
Ja,
je hoeft je geen zorgen te maken over de sterkte van de leren bevestigingslus van de Photon. We hebben het getest en het weerstaat een trekkracht van 9 kg zonder te breken. Klik hier om de test te bekijken.
Onze excuses daarvoor. Het komt soms voor dat men het onderdeel van de Photon's 3-in-1 universele kabel kwijtraakt.
U kunt uw Photon nog steeds gebruiken met een andere USB-kabel. Als u een kabel wilt nabestellen, kunt u deze direct op onze website bestellen door hier te klikken.
De universele 3-in-1-kabel, meegeleverd met de Photon, kan niet alle iPads® opladen. Met iPad® worden de tablets van het merk Apple® bedoeld.
Als dit bij uw iPad® gebeurt, probeer dan uw gebruikelijke kabel te gebruiken.
Als uw Photon een beschadiging vertoont (opzwelling, doorbooring, scheur in de batterij), isoleer het dan van andere brandbare producten en neem contact met ons op via service@sunslice-solar.com.
We leggen u uit hoe u het veilig en milieuvriendelijk kunt verwijderen.
No matching questions found.
Produit Test Geoff
Manuals & Downloads
Frequently Asked Questions
Lees de GEBRUIKERSHANDLEIDING zorgvuldig door. Er wordt een gedetailleerde uitleg gegeven over hoe u het moet gebruiken.
U kunt de gebruikershandleidingen hieronder vinden
No matching questions found.
PV200 - FOLDABLE SOLAR PANEL 200 WATTS
Manuals & Downloads
Frequently Asked Questions
No questions have been added for this product yet.
No matching questions found.
VOLTA WALLET
Manuals & Downloads
Frequently Asked Questions
No questions have been added for this product yet.
No matching questions found.
ZENITH
Manuals & Downloads
Frequently Asked Questions
Lees de GEBRUIKERSHANDLEIDING zorgvuldig door. Er wordt een gedetailleerde uitleg gegeven over hoe u het moet gebruiken.
U kunt de gebruikershandleidingen hieronder vinden
No matching questions found.
ELECTRON
Manuals & Downloads
Product Questions & Troubleshooting
No additional product-specific questions are currently listed.
No matching information found for this product.
EMPERION 45 MINI
Manuals & Downloads
Product Questions & Troubleshooting
No additional product-specific questions are currently listed.
No matching information found for this product.
EMPERION 65 PRO
Manuals & Downloads
Product Questions & Troubleshooting
No additional product-specific questions are currently listed.
No matching information found for this product.
PHOTON
Manuals & Downloads
Product Questions & Troubleshooting
Please read the USER MANUAL of the Photon carefully. A detailed explanation is given on how to use the Photon.
You can find the user manuals below
If you're experiencing trouble using your Photon to charge your phone, please follow the following instructions:
0. Press the POWER button
Connect your device to the Photon. If your device does not start charging automatically, please press the POWER button on the edge of the Photon.
1. Check if the battery works
First make sure the battery has some charge. Start by pressing the POWER button once on the side of the battery to see if some blue lights turn on.
If the battery doesn't turn on, try plugging it into a USB charger using the USB-C input, and check if the battery turns on. If you see little blue lights at some point, the battery works fine. If not, it could be an issue with your Sunslice cable. Please try with another USB-C cable (or make sure your Sunslice cable works well) before proceeding to the next step.
If despite these steps no lights appear at all, then please contact us at service@sunslice-solar.com and make sure notifying us you read carefully the FAQ before contacting us. We will help you further.
2. Cable position
Make sure the cable is inserted correctly in the USB port. It can happen that the USB port is more centered than it should be. The cable must be placed in the lower part of the receptacle, as shown in the picture below. The cable's metallic data pins should face upwards. Please look at the drawings carefully and replicate this with your Photon.
3. For iPhone users
Check that the cable is inserted correctly in your phone. If you have an iPhone, please note that the cable only works one way around. It is necessary as the other side of the cable charges micro-USB inputs. You may need to turn your phone over for it to charge.
4. Check if it works with a different cable
If you have tried using the Sunslice cable both ways following all the instructions above, please try using a different charging cable. If the phone now charges with your cable, it means your Sunslice cable is defaulting. If it still does not work, your device is defaulting and will be changed. Please contact us at service©sunslice-solar.com
The Photon has a little loop to secure the Sunslice cable on its side and avoid losing it. This loop has been specifically reinforced to serve as an attachement point for a backpack. You can easily slip a carabiner or a rope to fix it on your backpack or to other places.
A second loop has been added at the other side of the Photon that can be used as a second attachment point to stabilize the Photon.
The Photon is equipped with a standard USB output. That means that, essentially, if your device can be charged using a USB cable, it will work with the Photon.
We provide a complementary 3-in-1 cable that can charge any device with a USB-C, Lightning and Micro-USB port (Max 5V).
If you have any other type of port, you will have to use your own cable (Mini-USB, iPod, Nokia 3.5 etc.). Be aware that the Photon is limited to a 5V voltage.
In case you're not sure, send us a picture of your device and the charging ports, and we will get back to you as soon as possible !
Optimal solar charge experience can be obtained by :
- opening the Photon completely towards the sun
- no shading on any of the solar cells
- tilting the Photon perpendicularly to the sun
- static conditions. Hanging the Photon on your backpack whilst hiking is a handy charging solution but will reduce the charging speed as the Photon will move and the solar exposure will fluctuate a lot.
- perfect sun conditions (summer time, no clouds, +-15°C)
- not placing the Photon behind a window (this can reduce the solar charging speed up to 90%)
- allowing ventilation around the product in order to keep the temperature low (high temperatures affect the efficiency of the solar cells)
When charging the Photon in the Sun :
The time required to accumulate a phone equivalent charge in the Photon's battery may vary depending on the phone to be charged. Here are a few examples.
Please note that the charging speed of the Photon in the sun can vary greatly with charging conditions. The above charging times are given for optimal tilt and at an ambient temperature of 25°C.
In the case of excessive heat, one or more shaded cells, movement, positioning behind glass, ... these performances can be greatly reduced. Please refer to FAQ question "How can I get the optimal charge experience ?"
When charging your device with the Photon (if the Photon is pre-charged) :
The charging time needed to charge your device with the Photon (if the Photon is already 100% pre-charged) will also vary according to your device. One can assume an approximate 1h30 / 2'000 mAh charging speed.
The Photon has 5 charging indicator LEDs as depicted below.
Please be aware that the first 4 BLUE LED lights (on the left) indicate the charge status of the Photon's integrated powerbank. The fifth GREEN LED light (on the right) indicates that the Photon is charging in the sun.
When the 4 blue LED lights are on, it means the Photon is 100% charged.
To summarise (approximate figures) :
- 0 LED : 0%
- 1 LED : 1%-29%
- 2 LED : 30% - 69%
- 3 LED : 70%-99%
- 4 LED : 100%
The fourth LED light can take more time to light on as the charging speed slows down at the end of the charging cycle. Please consider this when charging in the sun as the fourth LED light can take a long time before going on.
Yes,
you do not have to worry about the strength of the leather attachment loop of the Photon. We have tested it and it withstands a 9kg traction without breaking. Click here to watch the test.
We are sorry for that. It occurs sometimes that one looses the part of the Photon's 3-in-1 universal cable.
You can still use your Photon with any other USB cable. In case you want to re-order a cable, you can order directly on our website by clicking here .
The universal 3-in-1 cable, included with the Photon, cannot charge all iPads®. By iPad®, one means the tablets from the Apple® brand.
In case this happens to your iPad®, please try with your usual cable.
In case your Photon presents a distortion (swelling, puncture, crack in the battery), please isolate it from other ingnitable products and contact us at service@sunslice-solar.com .
We will explain you how to get rid of it safely and ecologically.
No matching information found for this product.
FUSION FLEX 6
Manuals & Downloads
Product Questions & Troubleshooting
Please read the USER MANUAL carefully. A detailed explanation is given on how to use it.
You can find the user manuals below
No matching information found for this product.
FUSION FLEX 12
Manuals & Downloads
Product Questions & Troubleshooting
Please read the USER MANUAL carefully. A detailed explanation is given on how to use it.
You can find the user manuals below
No matching information found for this product.
FUSION FLEX 18
Manuals & Downloads
Product Questions & Troubleshooting
Please read the USER MANUAL carefully. A detailed explanation is given on how to use it.
You can find the user manuals below
No matching information found for this product.
FUSION FLEX 24
Manuals & Downloads
Product Questions & Troubleshooting
Please read the USER MANUAL carefully. A detailed explanation is given on how to use it.
You can find the user manuals below
The Fusion FLEX 24 can charge different products.
Hereunder is a table that explains the different compatibilities of the Fusion Flex 24.
Please consider the compatibility of the USB-C port is different than the compatibility of the USB-A port.
You need to use the USB-C to USB-A cable. Plug the USB-A end into the Fusion Flex 24 and then the USB-C end into the USB-C port of the Gravity 100. Please do NOT use the USB-C to USB-C cable supplied with the Gravity 100 to charge the Gravity 100 from the Fusion Flex 24's USB-C port. You can use it to charge the Gravity 100 with the Emperion fast charger or any other USB-C charger.
This image shows the setup :
No matching information found for this product.
FUSION FLEX 48
Manuals & Downloads
Product Questions & Troubleshooting
Please read the USER MANUAL carefully. A detailed explanation is given on how to use it.
You can find the user manuals below
The Fusion FLEX 48 can charge different products.
Hereunder is a table that explains the different compatibilities of the Fusion Flex 48.
Please consider the compatibility of the USB-C port is different than the compatibility of the USB-A ports and the DC 5521 port.
The DC 5521 is a non regulated output port that can mainly charge powerstations such as the Sunslice Gravity 144 and Sunslice Gravity 432.
You need to use the USB-C to USB-A cable. Plug the USB-A end into the Fusion Flex 48 and then the USB-C end into the USB-C port of the Gravity 100. Please do NOT use the USB-C to USB-C cable supplied with the Gravity 100 to charge the Gravity 100 from the Fusion Flex 48's USB-C port. You can use it to charge the Gravity 100 with the Emperion fast charger or any other USB-C charger.
This image shows the setup :
No matching information found for this product.
FUSION CORE 10
Manuals & Downloads
Product Questions & Troubleshooting
No additional product-specific questions are currently listed.
No matching information found for this product.
FUSION CORE 22
Manuals & Downloads
Product Questions & Troubleshooting
No additional product-specific questions are currently listed.
No matching information found for this product.
FUSION 40
Manuals & Downloads
Product Questions & Troubleshooting
No additional product-specific questions are currently listed.
No matching information found for this product.
FUSION 60
Manuals & Downloads
Product Questions & Troubleshooting
No additional product-specific questions are currently listed.
No matching information found for this product.
FUSION 100
Manuals & Downloads
Product Questions & Troubleshooting
Please read the USER MANUAL carefully. A detailed explanation is given on how to use it.
You can find the user manuals below
No matching information found for this product.
FUSION 150
Manuals & Downloads
Product Questions & Troubleshooting
No additional product-specific questions are currently listed.
No matching information found for this product.
FUSION 200
Manuals & Downloads
Product Questions & Troubleshooting
No additional product-specific questions are currently listed.
No matching information found for this product.
FUSION 440
Manuals & Downloads
Product Questions & Troubleshooting
No additional product-specific questions are currently listed.
No matching information found for this product.
JUNCTION BOX
Manuals & Downloads
Product Questions & Troubleshooting
No additional product-specific questions are currently listed.
No matching information found for this product.
ZENITH
Manuals & Downloads
Product Questions & Troubleshooting
Please read the USER MANUAL carefully. A detailed explanation is given on how to use it.
You can find the user manuals below
No matching information found for this product.
CYCLOTRON
Manuals & Downloads
Product Questions & Troubleshooting
Please read the USER MANUAL carefully. A detailed explanation is given on how to use it.
You can find the user manuals below
The Cyclotron allows wireless charging. How to use it ?
- First, place your phone on the Cyclotron, into the brackets.
- Push the POWER button to activate the wireless charging function.
- Your phone will start charging wirelessly.
In case it does not work , please check the following aspects :
- Be sure your phone allows wireless charging. Please refer to its user manual.
If your phone allows wireless charging :
- If your phone has a protective case, remove it and try again.
- If a metal plate is stuck to the back of your phone, remove it and try again.
- If the blue LED lights still do not turn on, please ensure you have pushed the POWER button on the right side of the Cyclotron.
The Cyclotron allows smartphones with dimensions :
Width : 70 to 105 mm
Length : no limit
Thickness : 1 to 12 mm
No matching information found for this product.
HADRON
Manuals & Downloads
Product Questions & Troubleshooting
Please read the USER MANUAL carefully. A detailed explanation is given on how to use it.
You can find the user manuals below
The Hadron automatically includes an EU plug . In case you need a US, CH or GB plug, please reach out to us at service@sunslice-solar.com .
In any case, the Hadron can be charged via its USB-C input with a standard USB-C cable.
No matching information found for this product.
GRAVITY 5
Manuals & Downloads
Product Questions & Troubleshooting
Please read the USER MANUAL carefully. A detailed explanation is given on how to use it.
You can find the user manuals below
No matching information found for this product.
GRAVITY 10
Manuals & Downloads
Product Questions & Troubleshooting
Please read the USER MANUAL carefully. A detailed explanation is given on how to use it.
You can find the user manuals below
No matching information found for this product.
GRAVITY 20
Manuals & Downloads
Product Questions & Troubleshooting
Please read the USER MANUAL carefully. A detailed explanation is given on how to use it.
You can find the user manuals below
No matching information found for this product.
GRAVITY 10 EXTREME
Manuals & Downloads
Product Questions & Troubleshooting
No additional product-specific questions are currently listed.
No matching information found for this product.
GRAVITY 20 EXTREME PRO
Manuals & Downloads
Product Questions & Troubleshooting
No additional product-specific questions are currently listed.
No matching information found for this product.
GRAVITY 100
Manuals & Downloads
Product Questions & Troubleshooting
Please read the USER MANUAL carefully. A detailed explanation is given on how to use it.
You can find the user manuals below
You can order the Gravity 100 with an adaptor set. This adaptor set will allow a universal compatibility with all laptops.
The adaptor set is available on the Gravity 100 product page (dropdown menu).
No matching information found for this product.
GRAVITY 27
Manuals & Downloads
Product Questions & Troubleshooting
No additional product-specific questions are currently listed.
No matching information found for this product.
GRAVITY 27 PRO
Manuals & Downloads
Product Questions & Troubleshooting
No additional product-specific questions are currently listed.
No matching information found for this product.
GRAVITY 40
Manuals & Downloads
Product Questions & Troubleshooting
No additional product-specific questions are currently listed.
No matching information found for this product.
GRAVITY 144
Manuals & Downloads
Product Questions & Troubleshooting
Please read the USER MANUAL carefully. A detailed explanation is given on how to use it.
You can find the user manuals below
No matching information found for this product.
GRAVITY 486
Manuals & Downloads
Product Questions & Troubleshooting
No additional product-specific questions are currently listed.
No matching information found for this product.
GRAVITY 432
Manuals & Downloads
Product Questions & Troubleshooting
Please read the USER MANUAL carefully. A detailed explanation is given on how to use it.
You can find the user manuals below
No matching information found for this product.
GRAVITY 756
Manuals & Downloads
Product Questions & Troubleshooting
Please read the USER MANUAL carefully. A detailed explanation is given on how to use it.
You can find the user manuals below
Quick Diagnosis :
You may not have activated the AC function (function that activates the sockets on the back). To do this, you need to press the G button for 3 seconds as indicated in the user manual. The necessary information about this are circled in green in the pictures below:
You will find the schematic on page 4 of the user manual.
If it still does not work, please read the user manual again carefully before contacting us.
No matching information found for this product.
LINKPOWER BACKPACK
Manuals & Downloads
Product Questions & Troubleshooting
No additional product-specific questions are currently listed.
No matching information found for this product.
LINKPOWER MINI FLIGHTCASE
Manuals & Downloads
Product Questions & Troubleshooting
No additional product-specific questions are currently listed.
No matching information found for this product.
LINKPOWER PRO FLIGHTCASE
Manuals & Downloads
Product Questions & Troubleshooting
No additional product-specific questions are currently listed.
No matching information found for this product.
FLIGHT CASE
Manuals & Downloads
Product Questions & Troubleshooting
No additional product-specific questions are currently listed.
No matching information found for this product.
VOLTA WALLET
Manuals & Downloads
Product Questions & Troubleshooting
No additional product-specific questions are currently listed.
No matching information found for this product.
GRAVITY 2232
Manuals & Downloads
Product Questions & Troubleshooting
No additional product-specific questions are currently listed.
No matching information found for this product.
BLUETTI AC200MAX- PORTABLE SOLAR GENERATOR
Manuals & Downloads
As an official distributor of Bluetti in Europe, Sunslice engineers have translated the official Bluetti manuals in French for the convenience of our french speaking clients.
This manual is available on demand, exclusively for Sunslice clients having purchased the corresponding Bluetti product.
Please contact us at contact@sunslice-solar.com with your order number, we will be happy to send you your copy.
Watch this video for a quick start :
https://www.youtube.com/watch?v=tk1oAASkuSU
More information is available in the USER MANUAL
Product Questions & Troubleshooting
Please read the USER MANUAL carefully. A detailed explanation is given on how to use it.
You can find the user manuals below
Please watch this video :
https://www.youtube.com/watch?v=Fl2f6yzv1NY
From 0.00 to 0.38 : Connecting 1 panel to the AC200 Max
From 0.38 to 1.04 : Connecting several panels to the AC200 Max
In case you want to connect the easy solar kit to your Bluetti generator, you can do it as described below.
If you want to use the Easy Solar Kit without the Bluetti generator, please check the FAQ on HOW TO USE MY EASY SOLAR KIT - QUICK INSTALLATION.
The first step below is in case you have already installed the Easy Solar Kit and plugged it into your wall socket.
In case the Easy Solar Kit is not installed yet, please go directly to the second step.
No matching information found for this product.
BLUETTI AC300- PORTABLE SOLAR GENERATOR
Manuals & Downloads
As an official distributor of Bluetti in Europe, Sunslice engineers have translated the official Bluetti manuals in French for the convenience of our french speaking clients.
This manual is available on demand, exclusively for Sunslice clients having purchased the corresponding Bluetti product.
Please contact us at contact@sunslice-solar.com with your order number, we will be happy to send you your copy.
Watch these videos for a quick start :
https://www.youtube.com/watch?v=kGKZG_HOFKQ
Product Questions & Troubleshooting
Please read the USER MANUAL carefully. A detailed explanation is given on how to use it.
You can find the user manuals below
Please watch this video :
https://www.youtube.com/watch?v=Fl2f6yzv1NY
From 0.00 to 0.38 : Connecting 1 panel to the AC200 Max
From 0.38 to 1.04 : Connecting several panels to the AC200 Max
In case you want to connect the easy solar kit to your Bluetti generator, you can do it as described below.
If you want to use the Easy Solar Kit without the Bluetti generator, please check the FAQ on HOW TO USE MY EASY SOLAR KIT - QUICK INSTALLATION.
The first step below is in case you have already installed the Easy Solar Kit and plugged it into your wall socket.
In case the Easy Solar Kit is not installed yet, please go directly to the second step.
1. Go to "settings" then "next" and confirm that the "Max Grid Input Current" is set to "15A".
2. Click on the central button and look at what it is to check that the central unit is detecting your B230 or B300 batteries in "battery information".
3. Navigate to "Alarm" and check that there is no current problem detected.
4. Navigate to "Data" and then "Alarm History" and check if there has been a recent problem recorded
These checks will allow you to establish whether something is wrong with the battery or if the problem lies somehwere else. After proceeding to these checks, if the problem persists, please contact us.
No matching information found for this product.
BLUETTI B230 - POWER PACK
Manuals & Downloads
Product Questions & Troubleshooting
Please read the USER MANUAL carefully. A detailed explanation is given on how to use it.
You can find the user manuals below
No matching information found for this product.
BLUETTI B300 - POWER PACK
Manuals & Downloads
Product Questions & Troubleshooting
Please read the USER MANUAL carefully. A detailed explanation is given on how to use it.
You can find the user manuals below
No matching information found for this product.
BLUETTI EP500 PRO - SOLAR GENERATOR
Manuals & Downloads
As an official distributor of Bluetti in Europe, Sunslice engineers have translated the official Bluetti manuals in French for the convenience of our french speaking clients.
This manual is available on demand, exclusively for Sunslice clients having purchased the corresponding Bluetti product.
Please contact us at contact@sunslice-solar.com with your order number, we will be happy to send you your copy.
Product Questions & Troubleshooting
Please read the USER MANUAL carefully. A detailed explanation is given on how to use it.
You can find the user manuals below
No matching information found for this product.
EASY SOLAR KIT
Manuals & Downloads
Product Questions & Troubleshooting
Please read the USER MANUAL carefully. A detailed explanation is given on how to use it.
You can find the user manuals below
The Easy Solar Kit has been designed in order to reduce the electricity bill of our Sunslice customers. It is a plug and play solar kit, very easy to install and to use.
The Easy Solar Kit on its own cannot store the energy that it produces. This energy is injected on the home-grid and needs to be consumed instantaneously by the devices connected to the grid. If no device is connected or if too much electricity is produced compared to the electricity that is consumed, this (surplus) energy is reinjected (for free) on the main grid.
So, which solution do we have to store this surplus energy ?
There is no automatic solution for this.
Though we can suggest a manual solution that will make you able to store the energy produced by the solar panel into a power station when you want (for example when you are away for a long time or when you want to store back up power in case of possible power outage)
The Bluetti power stations can store from 2kWh to 12.3 kWh energy. It is very easy to connect the Easy Solar Kits to these power stations.
How ?
1. Install your Easy Solar Kit in the initial setup (kit connected to the home-grid) : the user manual can be found here.
2. Disconnect the plug from the grid and also the MC4-cables from the micro-inverter.
3. Connect the MC4-cables to the Bluetti power station.
All the energy produced by the solar panel of the Easy Solar Kit will be stored into the power station.
When you want, you can connect your devices to the power station and you can also reconnect the Easy Solar Kit to the grid.
You can find a quick electronics installation guide for the Easy Solar Kit below.
Please also refer to the User Manual included in the packaging to set up the Easy Solar Kit .
No matching information found for this product.
PV200 - FOLDABLE SOLAR PANEL 200 WATTS
Manuals & Downloads
Product Questions & Troubleshooting
No additional product-specific questions are currently listed.
No matching information found for this product.
GRAVITY 1024
Manuals & Downloads
Product Questions & Troubleshooting
No additional product-specific questions are currently listed.
No matching information found for this product.
GRAVITY 2048
Manuals & Downloads
Product Questions & Troubleshooting
No additional product-specific questions are currently listed.
No matching information found for this product.
General Questions & Answers
Facturering & Facturen
U zou een link naar uw online factuur moeten hebben ontvangen in uw orderbevestigingsmail:
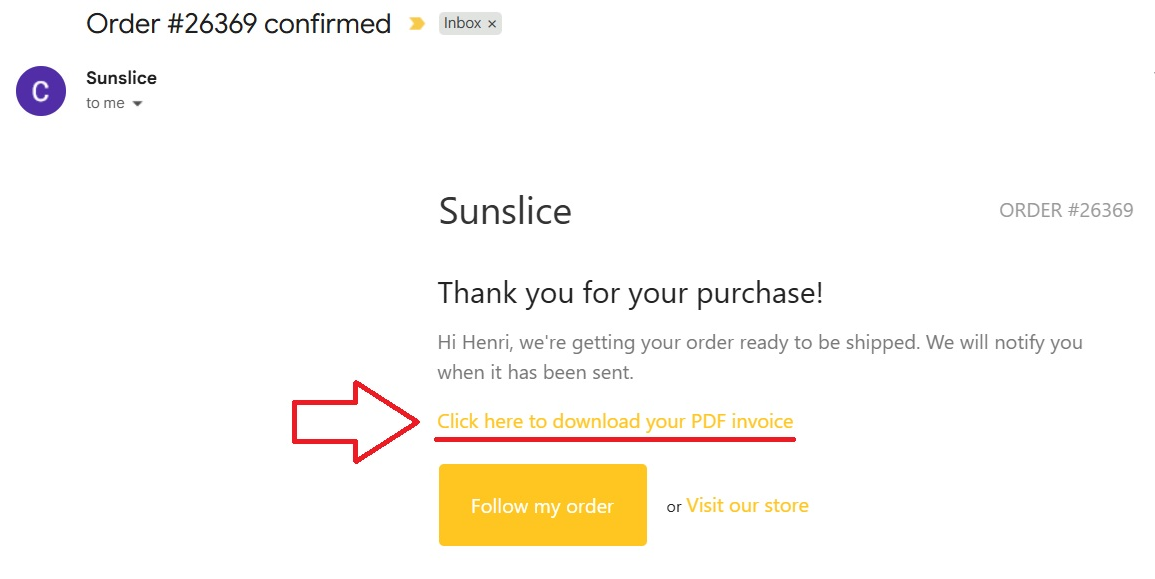
Als u de bevestigingsmail niet kunt vinden:
- controleer uw spammap
- wees zeker van het e-mailadres dat u heeft gebruikt bij het afrekenen op onze website
U kunt uw factuur ook direct downloaden van onze website als u een klantenaccount heeft aangemaakt:
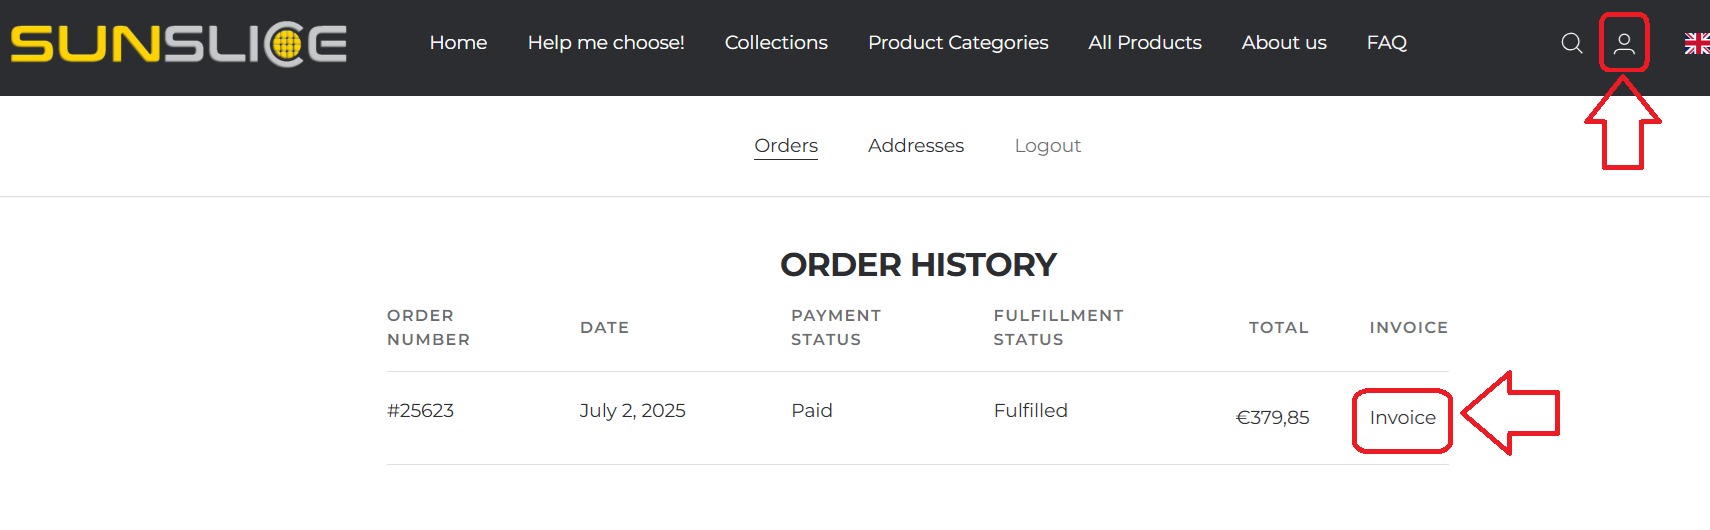
Vermeld alstublieft uw btw-nummer achter uw bedrijfsnaam (in hetzelfde veld), gescheiden door een "-".
Bijvoorbeeld:
Bedrijfsnaam: "Sunslice SRL - BE0680474695"
Neem contact met ons op via: sales@sunslice-solar.com
met de volgende informatie:
- Uw bestelling (producten, kleur)
- Bedrijfsgegevens (bedrijfsnaam + contactpersoon, btw-nummer, adres)
- Normale of spoedlevering
We sturen u een factuur per e-mail. Uw bestelling kan worden betaald na ontvangst van de factuur.
Inderdaad, dit kan gebeuren.
Gewoonlijk kunnen er bij ontvangst twee soorten belastingen worden gevraagd:
- Btw
- Invoerrechten
Neem voor het plaatsen van uw bestelling contact met ons op via sales@sunslice-solar.com voordat u doorgaat met uw bestelling met de volgende informatie:
- Uw bestelling (producten, kleur)
- Bedrijfsgegevens (bedrijfsnaam + contactpersoon, btw-nummer, adres)
- Normale of express verzending
We sturen u een factuur zonder Belgische btw.
Houd er rekening mee dat btw (tegen het tarief van uw eigen land) en invoerrechten nog steeds worden gevraagd bij ontvangst van uw bestelling.
Onze website biedt de mogelijkheid:
- Betalingen met creditcard (VISA / MASTERCARD)
- Bancontact
- Paypal. Mogen wij u vriendelijk verzoeken eerst de bovenstaande twee opties te overwegen voordat u overgaat tot betaling via Paypal. Er wordt namelijk een zeer hoge transactiekost aan ons aangerekend voor Paypal-betalingen... Hartelijk dank!
Voor bankoverschrijvingen kunt u contact met ons opnemen via sales@sunslice-solar.com voordat u doorgaat met uw bestelling met de volgende informatie:
- Uw bestelling (producten, kleur)
- Bedrijfsgegevens (bedrijfsnaam + contactpersoon, btw-nummer, adres)
- Normale of express verzending
We sturen u een factuur per e-mail. Uw bestelling kan worden betaald na ontvangst van de factuur.
Algemene vragen
Wil je een specifiek apparaat opladen, maar weet je niet welk Sunslice-product (zonne-oplader, generator, powerbank, ...) je moet kopen om dat te kunnen doen?
Geen zorgen:
1. Bekijk de technische specificaties van de producten op hun productpagina's
2. Controleer of je het antwoord op je vraag kunt vinden in deze FAQ
3. Als je het nog steeds niet weet, kun je ons een e-mail sturen op contact@sunslice-solar.com
VOEG ALSJEBLIEFT een foto toe van de oplader(s) van het apparaat/de apparaten die je wilt kunnen opladen. Je oplader ziet er bijvoorbeeld zo uit en we moeten de geschreven specificaties op de oplader duidelijk kunnen lezen.

Over het algemeen zijn alle Sunslice-producten waterbestendig. Dit betekent dat ze gedurende een redelijke tijd in regenachtige omstandigheden gebruikt kunnen worden.
Geen van onze producten kan wettelijk worden geclassificeerd als waterdicht (IP67), omdat we meestal niet de benodigde tests hebben doorstaan om deze certificaten te verkrijgen. Waarom niet? Vanwege het hoge budget geven we de voorkeur aan het toestaan van R&D om de waterbestendigheid van onze producten effectief te verbeteren. Onze producten kunnen echter in regenachtige omstandigheden worden gebruikt, tenzij anders vermeld in de gebruikershandleiding.
Algemeen gesproken:
- Producten met een batterij
- Moeten niet ondergedompeld worden in water. Als dit toch gebeurt en u krijgt uw product terug, droog het dan volledig voordat u het weer aanzet of gebruikt. Als de oplader na het droogproces blijft werken, zullen de apparaten die u met de Sunslice-oplader oplaadt geen schade oplopen. De levensduur van de Sunslice-oplader kan echter worden beïnvloed.
- Kunnen in regenachtige omstandigheden worden gebruikt, dus maak u geen zorgen als uw apparaat een tijdje aan uw rugzak hangt tijdens het wandelen in de regen. Droog het product daarna wel om de levensduur te behouden.
- Producten zonder batterij
- Wees niet bang voor water. Droog de producten daarna wel om hun levensduur te behouden.
Als uw apparaat meer tijd nodig heeft om voor 100% opgeladen te worden door een Sunslice-lader, kan dit komen door een defecte lader of door de technische specificaties van uw apparaat.
Een smartphone met een grotere batterij zal bijvoorbeeld langer nodig hebben om op te laden dan een smartphone met een kleine batterij. In de loop der tijd krijgen smartphones steeds grotere batterijen, wat zorgt voor langere oplaadtijden bij recente smartphones.
We proberen voortdurend, via verbeterd onderzoek en ontwikkeling, onze producten te laten meegroeien met de elektronische ontwikkelingen op de markt.
De kwantitatieve kenmerken die Sunslice over zijn producten claimt, gebruiken standaardapparaten (smartphones, camera's, tablets, ...) voor vergelijking, zoals de meeste spelers in de oplaadindustrie doen.
Houd er rekening mee dat sommige (recente) apparaten iets of aanzienlijk kunnen afwijken van de vergelijkingsapparaten. Bijvoorbeeld, iPhones hebben andere specificaties dan Android-apparaten, afhankelijk van hun geïntegreerde batterij, het energieverbruik bij gebruik van de telefoon, de oplaadsnelheid, enzovoort. Verschillende modellen binnen hetzelfde merk verschillen ook in deze specificaties.
Deze tabel geeft een idee van het aantal telefoonopladingen dat kan worden verkregen met een 4.000 mAh (bijv. de Photon) powerbank, afhankelijk van het telefoonmodel.

Houd er rekening mee dat sommige recente smartphones niet volledig tot 100% kunnen worden opgeladen door de Photon, omdat ze een zeer hoge interne batterijcapaciteit hebben.
Als er een kras op uw zonnepaneel verschijnt, hoeft u zich geen zorgen te maken. De meeste krassen beïnvloeden de oplaadsnelheid van de zon niet.
Als u een drastische verandering in de zonneprestaties opmerkt, kunt u contact met ons opnemen via service@sunslice-solar.com.
Het hangt ervan af.
We vermijden het leveren van nutteloze kabels omdat dit bijdraagt aan elektronische afval. Dus als er niet expliciet wordt vermeld dat een kabel is inbegrepen bij het plaatsen van de bestelling of op de productpagina, wordt er geen kabel aan uw bestelling toegevoegd.
Als u een specifieke kabel op onze website koopt, voegen we deze natuurlijk toe aan uw bestelling.
De verschillen tussen de nominale en werkelijke capaciteit van een powerbank zijn te wijten aan verschillende technische en praktische factoren:
1. Spanningsconversie: De nominale capaciteit van een batterij wordt meestal aangegeven in milliampère-uur (mAh) bij een specifieke spanning (vaak 3,7V, wat de standaardspanning is voor lithium-ioncellen). Om apparaten op te laden, moet deze spanning echter worden omgezet naar 5V, wat de standaard uitgangsspanning is voor USB-poorten. Deze conversie veroorzaakt energieverlies, waardoor de effectief beschikbare capaciteit afneemt.
2. Conversie-efficiëntie: De interne circuits van de powerbank zetten de energie van de batterij om van 3,7V naar 5V. Deze omzetting is niet 100% efficiënt en leidt tot een energieverlies van 5-15%, of meer bij modellen van lagere kwaliteit.
3. Interne weerstand: De interne componenten van de powerbank, inclusief kabels en connectors, veroorzaken energieverlies door elektrische weerstand, vooral bij hoge stroomsterkte. Dit vermindert de energie die beschikbaar is voor het op te laden apparaat.
4. Temperatuur: Tijdens het opladen of ontladen kan de batterij opwarmen, wat extra energieverlies veroorzaakt, vooral als de powerbank wordt gebruikt in een zeer warme of koude omgeving.
5. Natuurlijke batterijdegradatie: Na verloop van tijd degraderen batterijcellen, waardoor hun maximale capaciteit afneemt. Een oudere powerbank heeft daarom een lagere werkelijke capaciteit dan de oorspronkelijke nominale capaciteit.
Deze factoren zorgen ervoor dat de werkelijke capaciteit vaak lager is dan de aangegeven nominale capaciteit.
- Altijd opgeladen bewaren
- Laad minstens elke 3 maanden op om batterijschade te voorkomen
- Op een droge plaats bij kamertemperatuur
Begrip van laadtijden met zonne-energie
Bij het opladen van een apparaat met een draagbaar zonnepaneel beïnvloeden verschillende factoren de totale laadtijd. Onze berekeningen houden rekening met het vermogen van het zonnepaneel, omgevingsomstandigheden en de laadkenmerken van elk apparaat. Hieronder volgt een overzicht van de belangrijkste elementen die de prestaties van het opladen via zonne-energie beïnvloeden.
0. Perfecte theoretische omstandigheden
In een perfecte en theoretische wereld is de berekening van de laadtijd heel eenvoudig:
Laadtijd = Capaciteit (Wh) / Zonne-energie.
met Capaciteit (Wh) = Capaciteit (Ah) * 3,7V (voorbeeld voor smartphone: 3(000 m)Ah * 3,7V = 11,Wh
Maar wees je ervan bewust dat, hoewel dit een zeer snelle manier is om een schatting van de laadtijd te maken, het niet correct is omdat we niet in een perfecte theoretische wereld leven :-) Om deze fout te vermijden, en belangrijker nog om zo goed mogelijk uit te leggen waarom dit niet correct is, hebben we onderstaand artikel geschreven. Raak niet in paniek als je ondanks het lezen van het artikel zelf geen laadtijden kunt berekenen: schattingen van laadtijden worden onder het artikel weergegeven.
1. Vermogen van het zonnepaneel
Elk zonnepaneel heeft een piekvermogenswaarde (bijv. 18W), maar het daadwerkelijke vermogen dat aan een apparaat wordt geleverd, hangt af van de omstandigheden in de praktijk. De belangrijkste beperkende factoren zijn:
Verliezen in zonlicht efficiëntie
Niet al het zonlicht dat de aarde bereikt, wordt omgezet in bruikbare energie. Verliezen ontstaan door:
- Atmosferische filtering: De hoek van de zon, de ozonlaag en andere atmosferische effecten verminderen de intensiteit van het zonlicht. We schatten een 10% verlies.
- Interne inefficiënties: Het vermogen wordt verder verminderd door USB-conversie (8% verlies) en kabelweerstand (2% verlies).
Aangezien deze verliezen vermenigvuldigend zijn, is de totale efficiëntiefactor:
(1−0,10)×(1−0,08)×(1−0,02)=0,81(1 - 0,10) \times (1 - 0,08) \times (1 - 0,02) = 0,81(1−0,10)×(1−0,08)×(1−0,02)=0,81
Dit betekent dat het effectieve vermogen dat beschikbaar is van het zonnepaneel:
Piekvermogen×0,81\text{Piekvermogen} \times 0,81Piekvermogen×0,81
Verliezen door bewolking
Op bewolkte dagen bereikt minder zonlicht het paneel, wat de efficiëntie verder vermindert. We schatten een 50% verlies door wolken, wat samenkomt met interne inefficiënties:
(1−0,50)×(1−0,08)×(1−0,02)=0,44(1 - 0,50) \times (1 - 0,08) \times (1 - 0,02) = 0,44(1−0,50)×(1−0,08)×(1−0,02)=0,44
Dus het effectieve vermogen beschikbaar onder bewolkte omstandigheden is:
Piekvermogen×0,44\text{Piekvermogen} \times 0,44Piekvermogen×0,44
2. Beperkingen bij het opladen van apparaten
Elk apparaat heeft een maximale inputvermogen rating, wat betekent dat het slechts een bepaalde hoeveelheid stroom tegelijk kan accepteren.
- Een GoPro met een 1.500mAh batterij (5,5Wh) heeft een maximale input van 5W. Zelfs als het zonnepaneel meer vermogen levert, zal de GoPro niet sneller opladen dan 5W.
- Een smartphone kan tot 10-18W accepteren, afhankelijk van de snellaadmogelijkheden.
- Beperking USB-poort output: Zelfs als een zonnepaneel een hoog totaal wattage heeft, heeft elke USB-poort een maximale output. Bijvoorbeeld, de Fusion Flex 18 heeft twee USB-A uitgangen, elk beperkt tot 13,5W (5V/2,7A). Een apparaat dat meer vermogen nodig heeft dan dit, wordt beperkt door de output van de poort.
3. Praktisch oplaadvoorbeeld
Voorbeeld 1: Een GoPro opladen
Laten we het Fusion Flex 18 zonnepaneel (18W) nemen dat een GoPro oplaadt met een 1.500mAh batterij (5,5Wh) en een maximale input toegestaan door de GoPro van 5W.
Stap 1: Bereken het werkelijke zonne-energievermogen na efficiëntieverlies door zonlicht
De totale verliezen door zonlicht efficiëntie omvatten:
- Verliezen door atmosferische filtering: 10%
- Interne inefficiënties (USB-conversie + kabelweerstand): 8% en 2%
Omdat deze verliezen multiplicatief zijn in plaats van additief, is de totale efficiëntiefactor:
(1−0,10)×(1−0,08)×(1−0,02)=0,81% --> 19% verliezen.
Dit betekent dat de effectieve zonne-energie is:
18W × 0,81 = 14,58W
Stap 2: Controleer USB-poort outputlimiet
- Elke USB-A poort op de Fusion Flex 18 heeft een maximale output van 13,5W.
- Aangezien 14,58W > 13,5W, is de werkelijk beschikbare stroom per USB-poort beperkt tot 13,5W.
Stap 3: Bepaal de oplaadkracht voor de GoPro
- De GoPro heeft een maximale oplaadinput van 5W, wat betekent dat hij niet sneller kan opladen dan 5W.
- Aangezien 5W lager is dan de beschikbare 13,5W, zal de GoPro opladen met 5W.
Stap 4: Bereken oplaadtijd
- Oplaadtijd bij vol zonlicht: 5,5Wh/5W=1,1 uur5,5Wh / 5W = 1,1 \text{ uur}5,5Wh/5W=1,1 uur
Stap 5: Aanpassen voor bewolkte omstandigheden
Bewolking zorgt voor extra 50% verliezen, die samen met interne inefficiënties optreden. De totale efficiëntiefactor wordt:
(1−0,50)×(1−0,08)×(1−0,02)=0,44
Effectief zonne-energievermogen bij bewolkte omstandigheden=18W×0,44=7,92W
- De USB-poortlimiet van 13,5W blijft van toepassing, maar aangezien 7,92W < 13,5W is, is het effectief beschikbare vermogen 7,92W.
- Aangezien 7,92W > 5W, laadt de GoPro nog steeds op met 5W.
- Oplaadtijd blijft: ~1,1 uur.
Voorbeeld 2: Een smartphone opladen
Laten we nu de Fusion Flex 12 (12W) nemen die een smartphone met een 3.000mAh batterij (11,1Wh) en een maximale laadinput van 18W oplaadt.
Stap 1: Bereken het werkelijke zonne-energievermogen na efficiëntieverlies door zonlicht
De Fusion Flex 12 heeft een piekvermogen van 12W. Toepassing van de totale efficiëntiefactor van 0,81 (rekening houdend met atmosferische en interne verliezen):
Effectief zonne-energievermogen=12W×0,81=9,72W
Stap 2: Controleer USB-poort outputlimiet
- Elke USB-A poort op de Fusion Flex 12 heeft een maximale output van 12W (5V/2,4A).
- Aangezien 9,72W < 12W, blijft het werkelijk beschikbare vermogen 9,72W (beperkt door zonlicht efficiëntie, niet door de poort).
Stap 3: Bepaal laadvermogen voor de smartphone
- De smartphone heeft een maximale laadinput van 18W, wat betekent dat hij kan opladen met tot 18W als er genoeg vermogen beschikbaar is.
- Het beschikbare vermogen is slechts 9,72W, wat lager is dan de 18W die de smartphone kan accepteren.
- Eindlaadvermogen: 9,72W (beperkt door beschikbaar zonne-energievermogen).
Stap 4: Bereken oplaadtijd
- Oplaadtijd bij volle zon: 11,1Wh / 9,72W = 1,14 uur
Stap 5: Aanpassen voor bewolkte omstandigheden
Met gebruik van de totale efficiëntiefactor van 0,44 (bewolking + interne verliezen):
Effectief zonne-energievermogen=12W×0,44=5,28W
-
De USB-poortlimiet (12W) blijft van toepassing, maar aangezien 5,28W < 12W is, is het effectief beschikbare vermogen 5,28W.
-
De smartphone kan meer dan 5,28W accepteren, dus laadt hij op met 5,28W.
-
Oplaadtijd bij bewolkte omstandigheden:
11,1Wh / 5,28W = 2,1 uur
Aangezien de zoncondities nooit echt 100% zijn, kan men aannemen dat de oplaadtijd voor een smartphone tussen 1,14 en 2,1 uur zal liggen.
Verzending
We kunnen wereldwijd verzenden dankzij BPOST, onze vertrouwde distributiepartner.
Houd er rekening mee dat verschillende gebieden onderhevig zijn aan verschillende verzendtarieven en dat invoerrechten van toepassing kunnen zijn.
Afghanistan, Åland-eilanden, Albanië, Algerije, Amerikaans Samoa, Andorra, Angola, Anguilla, Antarctica, Antigua en Barbuda, Argentinië, Armenië, Aruba, Ascension, Azië/Midden-Oosten, Azië/Midden-Oosten/Noord-Afrika, Australië, Oostenrijk, Azerbeidzjan, Bahama’s, Bahrein, Bangladesh, Barbados, Wit-Rusland, België, Belize, Benin, Bermuda, Bhutan, Bolivia, Bonaire, Sint Eustatius en Saba, Bosnië en Herzegovina, Botswana, Bouvet-eiland, Brazilië, Brits Indische Oceaangebied, Brunei Darussalam, Bulgarije, Burkina Faso, Burundi, Cambodja, Kameroen, Canada, Canarische Eilanden, Kaapverdië, Kaaimaneilanden, Centraal-Afrikaanse Republiek, Ceuta, Tsjaad, Chili, China, Kersteiland, Cocos (Keeling) Eilanden, Colombia, Comoren, Congo, Democratische Republiek Congo, Cookeilanden, Costa Rica, Kroatië, Cuba, Curaçao, Cyprus, Tsjechië, Denemarken, Djibouti, Dominica, Dominicaanse Republiek, Ecuador, Egypte, El Salvador, Equatoriaal-Guinea, Eritrea, Estland, Ethiopië, Europese Unie, Falklandeilanden (Malvinas), Faeröer, Fiji, Finland, Frankrijk, Frans-Guyana, Frans-Polynesië, Franse Zuidelijke Gebieden, Gabon, Gambia, Georgië, Duitsland, Ghana, Gibraltar, Groot-Brittannië, Griekenland, Groenland, Grenada, Guadeloupe, Guam, Guatemala, Guernsey, Guinee, Guinee-Bissau, Guyana, Haïti, Heard- en McDonaldeilanden, Heilige Stoel (Vaticaanstad), Honduras, Hongkong, Hongarije, IJsland, India, Indonesië, Iran, Irak, Ierland, Isle of Man, Israël, Italië, Ivoorkust, Jamaica, Japan, Jersey, Jordanië, Kazachstan, Kenia, Kiribati, Noord-Korea, Zuid-Korea, Kosovo, Koeweit, Kirgizië, Laos, Letland, Libanon, Lesotho, Liberia, Libië, Liechtenstein, Litouwen, Livigno, Luxemburg, Macao, Macedonië, Madagaskar, Malawi, Maleisië, Malediven, Mali, Malta, Marshalleilanden, Martinique, Mauritanië, Mauritius, Mayotte, Melilla, Mexico, Micronesië, Moldavië, Monaco, Mongolië, Montenegro, Montserrat, Marokko, Mozambique, Myanmar, Namibië, Nauru, Nepal, Nederland, Nederlandse Antillen, Nieuw-Caledonië, Nieuw-Zeeland, Nicaragua, Niger, Nigeria, Niue, Niet-Europese Unie, Norfolk Island, Noord-Afrika, Noordelijke Marianen, Noorwegen, Oman, Pakistan, Palau, Palestijnse Gebieden, Panama, Papoea-Nieuw-Guinea, Paraguay, Peru, Filipijnen, Pitcairn, Polen, Portugal, Puerto Rico, Qatar, Rest van Afrika, Rest van Europa, Rest van de wereld, Réunion, Roemenië, Rusland, Rwanda, Sint-Helena, Saint Kitts en Nevis, Sint Lucia, Saint Martin, Saint Pierre en Miquelon, Saint Vincent en de Grenadines, Samoa, San Marino, Sao Tomé en Principe, Saoedi-Arabië, Senegal, Servië, Seychellen, Sierra Leone, Singapore, Slowakije, Slovenië, Salomonseilanden, Somalië, Zuid-Afrika, Zuid-Georgia en de Zuidelijke Sandwicheilanden, Spanje, Sri Lanka, Soedan, Zuid-Soedan, Suriname, Spitsbergen en Jan Mayen, Swaziland, Zweden, Zwitserland, Syrische Arabische Republiek, Taiwan, Tadzjikistan, Tanzania, Thailand, Timor-Leste, Togo, Tokelau, Tonga, Trinidad en Tobago, Tunesië, Turkije, Turkmenistan, Turks- en Caicoseilanden, Tuvalu, Oeganda, Oekraïne, Verenigde Arabische Emiraten, Verenigde Staten, Kleine afgelegen eilanden van de Verenigde Staten, Uruguay, Oezbekistan, Vanuatu, Venezuela, Vietnam, Britse Maagdeneilanden, Amerikaanse Maagdeneilanden, Wallis en Futuna, Westelijke Sahara, Jemen, Zambia, Zimbabwe
We doen ons best om uw bestellingen zo snel mogelijk te verzenden!
Voor leveringen in België duurt het meestal tussen de 24 en 72 uur.
Voor andere Europese landen variëren de levertijden tussen 3 en 7 dagen, afhankelijk van de snelheid van de lokale diensten.
Voor de VS duurt de levering meestal tussen de 4 en 7 dagen.
Houd er rekening mee dat vertragingen door postdiensten kunnen optreden en buiten onze controle liggen, ondanks onze beste inspanningen!
Tijdens het hoogseizoen (vooral aan het einde van het jaar) kunnen de vertragingen langer zijn vanwege het hoge volume dat onze logistieke partners en vervoerders moeten verwerken.
Om onze klanten de meest voordelige verzendtarieven te bieden, maken we voornamelijk gebruik van de BPost International verzendservice. Voor expresverzending of "exacte deadline verzending" kunt u in de afrekeninstellingen kiezen voor "UPS express levering" of "versnelde verzending".
Na het plaatsen van uw bestelling zou u een automatische bevestigingsmail van ons moeten hebben ontvangen.
In deze e-mail kunt u op de link "Volg mijn bestelling" klikken om toegang te krijgen tot de status van uw bestelling en trackingupdates.
Onze excuses voor de vertraging.
Overweeg alstublieft om 2-3 dagen te wachten voordat u zich zorgen maakt. We verzenden meestal binnen 24 uur na ontvangst van een bestelling, maar soms kan er extra tijd nodig zijn.
Controleer eerst de trackinglink die is opgenomen in de bevestigingsmail die u zou moeten hebben ontvangen toen we uw bestelling verzonden. Deze kan ook in een andere e-mail staan, verzonden door ons of door onze vervoerder of logistieke partner.
Controleer uw spamfolder als u geen e-mail met trackinglink kunt vinden.
Als de trackinglink van uw bestelling aangeeft dat de zending al meer dan 10 werkdagen niet is verplaatst van de ene fase naar de andere, neem dan contact met ons op via service@sunslice-solar.com.
No matching questions found.
Still need help?
Contact the Sunslice team and we'll be happy to help.