




Help Center
Find product manuals, troubleshooting help, and answers to common questions.
Product Support
BLUETTI AC200MAX- PORTABLE SOLAR GENERATOR
Manuals & Downloads
Frequently Asked Questions
Si prega di leggere attentamente il MANUALE DELL'UTENTE. Viene fornita una spiegazione dettagliata su come utilizzarlo.
Puoi trovare i manuali utente qui sotto
Guarda questo video per un avvio rapido:
https://www.youtube.com/watch?v=tk1oAASkuSU
Ulteriori informazioni sono disponibili nel MANUALE D’USO
Per favore guarda questo video:
https://www.youtube.com/watch?v=Fl2f6yzv1NY
Da 0.00 a 0.38: Collegamento di 1 pannello al AC200 Max
Da 0.38 a 1.04: Collegamento di più pannelli al AC200 Max
Se vuoi collegare il Easy Solar Kit al tuo generatore Bluetti, puoi farlo come descritto di seguito.
Se vuoi usare il Easy Solar Kit senza il generatore Bluetti, consulta le FAQ su COME USARE IL MIO EASY SOLAR KIT - INSTALLAZIONE RAPIDA.
Il primo passaggio qui sotto è per chi ha già installato il Easy Solar Kit e lo ha collegato alla presa di corrente.
Nel caso in cui il Easy Solar Kit non sia ancora installato, procedi direttamente al secondo passaggio.


No matching questions found.
BLUETTI AC300- PORTABLE SOLAR GENERATOR
Manuals & Downloads
Frequently Asked Questions
Si prega di leggere attentamente il MANUALE DELL'UTENTE. Viene fornita una spiegazione dettagliata su come utilizzarlo.
Puoi trovare i manuali utente qui sotto
Guarda questi video per un avvio rapido:
https://www.youtube.com/watch?v=kGKZG_HOFKQ
Per favore guarda questo video:
https://www.youtube.com/watch?v=Fl2f6yzv1NY
Da 0.00 a 0.38: Collegamento di 1 pannello al AC200 Max
Da 0.38 a 1.04: Collegamento di più pannelli al AC200 Max
Se vuoi collegare l'Easy Solar Kit al tuo generatore Bluetti, puoi farlo come descritto di seguito.
Se vuoi usare l'Easy Solar Kit senza il generatore Bluetti, consulta le FAQ su COME USARE IL MIO EASY SOLAR KIT - INSTALLAZIONE RAPIDA.
Il primo passaggio qui sotto è per chi ha già installato l'Easy Solar Kit e lo ha collegato alla presa di corrente.
Nel caso in cui il Easy Solar Kit non sia ancora installato, procedi direttamente al secondo passaggio.

1. Vai su "impostazioni", poi su "avanti" e conferma che la "Corrente massima di ingresso dalla rete" sia impostata su "15A".
2. Clicca sul pulsante centrale e verifica cosa mostra per controllare che l'unità centrale stia rilevando le tue batterie B230 o B300 in "informazioni batteria".
3. Naviga su "Allarme" e controlla che non venga rilevato alcun problema attuale.
4. Naviga su "Dati" e poi su "Cronologia allarmi" per verificare se è stato registrato un problema recente.
Questi controlli ti permetteranno di stabilire se c'è un problema con la batteria o se il problema risiede altrove. Dopo aver effettuato questi controlli, se il problema persiste, ti preghiamo di contattarci.
No matching questions found.
BLUETTI B230 - POWER PACK
Manuals & Downloads
Frequently Asked Questions
Si prega di leggere attentamente il MANUALE DELL'UTENTE. Viene fornita una spiegazione dettagliata su come utilizzarlo.
Puoi trovare i manuali utente qui sotto
No matching questions found.
BLUETTI B300 - POWER PACK
Manuals & Downloads
Frequently Asked Questions
Si prega di leggere attentamente il MANUALE DELL'UTENTE. Viene fornita una spiegazione dettagliata su come utilizzarlo.
Puoi trovare i manuali utente qui sotto
No matching questions found.
BLUETTI EP500 PRO - SOLAR GENERATOR
Manuals & Downloads
Frequently Asked Questions
Si prega di leggere attentamente il MANUALE DELL'UTENTE. Viene fornita una spiegazione dettagliata su come utilizzarlo.
Puoi trovare i manuali utente qui sotto


No matching questions found.
CYCLOTRON
Manuals & Downloads
Frequently Asked Questions
Si prega di leggere attentamente il MANUALE DELL'UTENTE. Viene fornita una spiegazione dettagliata su come utilizzarlo.
Puoi trovare i manuali utente qui sotto
Il Cyclotron supporta la ricarica wireless. Come usarlo?
- Per prima cosa, posiziona il telefono sul Cyclotron, negli appositi supporti.
- Premi il pulsante POWER per attivare la funzione di ricarica wireless.
- Il tuo telefono inizierà a caricarsi wireless.

Se non funziona, verifica i seguenti aspetti:
- Assicurati che il tuo telefono supporti la ricarica wireless. Consulta il manuale utente.
Se il tuo telefono supporta la ricarica wireless:
- Se il tuo telefono ha una custodia protettiva, rimuovila e riprova.
- Se una piastra metallica è attaccata al retro del tuo telefono, rimuovila e riprova.
- Se il LED blu non si accende ancora, assicurati di aver premuto il pulsante POWER sul lato destro del Cyclotron.
Il Cyclotron consente l'uso con smartphone dalle dimensioni :
Larghezza: da 70 a 105 mm
Lunghezza: senza limiti
Spessore: da 1 a 12 mm
No matching questions found.
EASY SOLAR KIT
Manuals & Downloads
Frequently Asked Questions
Si prega di leggere attentamente il MANUALE DELL'UTENTE. Viene fornita una spiegazione dettagliata su come utilizzarlo.
Puoi trovare i manuali utente qui sotto
Il Kit Easy Solar è stato progettato per ridurre la bolletta elettrica dei nostri clienti Sunslice. È un kit solare plug and play, molto facile da installare e da usare.
Il Kit Easy Solar da solo non può immagazzinare l'energia che produce. Questa energia viene immessa nella rete domestica e deve essere consumata istantaneamente dai dispositivi collegati alla rete. Se nessun dispositivo è collegato o se viene prodotta troppa elettricità rispetto a quella consumata, questa energia (in eccesso) viene reimmessa (gratuitamente) nella rete principale.
Quindi, quale soluzione abbiamo per immagazzinare questa energia in eccesso?
Non esiste una soluzione automatica per questo.
Tuttavia, possiamo suggerire una soluzione manuale che ti permetterà di immagazzinare l'energia prodotta dal pannello solare in una power station quando vuoi (ad esempio quando sei via per un lungo periodo o quando vuoi conservare energia di riserva in caso di possibile interruzione di corrente).
Le power station Bluetti possono immagazzinare da 2 kWh a 12,3 kWh di energia. È molto facile collegare i Kit Easy Solar a queste power station.
Come?
1. Installa il tuo Kit Easy Solar nella configurazione iniziale (kit collegato alla rete domestica): il manuale utente è disponibile qui.
2. Scollega la spina dalla rete e anche i cavi MC4 dal micro-inverter.
3. Collega i cavi MC4 alla power station Bluetti.
Tutta l'energia prodotta dal pannello solare del Kit Easy Solar sarà immagazzinata nella power station.
Quando vuoi, puoi collegare i tuoi dispositivi alla power station e puoi anche ricollegare il Kit Easy Solar alla rete.
Di seguito puoi trovare una guida rapida all'installazione elettronica per l'Easy Solar Kit.
Si prega inoltre di fare riferimento al Manuale Utente incluso nella confezione per configurare l'Easy Solar Kit.
No matching questions found.
ELECTRON
Manuals & Downloads
Frequently Asked Questions
No questions have been added for this product yet.
No matching questions found.
EMPERION 45 MINI
Manuals & Downloads
Frequently Asked Questions
No questions have been added for this product yet.
No matching questions found.
EMPERION 65 PRO
Manuals & Downloads
Frequently Asked Questions
No questions have been added for this product yet.
No matching questions found.
FLIGHT CASE
Manuals & Downloads
Frequently Asked Questions
No questions have been added for this product yet.
No matching questions found.
FUSION 100
Manuals & Downloads
Frequently Asked Questions
Si prega di leggere attentamente il MANUALE DELL'UTENTE. Viene fornita una spiegazione dettagliata su come utilizzarlo.
Puoi trovare i manuali utente qui sotto
No matching questions found.
FUSION 150
Manuals & Downloads
Frequently Asked Questions
No questions have been added for this product yet.
No matching questions found.
FUSION 200
Manuals & Downloads
Frequently Asked Questions
No questions have been added for this product yet.
No matching questions found.
FUSION 40
Manuals & Downloads
Frequently Asked Questions
No questions have been added for this product yet.
No matching questions found.
FUSION 440
Manuals & Downloads
Frequently Asked Questions
No questions have been added for this product yet.
No matching questions found.
FUSION 60
Manuals & Downloads
Frequently Asked Questions
No questions have been added for this product yet.
No matching questions found.
FUSION CORE 10
Manuals & Downloads
Frequently Asked Questions
No questions have been added for this product yet.
No matching questions found.
FUSION CORE 22
Manuals & Downloads
Frequently Asked Questions
No questions have been added for this product yet.
No matching questions found.
FUSION FLEX 12
Manuals & Downloads
Frequently Asked Questions
Si prega di leggere attentamente il MANUALE DELL'UTENTE. Viene fornita una spiegazione dettagliata su come utilizzarlo.
Puoi trovare i manuali utente qui sotto
No matching questions found.
FUSION FLEX 18
Manuals & Downloads
Frequently Asked Questions
Si prega di leggere attentamente il MANUALE DELL'UTENTE. Viene fornita una spiegazione dettagliata su come utilizzarlo.
Puoi trovare i manuali utente qui sotto
No matching questions found.
FUSION FLEX 24
Manuals & Downloads
Frequently Asked Questions
Si prega di leggere attentamente il MANUALE DELL'UTENTE. Viene fornita una spiegazione dettagliata su come utilizzarlo.
Puoi trovare i manuali utente qui sotto
Il Fusion FLEX 24 può caricare diversi prodotti.
Di seguito è riportata una tabella che spiega le diverse compatibilità del Fusion Flex 24.
Si prega di considerare che la compatibilità della porta USB-C è diversa da quella della porta USB-A.

Devi utilizzare il cavo USB-C a USB-A. Collega l'estremità USB-A al Fusion Flex 24 e poi l'estremità USB-C alla porta USB-C del Gravity 100. Ti preghiamo di NON utilizzare il cavo USB-C a USB-C fornito con il Gravity 100 per caricare il Gravity 100 dalla porta USB-C del Fusion Flex 24. Puoi usarlo per caricare il Gravity 100 con il caricatore rapido Emperion o con qualsiasi altro caricatore USB-C.
Questa immagine mostra la configurazione:


No matching questions found.
FUSION FLEX 48
Manuals & Downloads
Frequently Asked Questions
Si prega di leggere attentamente il MANUALE DELL'UTENTE. Viene fornita una spiegazione dettagliata su come utilizzarlo.
Puoi trovare i manuali utente qui sotto
Il Fusion FLEX 48 può caricare diversi prodotti.
Di seguito è riportata una tabella che spiega le diverse compatibilità del Fusion Flex 48.
Si prega di considerare che la compatibilità della porta USB-C è diversa da quella delle porte USB-A e della porta DC 5521.
La porta DC 5521 è un'uscita non regolata che può principalmente caricare powerstation come la Sunslice Gravity 144 e la Sunslice Gravity 432.

Devi utilizzare il cavo USB-C a USB-A. Collega l'estremità USB-A al Fusion Flex 48 e poi l'estremità USB-C alla porta USB-C del Gravity 100. Ti preghiamo di NON utilizzare il cavo USB-C a USB-C fornito con il Gravity 100 per caricare il Gravity 100 dalla porta USB-C del Fusion Flex 48. Puoi usarlo per caricare il Gravity 100 con il caricatore rapido Emperion o qualsiasi altro caricatore USB-C.
Questa immagine mostra la configurazione:

No matching questions found.
FUSION FLEX 6
Manuals & Downloads
Frequently Asked Questions
Si prega di leggere attentamente il MANUALE DELL'UTENTE. Viene fornita una spiegazione dettagliata su come utilizzarlo.
Puoi trovare i manuali utente qui sotto
No matching questions found.
GRAVITY 10
Manuals & Downloads
Frequently Asked Questions
Si prega di leggere attentamente il MANUALE DELL'UTENTE. Viene fornita una spiegazione dettagliata su come utilizzarlo.
Puoi trovare i manuali utente qui sotto
No matching questions found.
GRAVITY 10 EXTREME
Manuals & Downloads
Frequently Asked Questions
No questions have been added for this product yet.
No matching questions found.
GRAVITY 100
Manuals & Downloads
Frequently Asked Questions
Si prega di leggere attentamente il MANUALE DELL'UTENTE. Viene fornita una spiegazione dettagliata su come utilizzarlo.
Puoi trovare i manuali utente qui sotto
Puoi ordinare il Gravity 100 con un set di adattatori. Questo set di adattatori garantirà una compatibilità universale con tutti i laptop.
Il set di adattatori è disponibile nella pagina prodotto del Gravity 100 (menu a tendina).
No matching questions found.
GRAVITY 1024
Manuals & Downloads
Frequently Asked Questions
No questions have been added for this product yet.
No matching questions found.
GRAVITY 144
Manuals & Downloads
Frequently Asked Questions
Si prega di leggere attentamente il MANUALE DELL'UTENTE. Viene fornita una spiegazione dettagliata su come utilizzarlo.
Puoi trovare i manuali utente qui sotto
No matching questions found.
GRAVITY 20
Manuals & Downloads
Frequently Asked Questions
Si prega di leggere attentamente il MANUALE DELL'UTENTE. Viene fornita una spiegazione dettagliata su come utilizzarlo.
Puoi trovare i manuali utente qui sotto
No matching questions found.
GRAVITY 20 EXTREME PRO
Manuals & Downloads
Frequently Asked Questions
No questions have been added for this product yet.
No matching questions found.
GRAVITY 2048
Manuals & Downloads
Frequently Asked Questions
No questions have been added for this product yet.
No matching questions found.
GRAVITY 2232
Manuals & Downloads
Frequently Asked Questions
No questions have been added for this product yet.
No matching questions found.
GRAVITY 27
Manuals & Downloads
Frequently Asked Questions
No questions have been added for this product yet.
No matching questions found.
GRAVITY 27 PRO
Manuals & Downloads
Frequently Asked Questions
No questions have been added for this product yet.
No matching questions found.
GRAVITY 40
Manuals & Downloads
Frequently Asked Questions
No questions have been added for this product yet.
No matching questions found.
GRAVITY 432
Manuals & Downloads
Frequently Asked Questions
Si prega di leggere attentamente il MANUALE DELL'UTENTE. Viene fornita una spiegazione dettagliata su come utilizzarlo.
Puoi trovare i manuali utente qui sotto
No matching questions found.
GRAVITY 486
Manuals & Downloads
Frequently Asked Questions
No questions have been added for this product yet.
No matching questions found.
GRAVITY 5
Manuals & Downloads
Frequently Asked Questions
Si prega di leggere attentamente il MANUALE DELL'UTENTE. Viene fornita una spiegazione dettagliata su come utilizzarlo.
Puoi trovare i manuali utente qui sotto
No matching questions found.
GRAVITY 756
Manuals & Downloads
Frequently Asked Questions
Si prega di leggere attentamente il MANUALE DELL'UTENTE. Viene fornita una spiegazione dettagliata su come utilizzarlo.
Puoi trovare i manuali utente qui sotto
Diagnosi rapida:
Potresti non aver attivato la funzione AC (funzione che attiva le prese sul retro). Per farlo, devi premere il pulsante G per 3 secondi come indicato nel manuale utente. Le informazioni necessarie sono cerchiate in verde nelle immagini qui sotto:
Troverai lo schema a pagina 4 del manuale utente.


Se ancora non funziona, si prega di leggere nuovamente con attenzione il manuale utente prima di contattarci.
No matching questions found.
HADRON
Manuals & Downloads
Frequently Asked Questions
Si prega di leggere attentamente il MANUALE DELL'UTENTE. Viene fornita una spiegazione dettagliata su come utilizzarlo.
Puoi trovare i manuali utente qui sotto
Il Hadron include automaticamente una spina EU. Se hai bisogno di una spina US, CH o GB, contattaci all'indirizzo service@sunslice-solar.com.
In ogni caso, il Hadron può essere caricato tramite il suo ingresso USB-C con un cavo USB-C standard.
No matching questions found.
JUNCTION BOX
Manuals & Downloads
Frequently Asked Questions
No questions have been added for this product yet.
No matching questions found.
LINKPOWER BACKPACK
Manuals & Downloads
Frequently Asked Questions
No questions have been added for this product yet.
No matching questions found.
LINKPOWER MINI FLIGHTCASE
Manuals & Downloads
Frequently Asked Questions
No questions have been added for this product yet.
No matching questions found.
LINKPOWER PRO FLIGHTCASE
Manuals & Downloads
Frequently Asked Questions
No questions have been added for this product yet.
No matching questions found.
PHOTON
Manuals & Downloads
Frequently Asked Questions
Si prega di leggere attentamente il MANUALE DELL'UTENTE del Photon. Viene fornita una spiegazione dettagliata su come utilizzare il Photon.
Puoi trovare i manuali utente qui sotto
Se riscontri problemi nell'usare il tuo Photon per caricare il telefono, segui le seguenti istruzioni:
0. Premi il pulsante POWER
Collega il tuo dispositivo al Photon. Se il dispositivo non inizia a caricarsi automaticamente, premi il pulsante POWER sul bordo del Photon.

1. Verifica se la batteria funziona
Per prima cosa assicurati che la batteria abbia carica. Premi una volta il pulsante POWER sul lato della batteria per vedere se si accendono delle luci blu.
Se la batteria non si accende, prova a collegarla a un caricatore USB usando l’ingresso USB-C e verifica se la batteria si accende. Se vedi delle luci blu, la batteria funziona correttamente. In caso contrario, potrebbe esserci un problema con il cavo Sunslice. Prova con un altro cavo USB-C (o assicurati che il tuo cavo Sunslice funzioni bene) prima di procedere al passo successivo.
Se non si accende nessuna luce nonostante questi passaggi, contattaci all’indirizzo service@sunslice-solar.com e assicurati di aver letto attentamente le FAQ prima di scriverci. Ti aiuteremo ulteriormente.
2. Posizione del cavo
Assicurati che il cavo sia inserito correttamente nella porta USB. Può succedere che la porta USB sia più centrata del dovuto. Il cavo deve essere posizionato nella parte inferiore del connettore, come mostrato nell’immagine qui sotto. I pin metallici del cavo devono essere rivolti verso l’alto. Guarda attentamente i disegni e riproduci questa posizione con il tuo Photon.

3. Per utenti iPhone
Controlla che il cavo sia inserito correttamente nel telefono. Se hai un iPhone, tieni presente che il cavo funziona solo in un verso. Questo perché l’altro lato del cavo carica ingressi micro-USB. Potrebbe essere necessario girare il telefono per far partire la carica.

4. Verifica con un cavo diverso
Se hai provato a usare il cavo Sunslice in entrambi i modi seguendo tutte le istruzioni sopra, prova a usare un cavo di ricarica diverso. Se il telefono si carica con il nuovo cavo, significa che il cavo Sunslice è difettoso. Se invece non funziona ancora, il problema è nel dispositivo e sarà sostituito. Contattaci all’indirizzo service@sunslice-solar.com
Il Photon ha un piccolo anello per fissare il cavo Sunslice sul lato ed evitare di perderlo. Questo anello è stato specificamente rinforzato per servire come punto di attacco per uno zaino. Puoi facilmente infilare un moschettone o una corda per fissarlo allo zaino o ad altri luoghi.
È stato aggiunto un secondo anello sull'altro lato del Photon che può essere utilizzato come secondo punto di fissaggio per stabilizzare il Photon.

Il Photon è dotato di un'uscita USB standard. Ciò significa che, essenzialmente, se il tuo dispositivo può essere caricato tramite un cavo USB, funzionerà con il Photon.
Forniamo un cavo 3-in-1 complementare che può caricare qualsiasi dispositivo con porta USB-C, Lightning e Micro-USB (Max 5V).
Se hai un altro tipo di porta, dovrai utilizzare il tuo cavo (Mini-USB, iPod, Nokia 3.5 ecc.). Tieni presente che il Photon è limitato a una tensione di 5V.
Se non sei sicuro, inviaci una foto del tuo dispositivo e delle porte di ricarica, e ti risponderemo il prima possibile!
Esperienza di ricarica solare ottimale può essere ottenuta tramite:
- aprire completamente il Photon verso il sole
- nessuna ombra su nessuna delle celle solari
- inclinare il Photon perpendicolarmente al sole
- condizioni statiche. Appendere il Photon allo zaino durante l'escursione è una soluzione di ricarica comoda, ma ridurrà la velocità di ricarica poiché il Photon si muoverà e l'esposizione solare varierà molto.
- condizioni di sole perfette (estate, senza nuvole, circa 15°C)
- non posizionare il Photon dietro a una finestra (questo può ridurre la velocità di ricarica solare fino al 90%)
- permettere la ventilazione intorno al prodotto per mantenere la temperatura bassa (le alte temperature influenzano l'efficienza delle celle solari)
Quando si carica il Photon al sole:
Il tempo necessario per accumulare una carica equivalente a quella di un telefono nella batteria del Photon può variare a seconda del telefono da caricare. Ecco alcuni esempi.
Si prega di notare che la velocità di ricarica del Photon al sole può variare notevolmente in base alle condizioni di ricarica. I tempi di ricarica indicati sopra si riferiscono a un'inclinazione ottimale e a una temperatura ambiente di 25°C.
In caso di calore eccessivo, una o più celle in ombra, movimento, posizionamento dietro vetro, ... queste prestazioni possono essere notevolmente ridotte. Si prega di consultare la domanda FAQ "Come posso ottenere un'esperienza di carica ottimale?"
Quando si carica il dispositivo con il Photon (se il Photon è pre-caricato):
Il tempo di ricarica necessario per caricare il dispositivo con il Photon (se il Photon è già pre-caricato al 100%) varierà anche in base al dispositivo. Si può assumere una velocità di ricarica approssimativa di 1h30 / 2.000 mAh.

Il Photon ha 5 LED indicatori di carica come mostrato di seguito.

Si prega di notare che le prime 4 luci LED BLU (a sinistra) indicano lo stato di carica della powerbank integrata del Photon. La quinta luce LED VERDE (a destra) indica che il Photon si sta caricando al sole.
Quando le 4 luci LED blu sono accese, significa che il Photon è carico al 100%.
Per riassumere (valori approssimativi) :
- 0 LED : 0%
- 1 LED : 1%-29%
- 2 LED : 30% - 69%
- 3 LED : 70%-99%
- 4 LED : 100%
La quarta luce LED può impiegare più tempo ad accendersi poiché la velocità di ricarica rallenta verso la fine del ciclo di carica. Si prega di considerare questo aspetto durante la ricarica al sole, poiché la quarta luce LED può richiedere molto tempo prima di accendersi.
Sì,
non devi preoccuparti della resistenza dell’anello di fissaggio in pelle del Photon. Lo abbiamo testato e resiste a una trazione di 9 kg senza rompersi. Clicca qui per vedere il test.
Ci dispiace per questo. A volte può capitare di perdere la parte del cavo universale 3-in-1 del Photon.
Puoi comunque utilizzare il tuo Photon con qualsiasi altro cavo USB. Se desideri riordinare un cavo, puoi farlo direttamente sul nostro sito cliccando qui.
Il cavo universale 3-in-1, incluso con il Photon, non può caricare tutti gli iPad®. Per iPad® si intendono i tablet del marchio Apple®.
Se questo dovesse accadere al tuo iPad®, prova a utilizzare il tuo cavo abituale.
Nel caso in cui il tuo Photon presenti una deformazione (rigonfiamento, foratura, crepa nella batteria), ti preghiamo di isolarlo da altri prodotti infiammabili e di contattarci all'indirizzo service@sunslice-solar.com.
Ti spiegheremo come smaltirlo in modo sicuro ed ecologico.
No matching questions found.
Produit Test Geoff
Manuals & Downloads
Frequently Asked Questions
Si prega di leggere attentamente il MANUALE DELL'UTENTE. Viene fornita una spiegazione dettagliata su come utilizzarlo.
Puoi trovare i manuali utente qui sotto
No matching questions found.
PV200 - FOLDABLE SOLAR PANEL 200 WATTS
Manuals & Downloads
Frequently Asked Questions
No questions have been added for this product yet.
No matching questions found.
VOLTA WALLET
Manuals & Downloads
Frequently Asked Questions
No questions have been added for this product yet.
No matching questions found.
ZENITH
Manuals & Downloads
Frequently Asked Questions
Si prega di leggere attentamente il MANUALE DELL'UTENTE. Viene fornita una spiegazione dettagliata su come utilizzarlo.
Puoi trovare i manuali utente qui sotto
No matching questions found.
ELECTRON
Manuals & Downloads
Product Questions & Troubleshooting
No additional product-specific questions are currently listed.
No matching information found for this product.
EMPERION 45 MINI
Manuals & Downloads
Product Questions & Troubleshooting
No additional product-specific questions are currently listed.
No matching information found for this product.
EMPERION 65 PRO
Manuals & Downloads
Product Questions & Troubleshooting
No additional product-specific questions are currently listed.
No matching information found for this product.
PHOTON
Manuals & Downloads
Product Questions & Troubleshooting
Please read the USER MANUAL of the Photon carefully. A detailed explanation is given on how to use the Photon.
You can find the user manuals below
If you're experiencing trouble using your Photon to charge your phone, please follow the following instructions:
0. Press the POWER button
Connect your device to the Photon. If your device does not start charging automatically, please press the POWER button on the edge of the Photon.
1. Check if the battery works
First make sure the battery has some charge. Start by pressing the POWER button once on the side of the battery to see if some blue lights turn on.
If the battery doesn't turn on, try plugging it into a USB charger using the USB-C input, and check if the battery turns on. If you see little blue lights at some point, the battery works fine. If not, it could be an issue with your Sunslice cable. Please try with another USB-C cable (or make sure your Sunslice cable works well) before proceeding to the next step.
If despite these steps no lights appear at all, then please contact us at service@sunslice-solar.com and make sure notifying us you read carefully the FAQ before contacting us. We will help you further.
2. Cable position
Make sure the cable is inserted correctly in the USB port. It can happen that the USB port is more centered than it should be. The cable must be placed in the lower part of the receptacle, as shown in the picture below. The cable's metallic data pins should face upwards. Please look at the drawings carefully and replicate this with your Photon.
3. For iPhone users
Check that the cable is inserted correctly in your phone. If you have an iPhone, please note that the cable only works one way around. It is necessary as the other side of the cable charges micro-USB inputs. You may need to turn your phone over for it to charge.
4. Check if it works with a different cable
If you have tried using the Sunslice cable both ways following all the instructions above, please try using a different charging cable. If the phone now charges with your cable, it means your Sunslice cable is defaulting. If it still does not work, your device is defaulting and will be changed. Please contact us at service©sunslice-solar.com
The Photon has a little loop to secure the Sunslice cable on its side and avoid losing it. This loop has been specifically reinforced to serve as an attachement point for a backpack. You can easily slip a carabiner or a rope to fix it on your backpack or to other places.
A second loop has been added at the other side of the Photon that can be used as a second attachment point to stabilize the Photon.
The Photon is equipped with a standard USB output. That means that, essentially, if your device can be charged using a USB cable, it will work with the Photon.
We provide a complementary 3-in-1 cable that can charge any device with a USB-C, Lightning and Micro-USB port (Max 5V).
If you have any other type of port, you will have to use your own cable (Mini-USB, iPod, Nokia 3.5 etc.). Be aware that the Photon is limited to a 5V voltage.
In case you're not sure, send us a picture of your device and the charging ports, and we will get back to you as soon as possible !
Optimal solar charge experience can be obtained by :
- opening the Photon completely towards the sun
- no shading on any of the solar cells
- tilting the Photon perpendicularly to the sun
- static conditions. Hanging the Photon on your backpack whilst hiking is a handy charging solution but will reduce the charging speed as the Photon will move and the solar exposure will fluctuate a lot.
- perfect sun conditions (summer time, no clouds, +-15°C)
- not placing the Photon behind a window (this can reduce the solar charging speed up to 90%)
- allowing ventilation around the product in order to keep the temperature low (high temperatures affect the efficiency of the solar cells)
When charging the Photon in the Sun :
The time required to accumulate a phone equivalent charge in the Photon's battery may vary depending on the phone to be charged. Here are a few examples.
Please note that the charging speed of the Photon in the sun can vary greatly with charging conditions. The above charging times are given for optimal tilt and at an ambient temperature of 25°C.
In the case of excessive heat, one or more shaded cells, movement, positioning behind glass, ... these performances can be greatly reduced. Please refer to FAQ question "How can I get the optimal charge experience ?"
When charging your device with the Photon (if the Photon is pre-charged) :
The charging time needed to charge your device with the Photon (if the Photon is already 100% pre-charged) will also vary according to your device. One can assume an approximate 1h30 / 2'000 mAh charging speed.
The Photon has 5 charging indicator LEDs as depicted below.
Please be aware that the first 4 BLUE LED lights (on the left) indicate the charge status of the Photon's integrated powerbank. The fifth GREEN LED light (on the right) indicates that the Photon is charging in the sun.
When the 4 blue LED lights are on, it means the Photon is 100% charged.
To summarise (approximate figures) :
- 0 LED : 0%
- 1 LED : 1%-29%
- 2 LED : 30% - 69%
- 3 LED : 70%-99%
- 4 LED : 100%
The fourth LED light can take more time to light on as the charging speed slows down at the end of the charging cycle. Please consider this when charging in the sun as the fourth LED light can take a long time before going on.
Yes,
you do not have to worry about the strength of the leather attachment loop of the Photon. We have tested it and it withstands a 9kg traction without breaking. Click here to watch the test.
We are sorry for that. It occurs sometimes that one looses the part of the Photon's 3-in-1 universal cable.
You can still use your Photon with any other USB cable. In case you want to re-order a cable, you can order directly on our website by clicking here .
The universal 3-in-1 cable, included with the Photon, cannot charge all iPads®. By iPad®, one means the tablets from the Apple® brand.
In case this happens to your iPad®, please try with your usual cable.
In case your Photon presents a distortion (swelling, puncture, crack in the battery), please isolate it from other ingnitable products and contact us at service@sunslice-solar.com .
We will explain you how to get rid of it safely and ecologically.
No matching information found for this product.
FUSION FLEX 6
Manuals & Downloads
Product Questions & Troubleshooting
Please read the USER MANUAL carefully. A detailed explanation is given on how to use it.
You can find the user manuals below
No matching information found for this product.
FUSION FLEX 12
Manuals & Downloads
Product Questions & Troubleshooting
Please read the USER MANUAL carefully. A detailed explanation is given on how to use it.
You can find the user manuals below
No matching information found for this product.
FUSION FLEX 18
Manuals & Downloads
Product Questions & Troubleshooting
Please read the USER MANUAL carefully. A detailed explanation is given on how to use it.
You can find the user manuals below
No matching information found for this product.
FUSION FLEX 24
Manuals & Downloads
Product Questions & Troubleshooting
Please read the USER MANUAL carefully. A detailed explanation is given on how to use it.
You can find the user manuals below
The Fusion FLEX 24 can charge different products.
Hereunder is a table that explains the different compatibilities of the Fusion Flex 24.
Please consider the compatibility of the USB-C port is different than the compatibility of the USB-A port.
You need to use the USB-C to USB-A cable. Plug the USB-A end into the Fusion Flex 24 and then the USB-C end into the USB-C port of the Gravity 100. Please do NOT use the USB-C to USB-C cable supplied with the Gravity 100 to charge the Gravity 100 from the Fusion Flex 24's USB-C port. You can use it to charge the Gravity 100 with the Emperion fast charger or any other USB-C charger.
This image shows the setup :
No matching information found for this product.
FUSION FLEX 48
Manuals & Downloads
Product Questions & Troubleshooting
Please read the USER MANUAL carefully. A detailed explanation is given on how to use it.
You can find the user manuals below
The Fusion FLEX 48 can charge different products.
Hereunder is a table that explains the different compatibilities of the Fusion Flex 48.
Please consider the compatibility of the USB-C port is different than the compatibility of the USB-A ports and the DC 5521 port.
The DC 5521 is a non regulated output port that can mainly charge powerstations such as the Sunslice Gravity 144 and Sunslice Gravity 432.
You need to use the USB-C to USB-A cable. Plug the USB-A end into the Fusion Flex 48 and then the USB-C end into the USB-C port of the Gravity 100. Please do NOT use the USB-C to USB-C cable supplied with the Gravity 100 to charge the Gravity 100 from the Fusion Flex 48's USB-C port. You can use it to charge the Gravity 100 with the Emperion fast charger or any other USB-C charger.
This image shows the setup :
No matching information found for this product.
FUSION CORE 10
Manuals & Downloads
Product Questions & Troubleshooting
No additional product-specific questions are currently listed.
No matching information found for this product.
FUSION CORE 22
Manuals & Downloads
Product Questions & Troubleshooting
No additional product-specific questions are currently listed.
No matching information found for this product.
FUSION 40
Manuals & Downloads
Product Questions & Troubleshooting
No additional product-specific questions are currently listed.
No matching information found for this product.
FUSION 60
Manuals & Downloads
Product Questions & Troubleshooting
No additional product-specific questions are currently listed.
No matching information found for this product.
FUSION 100
Manuals & Downloads
Product Questions & Troubleshooting
Please read the USER MANUAL carefully. A detailed explanation is given on how to use it.
You can find the user manuals below
No matching information found for this product.
FUSION 150
Manuals & Downloads
Product Questions & Troubleshooting
No additional product-specific questions are currently listed.
No matching information found for this product.
FUSION 200
Manuals & Downloads
Product Questions & Troubleshooting
No additional product-specific questions are currently listed.
No matching information found for this product.
FUSION 440
Manuals & Downloads
Product Questions & Troubleshooting
No additional product-specific questions are currently listed.
No matching information found for this product.
JUNCTION BOX
Manuals & Downloads
Product Questions & Troubleshooting
No additional product-specific questions are currently listed.
No matching information found for this product.
ZENITH
Manuals & Downloads
Product Questions & Troubleshooting
Please read the USER MANUAL carefully. A detailed explanation is given on how to use it.
You can find the user manuals below
No matching information found for this product.
CYCLOTRON
Manuals & Downloads
Product Questions & Troubleshooting
Please read the USER MANUAL carefully. A detailed explanation is given on how to use it.
You can find the user manuals below
The Cyclotron allows wireless charging. How to use it ?
- First, place your phone on the Cyclotron, into the brackets.
- Push the POWER button to activate the wireless charging function.
- Your phone will start charging wirelessly.
In case it does not work , please check the following aspects :
- Be sure your phone allows wireless charging. Please refer to its user manual.
If your phone allows wireless charging :
- If your phone has a protective case, remove it and try again.
- If a metal plate is stuck to the back of your phone, remove it and try again.
- If the blue LED lights still do not turn on, please ensure you have pushed the POWER button on the right side of the Cyclotron.
The Cyclotron allows smartphones with dimensions :
Width : 70 to 105 mm
Length : no limit
Thickness : 1 to 12 mm
No matching information found for this product.
HADRON
Manuals & Downloads
Product Questions & Troubleshooting
Please read the USER MANUAL carefully. A detailed explanation is given on how to use it.
You can find the user manuals below
The Hadron automatically includes an EU plug . In case you need a US, CH or GB plug, please reach out to us at service@sunslice-solar.com .
In any case, the Hadron can be charged via its USB-C input with a standard USB-C cable.
No matching information found for this product.
GRAVITY 5
Manuals & Downloads
Product Questions & Troubleshooting
Please read the USER MANUAL carefully. A detailed explanation is given on how to use it.
You can find the user manuals below
No matching information found for this product.
GRAVITY 10
Manuals & Downloads
Product Questions & Troubleshooting
Please read the USER MANUAL carefully. A detailed explanation is given on how to use it.
You can find the user manuals below
No matching information found for this product.
GRAVITY 20
Manuals & Downloads
Product Questions & Troubleshooting
Please read the USER MANUAL carefully. A detailed explanation is given on how to use it.
You can find the user manuals below
No matching information found for this product.
GRAVITY 10 EXTREME
Manuals & Downloads
Product Questions & Troubleshooting
No additional product-specific questions are currently listed.
No matching information found for this product.
GRAVITY 20 EXTREME PRO
Manuals & Downloads
Product Questions & Troubleshooting
No additional product-specific questions are currently listed.
No matching information found for this product.
GRAVITY 100
Manuals & Downloads
Product Questions & Troubleshooting
Please read the USER MANUAL carefully. A detailed explanation is given on how to use it.
You can find the user manuals below
You can order the Gravity 100 with an adaptor set. This adaptor set will allow a universal compatibility with all laptops.
The adaptor set is available on the Gravity 100 product page (dropdown menu).
No matching information found for this product.
GRAVITY 27
Manuals & Downloads
Product Questions & Troubleshooting
No additional product-specific questions are currently listed.
No matching information found for this product.
GRAVITY 27 PRO
Manuals & Downloads
Product Questions & Troubleshooting
No additional product-specific questions are currently listed.
No matching information found for this product.
GRAVITY 40
Manuals & Downloads
Product Questions & Troubleshooting
No additional product-specific questions are currently listed.
No matching information found for this product.
GRAVITY 144
Manuals & Downloads
Product Questions & Troubleshooting
Please read the USER MANUAL carefully. A detailed explanation is given on how to use it.
You can find the user manuals below
No matching information found for this product.
GRAVITY 486
Manuals & Downloads
Product Questions & Troubleshooting
No additional product-specific questions are currently listed.
No matching information found for this product.
GRAVITY 432
Manuals & Downloads
Product Questions & Troubleshooting
Please read the USER MANUAL carefully. A detailed explanation is given on how to use it.
You can find the user manuals below
No matching information found for this product.
GRAVITY 756
Manuals & Downloads
Product Questions & Troubleshooting
Please read the USER MANUAL carefully. A detailed explanation is given on how to use it.
You can find the user manuals below
Quick Diagnosis :
You may not have activated the AC function (function that activates the sockets on the back). To do this, you need to press the G button for 3 seconds as indicated in the user manual. The necessary information about this are circled in green in the pictures below:
You will find the schematic on page 4 of the user manual.
If it still does not work, please read the user manual again carefully before contacting us.
No matching information found for this product.
LINKPOWER BACKPACK
Manuals & Downloads
Product Questions & Troubleshooting
No additional product-specific questions are currently listed.
No matching information found for this product.
LINKPOWER MINI FLIGHTCASE
Manuals & Downloads
Product Questions & Troubleshooting
No additional product-specific questions are currently listed.
No matching information found for this product.
LINKPOWER PRO FLIGHTCASE
Manuals & Downloads
Product Questions & Troubleshooting
No additional product-specific questions are currently listed.
No matching information found for this product.
FLIGHT CASE
Manuals & Downloads
Product Questions & Troubleshooting
No additional product-specific questions are currently listed.
No matching information found for this product.
VOLTA WALLET
Manuals & Downloads
Product Questions & Troubleshooting
No additional product-specific questions are currently listed.
No matching information found for this product.
GRAVITY 2232
Manuals & Downloads
Product Questions & Troubleshooting
No additional product-specific questions are currently listed.
No matching information found for this product.
BLUETTI AC200MAX- PORTABLE SOLAR GENERATOR
Manuals & Downloads
As an official distributor of Bluetti in Europe, Sunslice engineers have translated the official Bluetti manuals in French for the convenience of our french speaking clients.
This manual is available on demand, exclusively for Sunslice clients having purchased the corresponding Bluetti product.
Please contact us at contact@sunslice-solar.com with your order number, we will be happy to send you your copy.
Watch this video for a quick start :
https://www.youtube.com/watch?v=tk1oAASkuSU
More information is available in the USER MANUAL
Product Questions & Troubleshooting
Please read the USER MANUAL carefully. A detailed explanation is given on how to use it.
You can find the user manuals below
Please watch this video :
https://www.youtube.com/watch?v=Fl2f6yzv1NY
From 0.00 to 0.38 : Connecting 1 panel to the AC200 Max
From 0.38 to 1.04 : Connecting several panels to the AC200 Max
In case you want to connect the easy solar kit to your Bluetti generator, you can do it as described below.
If you want to use the Easy Solar Kit without the Bluetti generator, please check the FAQ on HOW TO USE MY EASY SOLAR KIT - QUICK INSTALLATION.
The first step below is in case you have already installed the Easy Solar Kit and plugged it into your wall socket.
In case the Easy Solar Kit is not installed yet, please go directly to the second step.
No matching information found for this product.
BLUETTI AC300- PORTABLE SOLAR GENERATOR
Manuals & Downloads
As an official distributor of Bluetti in Europe, Sunslice engineers have translated the official Bluetti manuals in French for the convenience of our french speaking clients.
This manual is available on demand, exclusively for Sunslice clients having purchased the corresponding Bluetti product.
Please contact us at contact@sunslice-solar.com with your order number, we will be happy to send you your copy.
Watch these videos for a quick start :
https://www.youtube.com/watch?v=kGKZG_HOFKQ
Product Questions & Troubleshooting
Please read the USER MANUAL carefully. A detailed explanation is given on how to use it.
You can find the user manuals below
Please watch this video :
https://www.youtube.com/watch?v=Fl2f6yzv1NY
From 0.00 to 0.38 : Connecting 1 panel to the AC200 Max
From 0.38 to 1.04 : Connecting several panels to the AC200 Max
In case you want to connect the easy solar kit to your Bluetti generator, you can do it as described below.
If you want to use the Easy Solar Kit without the Bluetti generator, please check the FAQ on HOW TO USE MY EASY SOLAR KIT - QUICK INSTALLATION.
The first step below is in case you have already installed the Easy Solar Kit and plugged it into your wall socket.
In case the Easy Solar Kit is not installed yet, please go directly to the second step.
1. Go to "settings" then "next" and confirm that the "Max Grid Input Current" is set to "15A".
2. Click on the central button and look at what it is to check that the central unit is detecting your B230 or B300 batteries in "battery information".
3. Navigate to "Alarm" and check that there is no current problem detected.
4. Navigate to "Data" and then "Alarm History" and check if there has been a recent problem recorded
These checks will allow you to establish whether something is wrong with the battery or if the problem lies somehwere else. After proceeding to these checks, if the problem persists, please contact us.
No matching information found for this product.
BLUETTI B230 - POWER PACK
Manuals & Downloads
Product Questions & Troubleshooting
Please read the USER MANUAL carefully. A detailed explanation is given on how to use it.
You can find the user manuals below
No matching information found for this product.
BLUETTI B300 - POWER PACK
Manuals & Downloads
Product Questions & Troubleshooting
Please read the USER MANUAL carefully. A detailed explanation is given on how to use it.
You can find the user manuals below
No matching information found for this product.
BLUETTI EP500 PRO - SOLAR GENERATOR
Manuals & Downloads
As an official distributor of Bluetti in Europe, Sunslice engineers have translated the official Bluetti manuals in French for the convenience of our french speaking clients.
This manual is available on demand, exclusively for Sunslice clients having purchased the corresponding Bluetti product.
Please contact us at contact@sunslice-solar.com with your order number, we will be happy to send you your copy.
Product Questions & Troubleshooting
Please read the USER MANUAL carefully. A detailed explanation is given on how to use it.
You can find the user manuals below
No matching information found for this product.
EASY SOLAR KIT
Manuals & Downloads
Product Questions & Troubleshooting
Please read the USER MANUAL carefully. A detailed explanation is given on how to use it.
You can find the user manuals below
The Easy Solar Kit has been designed in order to reduce the electricity bill of our Sunslice customers. It is a plug and play solar kit, very easy to install and to use.
The Easy Solar Kit on its own cannot store the energy that it produces. This energy is injected on the home-grid and needs to be consumed instantaneously by the devices connected to the grid. If no device is connected or if too much electricity is produced compared to the electricity that is consumed, this (surplus) energy is reinjected (for free) on the main grid.
So, which solution do we have to store this surplus energy ?
There is no automatic solution for this.
Though we can suggest a manual solution that will make you able to store the energy produced by the solar panel into a power station when you want (for example when you are away for a long time or when you want to store back up power in case of possible power outage)
The Bluetti power stations can store from 2kWh to 12.3 kWh energy. It is very easy to connect the Easy Solar Kits to these power stations.
How ?
1. Install your Easy Solar Kit in the initial setup (kit connected to the home-grid) : the user manual can be found here.
2. Disconnect the plug from the grid and also the MC4-cables from the micro-inverter.
3. Connect the MC4-cables to the Bluetti power station.
All the energy produced by the solar panel of the Easy Solar Kit will be stored into the power station.
When you want, you can connect your devices to the power station and you can also reconnect the Easy Solar Kit to the grid.
You can find a quick electronics installation guide for the Easy Solar Kit below.
Please also refer to the User Manual included in the packaging to set up the Easy Solar Kit .
No matching information found for this product.
PV200 - FOLDABLE SOLAR PANEL 200 WATTS
Manuals & Downloads
Product Questions & Troubleshooting
No additional product-specific questions are currently listed.
No matching information found for this product.
GRAVITY 1024
Manuals & Downloads
Product Questions & Troubleshooting
No additional product-specific questions are currently listed.
No matching information found for this product.
GRAVITY 2048
Manuals & Downloads
Product Questions & Troubleshooting
No additional product-specific questions are currently listed.
No matching information found for this product.
General Questions & Answers
Fatturazione e Fatture
Dovresti aver ricevuto un link alla tua fattura online nell'email di conferma dell'ordine:
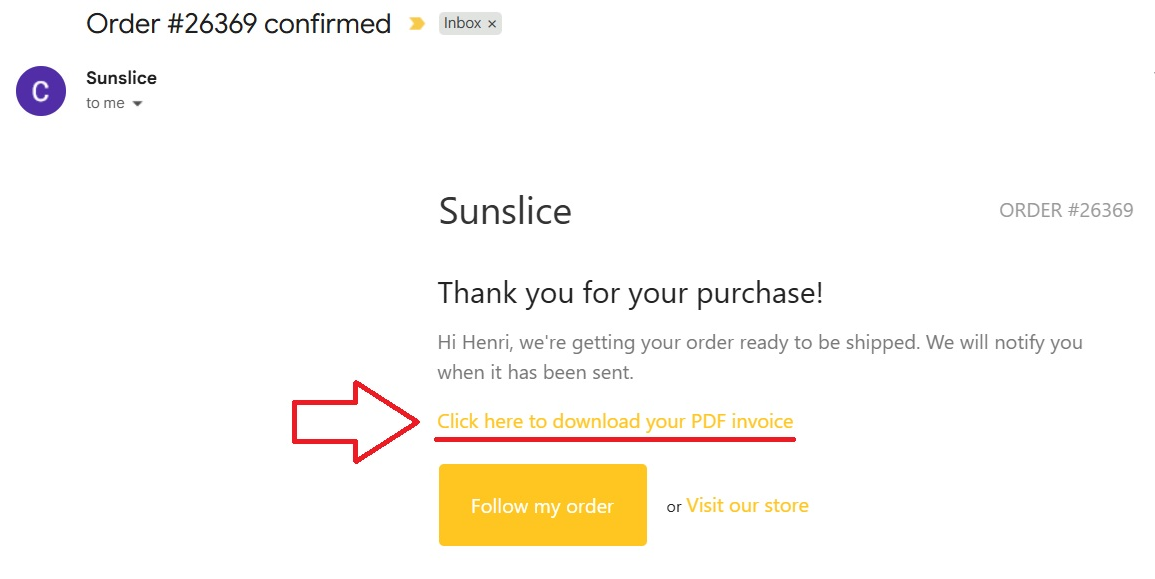
Se non riesci a trovare l'email di conferma:
- controlla la tua cartella spam
- assicurati di quale email hai usato durante il checkout sul nostro sito
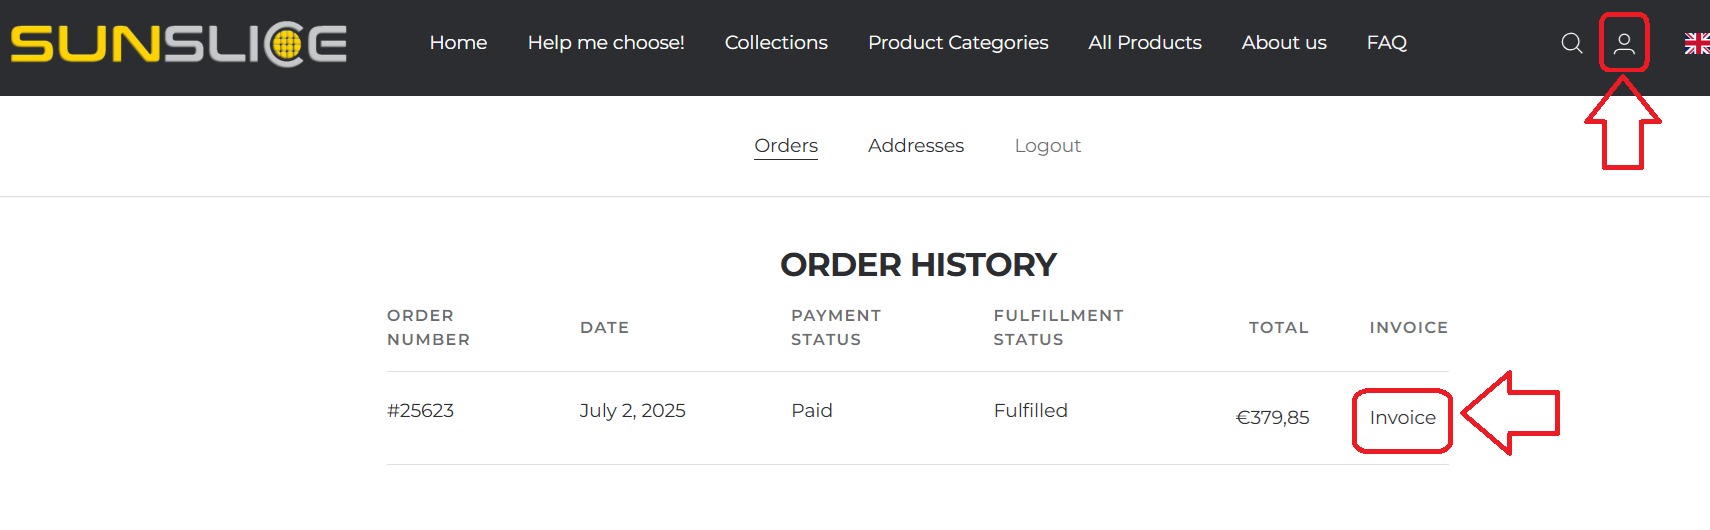
Puoi anche scaricare la tua fattura direttamente dal nostro sito web se hai creato un account cliente:
Per favore, scrivi il tuo numero di partita IVA dopo il nome della tua azienda (nello stesso campo), separato da un "-".
Per esempio:
Nome azienda: "Sunslice SRL - BE0680474695"
Si prega di contattarci all'indirizzo: sales@sunslice-solar.com
con le seguenti informazioni:
- Il tuo ordine (prodotti, colore)
- Dettagli aziendali (nome dell'azienda + persona di riferimento, partita IVA, indirizzo)
- Spedizione normale o espressa
Ti invieremo una fattura via email. Il tuo ordine può essere pagato al ricevimento della fattura.
Infatti, questo può accadere.
Di solito, alla ricezione possono essere richiesti due tipi di tasse:
- IVA
- Dazi doganali
Prima di effettuare il vostro ordine, vi preghiamo di contattarci a sales@sunslice-solar.com prima di procedere con il vostro ordine con le seguenti informazioni:
- Il vostro ordine (prodotti, colore)
- Dati aziendali (ragione sociale + persona di contatto, numero di partita IVA, indirizzo)
- Spedizione normale o espressa
Vi invieremo una fattura esente da IVA belga.
Si prega di notare che l'IVA (con l'aliquota del vostro paese) e i dazi doganali saranno comunque richiesti al ricevimento del vostro ordine.
Il nostro sito web consente:
- Pagamenti con carta di credito (VISA / MASTERCARD)
- Bancontact
- Paypal. Ti chiediamo gentilmente di considerare prima le due opzioni sopra indicate prima di procedere al pagamento con Paypal. Infatti, per i pagamenti con Paypal ci viene addebitata una commissione di transazione molto alta... Grazie mille!
Per transazioni bancarie, ti preghiamo di contattarci a sales@sunslice-solar.com prima di procedere con il tuo ordine con le seguenti informazioni:
- Il tuo ordine (prodotti, colore)
- Dati aziendali (nome azienda + persona di contatto, partita IVA, indirizzo)
- Spedizione normale o espressa
Ti invieremo una fattura via email. Il tuo ordine può essere pagato al ricevimento della fattura.
Domande Generali
Vuoi caricare un dispositivo specifico ma non sai quale prodotto Sunslice (caricatore solare, generatore, powerbank, ...) dovresti acquistare per poterlo fare?
Nessun problema :
1. Dai un'occhiata alle specifiche tecniche dei prodotti nelle loro pagine prodotto
2. Controlla se puoi trovare la risposta alla tua domanda in questa FAQ
3. Se ancora non lo sai, puoi inviarci un'email a contact@sunslice-solar.com
PER FAVORE aggiungi una foto del caricatore o dei caricatori del dispositivo o dei dispositivi che desideri poter alimentare. Il tuo caricatore sarà simile a questo, ad esempio, e dobbiamo poter leggere chiaramente le specifiche scritte sul caricatore.

In generale, tutti i prodotti Sunslice sono resistenti all'acqua. Ciò significa che possono essere utilizzati in condizioni di pioggia per un tempo ragionevole.
Nessuno dei nostri prodotti può essere legalmente classificato come impermeabile (IP67) poiché solitamente non abbiamo superato i test necessari per ottenere queste certificazioni. Perché? A causa del budget elevato, preferiamo destinare le risorse alla ricerca e sviluppo per migliorare efficacemente la resistenza all'acqua dei nostri prodotti. Tuttavia, i nostri prodotti possono essere utilizzati in condizioni di pioggia, salvo diversa indicazione nel manuale d’uso.
In generale:
- Prodotti contenenti una batteria
- Non devono essere immersi in acqua. Se ciò dovesse accadere e riuscite a recuperare il prodotto, asciugatelo completamente prima di accenderlo o utilizzarlo nuovamente. Se il caricatore continua a funzionare dopo l’asciugatura, i dispositivi che caricherete con il caricatore Sunslice non subiranno danni. Tuttavia, la durata del caricatore Sunslice potrebbe risentirne.
- Possono essere utilizzati in condizioni di pioggia, quindi non preoccupatevi se il vostro dispositivo resta appeso allo zaino durante un’escursione sotto la pioggia. Si consiglia comunque di asciugare il prodotto successivamente per preservarne la durata.
- Prodotti senza batteria
- Non temete le condizioni di umidità. Si consiglia comunque di asciugare i prodotti successivamente per preservarne la durata.
Nel caso in cui il tuo dispositivo impieghi più tempo per caricarsi al 100% con un caricatore Sunslice, ciò può essere dovuto a un malfunzionamento del caricatore o alle specifiche tecniche intrinseche del tuo dispositivo.
Ad esempio, uno smartphone con una batteria più grande impiegherà più tempo per caricarsi rispetto a uno con una batteria più piccola. Con il tempo, gli smartphone integrano batterie sempre più grandi, il che comporta tempi di ricarica più lunghi per i modelli recenti.
Ci impegniamo costantemente, attraverso una ricerca e sviluppo avanzata, a far evolvere i nostri prodotti in linea con gli sviluppi elettronici sul mercato.
Le caratteristiche quantitative dichiarate da Sunslice sui suoi prodotti utilizzano dispositivi standard (smartphone, fotocamere, tablet, ...) per il confronto, come fanno la maggior parte degli operatori nel settore della ricarica.
Si tenga presente che alcuni dispositivi (più recenti) possono differire leggermente o in modo più significativo dai dispositivi di confronto. Ad esempio, gli iPhone avranno specifiche diverse rispetto ai dispositivi Android, in base alla batteria integrata, al consumo energetico durante l’uso del telefono, alla velocità di ricarica, ecc. Anche i diversi modelli all’interno della stessa marca differiranno in queste specifiche.
Questa tabella dà un’idea del numero di ricariche di telefono che si possono ottenere con una powerbank da 4.000 mAh (ad esempio il Photon), a seconda del modello di telefono.

Si tenga presente che alcuni smartphone recenti non potranno essere caricati al 100% dal Photon, poiché hanno una capacità della batteria interna molto elevata.
Se sul tuo pannello solare appare un graffio, non preoccuparti. La maggior parte dei graffi non influisce sulla velocità di ricarica solare.
Se noti un cambiamento drastico nelle prestazioni solari, puoi contattarci all'indirizzo service@sunslice-solar.com.
Dipende.
Evitiamo di fornire cavi inutili poiché ciò contribuisce ai rifiuti elettronici. Quindi, se non è esplicitamente indicato che un cavo è incluso al momento dell'ordine o nella pagina del prodotto, nessun cavo sarà aggiunto al tuo ordine.
Nel caso in cui acquisti un cavo specifico sul nostro sito, ovviamente lo aggiungeremo al tuo ordine.
Le differenze tra la capacità nominale e quella effettiva di una power bank sono dovute a diversi fattori tecnici e pratici:
1. Conversione di tensione: La capacità nominale di una batteria è solitamente indicata in milliampere-ora (mAh) a una tensione specifica (spesso 3,7V, che è la tensione standard per le celle agli ioni di litio). Tuttavia, per caricare i dispositivi, questa tensione deve essere convertita a 5V, che è la tensione di uscita standard per le porte USB. Questa conversione provoca perdite di energia, riducendo la capacità effettivamente disponibile.
2. Efficienza di conversione: I circuiti interni della power bank convertono l’energia della batteria da 3,7V a 5V. Questa conversione non è efficiente al 100% e comporta una perdita di energia del 5-15%, o anche di più per modelli di qualità inferiore.
3. Resistenza interna: I componenti interni della power bank, inclusi cavi e connettori, causano perdite di energia dovute alla resistenza elettrica, specialmente quando la corrente è elevata. Questo riduce l’energia disponibile per il dispositivo in carica.
4. Temperatura: Durante la carica o la scarica, la batteria può riscaldarsi, causando ulteriori perdite di energia, in particolare se la power bank viene utilizzata in ambienti molto caldi o freddi.
5. Degradazione naturale della batteria: Nel tempo, le celle della batteria si degradano, riducendo la loro capacità massima. Una power bank più vecchia avrà quindi una capacità effettiva inferiore rispetto alla capacità nominale iniziale.
Questi fattori fanno sì che la capacità effettiva sia spesso inferiore a quella nominale indicata.
- Conservare sempre carico
- Ricaricare almeno ogni 3 mesi per evitare danni alla batteria
- In un luogo asciutto a temperatura ambiente
Comprendere i tempi di ricarica solare
Quando si ricarica un dispositivo con un pannello solare portatile, diversi fattori influenzano il tempo totale di ricarica. I nostri calcoli considerano l'output del pannello solare, le condizioni ambientali e le caratteristiche di ricarica di ogni dispositivo. Di seguito una panoramica degli elementi chiave che influenzano le prestazioni della ricarica solare.
0. Condizioni teoriche perfette
In un mondo perfetto e teorico, il calcolo del tempo di ricarica è molto semplice:
Tempo di ricarica = Capacità (Wh) / Potenza solare.
con Capacità (Wh) = Capacità (Ah) * 3,7V (esempio per smartphone: 3(000 m)Ah * 3,7V = 11 Wh
Ma tieni presente che, anche se questo è un modo molto rapido per avere una stima del tempo di ricarica, non è corretto perché non viviamo in un mondo teorico perfetto :-) Per evitare questo errore, e soprattutto per spiegare al meglio perché non è corretto, abbiamo scritto questo piccolo articolo qui sotto. Non preoccuparti se non riesci a calcolare i tempi di ricarica da solo nonostante la lettura dell'articolo: le stime dei tempi di ricarica sono riportate sotto l'articolo.
1. Potenza in uscita del pannello solare
Ogni pannello solare ha una potenza di picco nominale (ad esempio, 18W), ma la potenza effettiva fornita a un dispositivo dipende dalle condizioni reali. I fattori limitanti chiave includono:
Perdite di efficienza della luce solare
Non tutta la luce solare che raggiunge la Terra viene convertita in energia utilizzabile. Le perdite si verificano a causa di:
- Filtraggio atmosferico: l'angolo del sole, lo strato di ozono e altri effetti atmosferici riducono l'intensità della luce solare. Stimiamo una perdita del 10%.
- Inefficienze interne: la potenza è ulteriormente ridotta a causa della conversione USB (perdita dell'8%) e della resistenza del cavo (perdita del 2%).
Poiché queste perdite sono moltiplicative, il fattore di efficienza totale è:
(1−0,10)×(1−0,08)×(1−0,02)=0,81(1 - 0.10) \times (1 - 0.08) \times (1 - 0.02) = 0.81(1−0,10)×(1−0,08)×(1−0,02)=0,81
Ciò significa che la potenza effettiva disponibile dal pannello solare è:
Potenza di picco×0,81\text{Potenza di picco} \times 0,81Potenza di picco×0,81
Perdite dovute alla copertura nuvolosa
Nei giorni nuvolosi, meno luce solare raggiunge il pannello, riducendo ulteriormente l'efficienza. Stimiamo una perdita del 50% dovuta alle nuvole, che si somma alle inefficienze interne:
(1−0,50)×(1−0,08)×(1−0,02)=0,44(1 - 0.50) \times (1 - 0.08) \times (1 - 0.02) = 0.44(1−0,50)×(1−0,08)×(1−0,02)=0,44
Quindi la potenza effettiva disponibile in condizioni di nuvolosità è:
Potenza di picco×0,44\text{Potenza di picco} \times 0,44Potenza di picco×0,44
2. Limitazioni di ricarica del dispositivo
Ogni dispositivo ha una potenza massima di input, il che significa che può accettare solo una certa quantità di potenza alla volta.
- Una GoPro con una batteria da 1.500mAh (5,5Wh) ha un input massimo di 5W. Anche se il pannello solare fornisce più potenza, la GoPro non si caricherà più velocemente di 5W.
- Uno smartphone può accettare fino a 10-18W, a seconda delle sue capacità di ricarica rapida.
- Limitazione di uscita della porta USB: Anche se un pannello solare ha una potenza complessiva elevata, ogni porta USB ha un’uscita massima. Ad esempio, il Fusion Flex 18 ha due uscite USB-A, ciascuna limitata a 13,5W (5V/2,7A). Un dispositivo che richiede più potenza sarà limitato dall’uscita della porta.
3. Esempio pratico di ricarica
Esempio 1: Ricarica di una GoPro
Prendiamo il pannello solare Fusion Flex 18 (18W) che carica una GoPro con una batteria da 1.500mAh (5,5Wh) e un input massimo consentito dalla GoPro di 5W.
Passo 1: Calcolare la potenza solare reale dopo le perdite di efficienza della luce solare
Le perdite totali dovute all’efficienza della luce solare includono:
- Perdite dovute al filtraggio atmosferico: 10%
- Inefficienze interne (conversione USB + resistenza del cavo): 8% e 2%
Poiché queste perdite sono moltiplicative e non additive, il fattore di efficienza totale è:
(1−0,10)×(1−0,08)×(1−0,02)=0,81% --> perdite del 19%.
Questo significa che la potenza solare effettiva è:
18W × 0,81 = 14,58W
Passo 2: Verificare il limite di uscita della porta USB
- Ogni porta USB-A sul Fusion Flex 18 ha una potenza massima in uscita di 13,5W.
- Poiché 14,58W > 13,5W, la potenza effettivamente disponibile per porta USB è limitata a 13,5W.
Passo 3: Determinare la potenza di ricarica per la GoPro
- La GoPro ha un input massimo di ricarica di 5W, il che significa che non può caricarsi più velocemente di 5W.
- Poiché 5W è inferiore ai 13,5W disponibili, la GoPro si caricherà a 5W.
Passo 4: Calcolare il tempo di ricarica
- Tempo di ricarica in piena luce solare: 5,5Wh/5W=1,1 ore5,5Wh / 5W = 1,1 \text{ ore}5,5Wh/5W=1,1 ore
Passo 5: Regolare per condizioni di cielo nuvoloso
La copertura nuvolosa introduce ulteriori perdite del 50%, che si sommano alle inefficienze interne. Il fattore di efficienza totale diventa:
(1−0,50)×(1−0,08)×(1−0,02)=0,44
Potenza solare effettiva in condizioni di cielo nuvoloso=18W×0,44=7,92W
- Si applica ancora il limite della porta USB di 13,5W, ma poiché 7,92W < 13,5W, la potenza effettivamente disponibile è 7,92W.
- Poiché 7,92W > 5W, la GoPro si ricarica ancora a 5W.
- Il tempo di ricarica rimane: ~1,1 ore.
Esempio 2: Ricarica di uno smartphone
Ora, prendiamo il Fusion Flex 12 (12W) che ricarica uno smartphone con batteria da 3.000mAh (11,1Wh) e un ingresso massimo di ricarica di 18W.
Passo 1: Calcolare la potenza solare reale dopo le perdite di efficienza della luce solare
Il Fusion Flex 12 ha una potenza di picco di 12W. Applicando il fattore di efficienza totale di 0,81 (considerando perdite atmosferiche e interne):
Potenza solare effettiva=12W×0,81=9,72W
Passo 2: Verificare il limite di uscita della porta USB
- Ogni porta USB-A sul Fusion Flex 12 ha una potenza massima di uscita di 12W (5V/2,4A).
- Poiché 9,72W < 12W, la potenza effettivamente disponibile rimane 9,72W (limitata dall’efficienza della luce solare, non dalla porta).
Passo 3: Determinare la potenza di ricarica per lo smartphone
- Lo smartphone ha un ingresso massimo di ricarica di 18W, il che significa che può caricarsi a fino a 18W se è disponibile abbastanza potenza.
- La potenza disponibile è solo 9,72W, inferiore ai 18W che lo smartphone può accettare.
- Potenza finale di ricarica: 9,72W (limitata dalla potenza solare disponibile).
Passo 4: Calcolare il tempo di ricarica
- Tempo di ricarica in pieno sole: 11,1Wh / 9,72W = 1,14 ore
Passo 5: Regolare per condizioni di cielo nuvoloso
Utilizzando il fattore di efficienza totale di 0,44 (copertura nuvolosa + perdite interne):
Potenza solare effettiva=12W×0,44=5,28W
-
Si applica ancora il limite della porta USB (12W), ma poiché 5,28W < 12W, la potenza effettivamente disponibile è 5,28W.
-
Lo smartphone può accettare più di 5,28W, quindi si ricarica a 5,28W.
-
Tempo di ricarica in condizioni di cielo nuvoloso:
11,1Wh / 5,28W = 2,1 ore
Poiché le condizioni di sole non sono mai realmente al 100%, si può supporre che il tempo di ricarica per uno smartphone sarà compreso tra 1,14 e 2,1 ore.
Spedizione
Possiamo spedire in tutto il mondo grazie a BPOST, il nostro partner di distribuzione di fiducia.
Si prega di notare che diverse aree sono soggette a tariffe di spedizione differenti e che potrebbero essere applicate tasse di importazione.
Afghanistan, Isole Åland, Albania, Algeria, Samoa Americane, Andorra, Angola, Anguilla, Antartide, Antigua e Barbuda, Argentina, Armenia, Aruba, Ascensione, Asia/Medio Oriente, Asia/Medio Oriente/Nord Africa, Australia, Austria, Azerbaigian, Bahamas, Bahrain, Bangladesh, Barbados, Bielorussia, Belgio, Belize, Benin, Bermuda, Bhutan, Bolivia, Bonaire, Saint Eustatius e Saba, Bosnia ed Erzegovina, Botswana, Isola Bouvet, Brasile, Territorio Britannico dell’Oceano Indiano, Brunei Darussalam, Bulgaria, Burkina Faso, Burundi, Cambogia, Camerun, Canada, Isole Canarie, Capo Verde, Isole Cayman, Repubblica Centrafricana, Ceuta, Ciad, Cile, Cina, Isola di Natale, Isole Cocos (Keeling), Colombia, Comore, Congo, Repubblica Democratica del Congo, Isole Cook, Costa Rica, Croazia, Cuba, Curaçao, Cipro, Repubblica Ceca, Danimarca, Gibuti, Dominica, Repubblica Dominicana, Ecuador, Egitto, El Salvador, Guinea Equatoriale, Eritrea, Estonia, Etiopia, Unione Europea, Isole Falkland (Malvine), Isole Faroe, Fiji, Finlandia, Francia, Guyana Francese, Polinesia Francese, Territori Francesi del Sud, Gabon, Gambia, Georgia, Germania, Ghana, Gibilterra, Gran Bretagna, Grecia, Groenlandia, Grenada, Guadalupa, Guam, Guatemala, Guernsey, Guinea, Guinea-Bissau, Guyana, Haiti, Isole Heard e McDonald, Santa Sede (Stato della Città del Vaticano), Honduras, Hong Kong, Ungheria, Islanda, India, Indonesia, Iran, Iraq, Irlanda, Isola di Man, Israele, Italia, Costa d’Avorio, Giamaica, Giappone, Jersey, Giordania, Kazakistan, Kenya, Kiribati, Corea del Nord, Corea del Sud, Kosovo, Kuwait, Kirghizistan, Repubblica Democratica Popolare del Laos, Lettonia, Libano, Lesotho, Liberia, Jamahiriya Araba Libica, Liechtenstein, Lituania, Livigno, Lussemburgo, Macao, Macedonia, Madagascar, Malawi, Malesia, Maldive, Mali, Malta, Isole Marshall, Martinica, Mauritania, Mauritius, Mayotte, Melilla, Messico, Micronesia (Stati Federati di), Moldavia, Monaco, Mongolia, Montenegro, Montserrat, Marocco, Mozambico, Myanmar, Namibia, Nauru, Nepal, Paesi Bassi, Antille Olandesi, Nuova Caledonia, Nuova Zelanda, Nicaragua, Niger, Nigeria, Niue, Paesi non appartenenti all’Unione Europea, Isola Norfolk, Nord Africa, Isole Marianne Settentrionali, Norvegia, Oman, Pakistan, Palau, Territorio Palestinese Occupato, Panama, Papua Nuova Guinea, Paraguay, Perù, Filippine, Pitcairn, Polonia, Portogallo, Porto Rico, Qatar, Resto dell’Africa, Resto dell’Europa, Resto del mondo, Riunione, Romania, Russia, Ruanda, Sant’Elena, Saint Kitts e Nevis, Santa Lucia, Saint Martin, Saint Pierre e Miquelon, Saint Vincent e Grenadine, Samoa, San Marino, São Tomé e Príncipe, Arabia Saudita, Senegal, Serbia, Seychelles, Sierra Leone, Singapore, Slovacchia, Slovenia, Isole Salomone, Somalia, Sudafrica, Georgia del Sud e Isole Sandwich Meridionali, Spagna, Sri Lanka, Sudan, Sudan del Sud, Suriname, Svalbard e Jan Mayen, Swaziland, Svezia, Svizzera, Repubblica Araba Siriana, Taiwan (Provincia della Cina), Tagikistan, Tanzania (Repubblica Unita di), Thailandia, Timor Est, Togo, Tokelau, Tonga, Trinidad e Tobago, Tunisia, Turchia, Turkmenistan, Isole Turks e Caicos, Tuvalu, Uganda, Ucraina, Emirati Arabi Uniti, Stati Uniti, Isole Minori Esterne degli Stati Uniti, Uruguay, Uzbekistan, Vanuatu, Venezuela, Vietnam, Isole Vergini Britanniche, Isole Vergini Americane, Wallis e Futuna, Sahara Occidentale, Yemen, Zambia, Zimbabwe
Facciamo del nostro meglio per spedire i tuoi ordini il più rapidamente possibile!
Per le consegne in Belgio, di solito ci vogliono tra 24 e 72 ore.
Per gli altri paesi europei, i tempi variano da 3 a 7 giorni a seconda della velocità dei servizi locali.
Per gli Stati Uniti, i tempi di consegna sono generalmente tra 4 e 7 giorni.
Si prega di notare che possono verificarsi ritardi dovuti ai servizi postali, che sono fuori dal nostro controllo nonostante i nostri migliori sforzi!
Durante la stagione di punta (specialmente a fine anno), i ritardi possono essere più lunghi a causa dell’elevato volume gestito dai nostri partner logistici e trasportatori.
Per offrire ai nostri clienti le tariffe di spedizione più vantaggiose, utilizziamo principalmente il servizio postale internazionale BPost. Per spedizioni espresse o "spedizioni con scadenza precisa", seleziona "consegna espressa UPS" o "spedizione accelerata" nelle impostazioni del checkout.
Dopo aver effettuato il tuo ordine, dovresti aver ricevuto una email di conferma automatica da parte nostra.
In questa email, puoi cliccare sul link "Segui il mio ordine" per accedere allo stato del tuo ordine e agli aggiornamenti di tracciamento.
Ci scusiamo molto per il ritardo.
Ti preghiamo di considerare di attendere 2-3 giorni prima di preoccuparti. Di solito spediamo entro 24 ore dal ricevimento dell'ordine, ma a volte può essere necessario un po' più di tempo.
Per favore, controlla prima il link di tracciamento incluso nell'email di conferma che dovresti aver ricevuto quando abbiamo spedito il tuo ordine. Potrebbe anche trovarsi in un'altra email, inviata da noi o dal nostro corriere o partner logistico.
Controlla la cartella spam nel caso non trovassi alcuna email con il link di tracciamento.
Se il link di tracciamento del tuo ordine indica che la spedizione non si è spostata da una fase all'altra da più di 10 giorni lavorativi, ti preghiamo di contattarci all'indirizzo service@sunslice-solar.com.
No matching questions found.
Still need help?
Contact the Sunslice team and we'll be happy to help.