
Help Center
Find product manuals, troubleshooting help, and answers to common questions.
Product Support
BLUETTI AC200MAX- PORTABLE SOLAR GENERATOR
Manuals & Downloads
Frequently Asked Questions
Bitte lesen Sie die BEDIENUNGSANLEITUNG sorgfältig durch. Eine ausführliche Erklärung zur Nutzung ist enthalten.
Die Bedienungsanleitungen finden Sie unten
Sehen Sie sich dieses Video für einen schnellen Einstieg an:
https://www.youtube.com/watch?v=tk1oAASkuSU
Weitere Informationen finden Sie im BENUTZERHANDBUCH
Bitte sehen Sie sich dieses Video an:
https://www.youtube.com/watch?v=Fl2f6yzv1NY
Von 0:00 bis 0:38: Anschluss eines Panels an den AC200 Max
Von 0:38 bis 1:04: Anschluss mehrerer Panels an den AC200 Max
Falls Sie das Easy Solar Kit mit Ihrem Bluetti-Generator verbinden möchten, können Sie dies wie unten beschrieben tun.
Wenn Sie das Easy Solar Kit ohne den Bluetti-Generator verwenden möchten, lesen Sie bitte die FAQ unter WIE ICH MEIN EASY SOLAR KIT BENUTZE – SCHNELLE INSTALLATION.
Der erste Schritt unten gilt, wenn Sie das Easy Solar Kit bereits installiert und an Ihre Steckdose angeschlossen haben.
Falls das Easy Solar Kit noch nicht installiert ist, gehen Sie bitte direkt zum zweiten Schritt.


No matching questions found.
BLUETTI AC300- PORTABLE SOLAR GENERATOR
Manuals & Downloads
Frequently Asked Questions
Bitte lesen Sie die BEDIENUNGSANLEITUNG sorgfältig durch. Eine ausführliche Erklärung zur Nutzung ist enthalten.
Die Bedienungsanleitungen finden Sie unten
Sehen Sie sich diese Videos für einen schnellen Einstieg an:
https://www.youtube.com/watch?v=kGKZG_HOFKQ
Bitte sehen Sie sich dieses Video an:
https://www.youtube.com/watch?v=Fl2f6yzv1NY
Von 0:00 bis 0:38: Anschluss eines Panels an den AC200 Max
Von 0:38 bis 1:04: Anschluss mehrerer Panels an den AC200 Max
Falls Sie das Easy Solar Kit mit Ihrem Bluetti-Generator verbinden möchten, können Sie dies wie unten beschrieben tun.
Wenn Sie das Easy Solar Kit ohne den Bluetti-Generator verwenden möchten, lesen Sie bitte die FAQ unter WIE MAN MEIN EASY SOLAR KIT VERWENDET – SCHNELLE INSTALLATION.
Der erste Schritt unten gilt, wenn Sie das Easy Solar Kit bereits installiert und an Ihre Steckdose angeschlossen haben.
Falls das Easy Solar Kit noch nicht installiert ist, gehen Sie bitte direkt zum zweiten Schritt.

1. Gehen Sie zu „Einstellungen“, dann „Weiter“ und bestätigen Sie, dass der „Maximale Netzeingangsstrom“ auf „15A“ eingestellt ist.
2. Drücken Sie die mittlere Taste und prüfen Sie unter „Batterieinformationen“, ob die Zentraleinheit Ihre B230- oder B300-Batterien erkennt.
3. Navigieren Sie zu „Alarm“ und überprüfen Sie, ob kein aktuelles Problem erkannt wird.
4. Gehen Sie zu „Daten“ und dann zu „Alarmverlauf“ und prüfen Sie, ob kürzlich ein Problem aufgezeichnet wurde.
Diese Überprüfungen helfen Ihnen festzustellen, ob ein Problem mit der Batterie vorliegt oder ob die Ursache woanders liegt. Wenn das Problem nach diesen Schritten weiterhin besteht, kontaktieren Sie uns bitte.
No matching questions found.
BLUETTI B230 - POWER PACK
Manuals & Downloads
Frequently Asked Questions
Bitte lesen Sie die BEDIENUNGSANLEITUNG sorgfältig durch. Eine ausführliche Erklärung zur Nutzung ist enthalten.
Die Bedienungsanleitungen finden Sie unten
No matching questions found.
BLUETTI B300 - POWER PACK
Manuals & Downloads
Frequently Asked Questions
Bitte lesen Sie die BEDIENUNGSANLEITUNG sorgfältig durch. Eine ausführliche Erklärung zur Nutzung ist enthalten.
Die Bedienungsanleitungen finden Sie unten
No matching questions found.
BLUETTI EP500 PRO - SOLAR GENERATOR
Manuals & Downloads
Frequently Asked Questions
Bitte lesen Sie die BEDIENUNGSANLEITUNG sorgfältig durch. Eine ausführliche Erklärung zur Nutzung ist enthalten.
Die Bedienungsanleitungen finden Sie unten


No matching questions found.
CYCLOTRON
Manuals & Downloads
Frequently Asked Questions
Bitte lesen Sie die BEDIENUNGSANLEITUNG sorgfältig durch. Eine ausführliche Erklärung zur Nutzung ist enthalten.
Die Bedienungsanleitungen finden Sie unten
Der Cyclotron ermöglicht kabelloses Laden. Wie benutzt man ihn?
- Legen Sie zuerst Ihr Telefon in die Halterungen auf den Cyclotron.
- Drücken Sie die POWER-Taste, um die Funktion für kabelloses Laden zu aktivieren.
- Ihr Telefon beginnt mit dem kabellosen Laden.

Falls es nicht funktioniert, überprüfen Sie bitte die folgenden Punkte:
- Stellen Sie sicher, dass Ihr Telefon kabelloses Laden unterstützt. Bitte lesen Sie dazu die Bedienungsanleitung.
Wenn Ihr Telefon kabelloses Laden unterstützt:
- Wenn Ihr Telefon eine Schutzhülle hat, entfernen Sie diese und versuchen Sie es erneut.
- Wenn eine Metallplatte auf der Rückseite Ihres Telefons klebt, entfernen Sie diese und versuchen Sie es erneut.
- Wenn die blaue LED immer noch nicht leuchtet, stellen Sie bitte sicher, dass Sie die POWER-Taste auf der rechten Seite des Cyclotron gedrückt haben.
Der Cyclotron eignet sich für Smartphones mit folgenden Abmessungen:
Breite: 70 bis 105 mm
Länge: keine Begrenzung
Dicke: 1 bis 12 mm
No matching questions found.
EASY SOLAR KIT
Manuals & Downloads
Frequently Asked Questions
Bitte lesen Sie die BEDIENUNGSANLEITUNG sorgfältig durch. Eine ausführliche Erklärung zur Nutzung ist enthalten.
Die Bedienungsanleitungen finden Sie unten
Das Easy Solar Kit wurde entwickelt, um die Stromrechnung unserer Sunslice-Kunden zu senken. Es ist ein Plug-and-Play-Solarkit, das sehr einfach zu installieren und zu verwenden ist.
Das Easy Solar Kit kann die erzeugte Energie nicht selbst speichern. Diese Energie wird ins Hausnetz eingespeist und muss sofort von den an das Netz angeschlossenen Geräten verbraucht werden. Wenn kein Gerät angeschlossen ist oder zu viel Strom im Vergleich zum Verbrauch erzeugt wird, wird diese (überschüssige) Energie kostenlos ins Hauptnetz zurückgespeist.
Welche Lösung gibt es also, um diese überschüssige Energie zu speichern?
Es gibt keine automatische Lösung dafür.
Wir können jedoch eine manuelle Lösung vorschlagen, mit der Sie die vom Solarpanel erzeugte Energie in einer Powerstation speichern können, wann immer Sie möchten (zum Beispiel, wenn Sie längere Zeit abwesend sind oder eine Notstromversorgung für mögliche Stromausfälle speichern wollen).
Die Bluetti Powerstations können zwischen 2 kWh und 12,3 kWh Energie speichern. Es ist sehr einfach, die Easy Solar Kits mit diesen Powerstations zu verbinden.
Wie?
1. Installieren Sie Ihr Easy Solar Kit in der Erstinstallation (Kit an das Hausnetz angeschlossen): Die Bedienungsanleitung finden Sie hier.
2. Trennen Sie den Stecker vom Netz und auch die MC4-Kabel vom Mikro-Wechselrichter.
3. Verbinden Sie die MC4-Kabel mit der Bluetti Powerstation.
Die gesamte vom Solarpanel des Easy Solar Kits erzeugte Energie wird in der Powerstation gespeichert.
Wenn Sie möchten, können Sie Ihre Geräte an die Powerstation anschließen und das Easy Solar Kit wieder mit dem Netz verbinden.
Unten finden Sie eine schnelle Installationsanleitung für die Elektronik des Easy Solar Kits.
Bitte beachten Sie auch das im Lieferumfang enthaltene Benutzerhandbuch, um das Easy Solar Kit einzurichten.
No matching questions found.
ELECTRON
Manuals & Downloads
Frequently Asked Questions
No questions have been added for this product yet.
No matching questions found.
EMPERION 45 MINI
Manuals & Downloads
Frequently Asked Questions
No questions have been added for this product yet.
No matching questions found.
EMPERION 65 PRO
Manuals & Downloads
Frequently Asked Questions
No questions have been added for this product yet.
No matching questions found.
FLIGHT CASE
Manuals & Downloads
Frequently Asked Questions
No questions have been added for this product yet.
No matching questions found.
FUSION 100
Manuals & Downloads
Frequently Asked Questions
Bitte lesen Sie die BEDIENUNGSANLEITUNG sorgfältig durch. Eine ausführliche Erklärung zur Nutzung ist enthalten.
Die Bedienungsanleitungen finden Sie unten
No matching questions found.
FUSION 150
Manuals & Downloads
Frequently Asked Questions
No questions have been added for this product yet.
No matching questions found.
FUSION 200
Manuals & Downloads
Frequently Asked Questions
No questions have been added for this product yet.
No matching questions found.
FUSION 40
Manuals & Downloads
Frequently Asked Questions
No questions have been added for this product yet.
No matching questions found.
FUSION 440
Manuals & Downloads
Frequently Asked Questions
No questions have been added for this product yet.
No matching questions found.
FUSION 60
Manuals & Downloads
Frequently Asked Questions
No questions have been added for this product yet.
No matching questions found.
FUSION CORE 10
Manuals & Downloads
Frequently Asked Questions
No questions have been added for this product yet.
No matching questions found.
FUSION CORE 22
Manuals & Downloads
Frequently Asked Questions
No questions have been added for this product yet.
No matching questions found.
FUSION FLEX 12
Manuals & Downloads
Frequently Asked Questions
Bitte lesen Sie die BEDIENUNGSANLEITUNG sorgfältig durch. Eine ausführliche Erklärung zur Nutzung ist enthalten.
Die Bedienungsanleitungen finden Sie unten
No matching questions found.
FUSION FLEX 18
Manuals & Downloads
Frequently Asked Questions
Bitte lesen Sie die BEDIENUNGSANLEITUNG sorgfältig durch. Eine ausführliche Erklärung zur Nutzung ist enthalten.
Die Bedienungsanleitungen finden Sie unten
No matching questions found.
FUSION FLEX 24
Manuals & Downloads
Frequently Asked Questions
Bitte lesen Sie die BEDIENUNGSANLEITUNG sorgfältig durch. Eine ausführliche Erklärung zur Nutzung ist enthalten.
Die Bedienungsanleitungen finden Sie unten
Der Fusion FLEX 24 kann verschiedene Produkte aufladen.
Nachfolgend finden Sie eine Tabelle, die die unterschiedlichen Kompatibilitäten des Fusion Flex 24 erklärt.
Bitte beachten Sie, dass die Kompatibilität des USB-C-Anschlusses von der des USB-A-Anschlusses abweicht.

Sie müssen das USB-C-auf-USB-A-Kabel verwenden. Stecken Sie das USB-A-Ende in den Fusion Flex 24 und dann das USB-C-Ende in den USB-C-Anschluss des Gravity 100. Bitte verwenden Sie NICHT das mit dem Gravity 100 gelieferte USB-C-auf-USB-C-Kabel, um den Gravity 100 über den USB-C-Anschluss des Fusion Flex 24 aufzuladen. Sie können es jedoch verwenden, um den Gravity 100 mit dem Emperion-Schnellladegerät oder einem anderen USB-C-Ladegerät aufzuladen.
Dieses Bild zeigt die Einrichtung:


No matching questions found.
FUSION FLEX 48
Manuals & Downloads
Frequently Asked Questions
Bitte lesen Sie die BEDIENUNGSANLEITUNG sorgfältig durch. Eine ausführliche Erklärung zur Nutzung ist enthalten.
Die Bedienungsanleitungen finden Sie unten
Der Fusion FLEX 48 kann verschiedene Produkte aufladen.
Nachfolgend finden Sie eine Tabelle, die die unterschiedlichen Kompatibilitäten des Fusion Flex 48 erklärt.
Bitte beachten Sie, dass die Kompatibilität des USB-C-Anschlusses sich von der der USB-A-Anschlüsse und des DC 5521-Anschlusses unterscheidet.
Der DC 5521 ist ein nicht geregelter Ausgangsanschluss, der hauptsächlich Powerstations wie die Sunslice Gravity 144 und Sunslice Gravity 432 aufladen kann.

Sie müssen das USB-C-zu-USB-A-Kabel verwenden. Stecken Sie das USB-A-Ende in den Fusion Flex 48 und dann das USB-C-Ende in den USB-C-Anschluss des Gravity 100. Bitte verwenden Sie NICHT das mit dem Gravity 100 gelieferte USB-C-zu-USB-C-Kabel, um den Gravity 100 über den USB-C-Anschluss des Fusion Flex 48 aufzuladen. Sie können es jedoch verwenden, um den Gravity 100 mit dem Emperion-Schnellladegerät oder einem anderen USB-C-Ladegerät aufzuladen.
Dieses Bild zeigt die Einrichtung:

No matching questions found.
FUSION FLEX 6
Manuals & Downloads
Frequently Asked Questions
Bitte lesen Sie die BEDIENUNGSANLEITUNG sorgfältig durch. Eine ausführliche Erklärung zur Nutzung ist enthalten.
Die Bedienungsanleitungen finden Sie unten
No matching questions found.
GRAVITY 10
Manuals & Downloads
Frequently Asked Questions
Bitte lesen Sie die BEDIENUNGSANLEITUNG sorgfältig durch. Eine ausführliche Erklärung zur Nutzung ist enthalten.
Die Bedienungsanleitungen finden Sie unten
No matching questions found.
GRAVITY 10 EXTREME
Manuals & Downloads
Frequently Asked Questions
No questions have been added for this product yet.
No matching questions found.
GRAVITY 100
Manuals & Downloads
Frequently Asked Questions
Bitte lesen Sie die BEDIENUNGSANLEITUNG sorgfältig durch. Eine ausführliche Erklärung zur Nutzung ist enthalten.
Die Bedienungsanleitungen finden Sie unten
Sie können den Gravity 100 mit einem Adapterset bestellen. Dieses Adapterset ermöglicht eine universelle Kompatibilität mit allen Laptops.
Das Adapterset ist auf der Produktseite des Gravity 100 im Dropdown-Menü erhältlich.
No matching questions found.
GRAVITY 1024
Manuals & Downloads
Frequently Asked Questions
No questions have been added for this product yet.
No matching questions found.
GRAVITY 144
Manuals & Downloads
Frequently Asked Questions
Bitte lesen Sie die BEDIENUNGSANLEITUNG sorgfältig durch. Eine ausführliche Erklärung zur Nutzung ist enthalten.
Die Bedienungsanleitungen finden Sie unten
No matching questions found.
GRAVITY 20
Manuals & Downloads
Frequently Asked Questions
Bitte lesen Sie die BEDIENUNGSANLEITUNG sorgfältig durch. Eine ausführliche Erklärung zur Nutzung ist enthalten.
Die Bedienungsanleitungen finden Sie unten
No matching questions found.
GRAVITY 20 EXTREME PRO
Manuals & Downloads
Frequently Asked Questions
No questions have been added for this product yet.
No matching questions found.
GRAVITY 2048
Manuals & Downloads
Frequently Asked Questions
No questions have been added for this product yet.
No matching questions found.
GRAVITY 2232
Manuals & Downloads
Frequently Asked Questions
No questions have been added for this product yet.
No matching questions found.
GRAVITY 27
Manuals & Downloads
Frequently Asked Questions
No questions have been added for this product yet.
No matching questions found.
GRAVITY 27 PRO
Manuals & Downloads
Frequently Asked Questions
No questions have been added for this product yet.
No matching questions found.
GRAVITY 40
Manuals & Downloads
Frequently Asked Questions
No questions have been added for this product yet.
No matching questions found.
GRAVITY 432
Manuals & Downloads
Frequently Asked Questions
Bitte lesen Sie die BEDIENUNGSANLEITUNG sorgfältig durch. Eine ausführliche Erklärung zur Nutzung ist enthalten.
Die Bedienungsanleitungen finden Sie unten
No matching questions found.
GRAVITY 486
Manuals & Downloads
Frequently Asked Questions
No questions have been added for this product yet.
No matching questions found.
GRAVITY 5
Manuals & Downloads
Frequently Asked Questions
Bitte lesen Sie die BEDIENUNGSANLEITUNG sorgfältig durch. Eine ausführliche Erklärung zur Nutzung ist enthalten.
Die Bedienungsanleitungen finden Sie unten
No matching questions found.
GRAVITY 756
Manuals & Downloads
Frequently Asked Questions
Bitte lesen Sie die BEDIENUNGSANLEITUNG sorgfältig durch. Eine ausführliche Erklärung zur Nutzung ist enthalten.
Die Bedienungsanleitungen finden Sie unten
Schnelle Diagnose:
Möglicherweise haben Sie die AC-Funktion (Funktion, die die Steckdosen auf der Rückseite aktiviert) nicht eingeschaltet. Dazu müssen Sie die G-Taste für 3 Sekunden drücken, wie in der Bedienungsanleitung angegeben. Die notwendigen Informationen sind in den untenstehenden Bildern grün markiert:
Das Schaltbild finden Sie auf Seite 4 der Bedienungsanleitung.


Wenn es immer noch nicht funktioniert, lesen Sie bitte die Bedienungsanleitung erneut sorgfältig durch, bevor Sie uns kontaktieren.
No matching questions found.
HADRON
Manuals & Downloads
Frequently Asked Questions
Bitte lesen Sie die BEDIENUNGSANLEITUNG sorgfältig durch. Eine ausführliche Erklärung zur Nutzung ist enthalten.
Die Bedienungsanleitungen finden Sie unten
Der Hadron wird automatisch mit einem EU-Stecker geliefert. Falls Sie einen US-, CH- oder GB-Stecker benötigen, kontaktieren Sie uns bitte unter service@sunslice-solar.com.
In jedem Fall kann der Hadron über seinen USB-C-Eingang mit einem Standard-USB-C-Kabel geladen werden.
No matching questions found.
JUNCTION BOX
Manuals & Downloads
Frequently Asked Questions
No questions have been added for this product yet.
No matching questions found.
LINKPOWER BACKPACK
Manuals & Downloads
Frequently Asked Questions
No questions have been added for this product yet.
No matching questions found.
LINKPOWER MINI FLIGHTCASE
Manuals & Downloads
Frequently Asked Questions
No questions have been added for this product yet.
No matching questions found.
LINKPOWER PRO FLIGHTCASE
Manuals & Downloads
Frequently Asked Questions
No questions have been added for this product yet.
No matching questions found.
PHOTON
Manuals & Downloads
Frequently Asked Questions
Bitte lesen Sie das BENUTZERHANDBUCH des Photon sorgfältig durch. Eine ausführliche Erklärung zur Verwendung des Photon ist enthalten.
Die Benutzerhandbücher finden Sie unten
Wenn Sie Probleme haben, Ihr Telefon mit dem Photon aufzuladen, befolgen Sie bitte die folgenden Anweisungen:
0. Drücken Sie die POWER-Taste
Verbinden Sie Ihr Gerät mit dem Photon. Wenn Ihr Gerät nicht automatisch zu laden beginnt, drücken Sie bitte die POWER-Taste am Rand des Photons.

1. Überprüfen Sie, ob die Batterie funktioniert
Stellen Sie zunächst sicher, dass die Batterie geladen ist. Drücken Sie einmal die POWER-Taste an der Seite der Batterie, um zu sehen, ob einige blaue Lichter aufleuchten.
Wenn die Batterie nicht angeht, versuchen Sie, sie über den USB-C-Eingang an ein USB-Ladegerät anzuschließen, und prüfen Sie, ob die Batterie angeht. Wenn Sie irgendwann kleine blaue Lichter sehen, funktioniert die Batterie einwandfrei. Wenn nicht, könnte es ein Problem mit Ihrem Sunslice-Kabel geben. Bitte versuchen Sie es mit einem anderen USB-C-Kabel (oder stellen Sie sicher, dass Ihr Sunslice-Kabel einwandfrei funktioniert), bevor Sie mit dem nächsten Schritt fortfahren.
Wenn trotz dieser Schritte keine Lichter erscheinen, kontaktieren Sie uns bitte unter service@sunslice-solar.com und teilen Sie uns mit, dass Sie die FAQ sorgfältig gelesen haben, bevor Sie uns kontaktieren. Wir helfen Ihnen gerne weiter.
2. Kabelposition
Stellen Sie sicher, dass das Kabel korrekt in den USB-Anschluss eingesteckt ist. Es kann vorkommen, dass der USB-Anschluss weiter innen sitzt als üblich. Das Kabel muss im unteren Bereich der Buchse platziert werden, wie im Bild unten gezeigt. Die metallischen Datenpins des Kabels sollten nach oben zeigen. Bitte schauen Sie sich die Zeichnungen genau an und übertragen Sie dies auf Ihr Photon.

3. Für iPhone-Nutzer
Überprüfen Sie, ob das Kabel korrekt in Ihr Telefon eingesteckt ist. Wenn Sie ein iPhone haben, beachten Sie bitte, dass das Kabel nur in einer Richtung funktioniert. Dies ist notwendig, da die andere Seite des Kabels Micro-USB-Anschlüsse lädt. Möglicherweise müssen Sie Ihr Telefon drehen, damit es geladen wird.

4. Prüfen Sie, ob es mit einem anderen Kabel funktioniert
Wenn Sie das Sunslice-Kabel in beide Richtungen gemäß den obigen Anweisungen ausprobiert haben, versuchen Sie bitte ein anderes Ladekabel. Wenn das Telefon jetzt mit Ihrem Kabel lädt, bedeutet das, dass Ihr Sunslice-Kabel defekt ist. Wenn es immer noch nicht funktioniert, ist Ihr Gerät defekt und wird ausgetauscht. Bitte kontaktieren Sie uns unter service@sunslice-solar.com
Der Photon verfügt über eine kleine Schlaufe an der Seite, um das Sunslice-Kabel zu sichern und ein Verlieren zu verhindern. Diese Schlaufe wurde speziell verstärkt, um als Befestigungspunkt für einen Rucksack zu dienen. Sie können einfach einen Karabiner oder ein Seil einhängen, um ihn an Ihrem Rucksack oder an anderen Stellen zu befestigen.
Auf der anderen Seite des Photon wurde eine zweite Schlaufe hinzugefügt, die als zweiter Befestigungspunkt zur Stabilisierung des Photon verwendet werden kann.

Der Photon ist mit einem standardmäßigen USB-Ausgang ausgestattet. Das bedeutet im Wesentlichen, dass, wenn Ihr Gerät über ein USB-Kabel aufgeladen werden kann, es auch mit dem Photon funktioniert.
Wir liefern ein kostenloses 3-in-1-Kabel mit, das jedes Gerät mit einem USB-C, Lightning und Micro-USB-Anschluss (max. 5V) aufladen kann.
Wenn Sie einen anderen Anschluss haben, müssen Sie Ihr eigenes Kabel verwenden (Mini-USB, iPod, Nokia 3,5 mm usw.). Beachten Sie, dass der Photon auf eine Spannung von 5V begrenzt ist.
Falls Sie unsicher sind, senden Sie uns ein Bild Ihres Geräts und der Ladeanschlüsse, und wir melden uns so schnell wie möglich bei Ihnen!
Optimales Solarladeerlebnis erreichen Sie durch:
- vollständiges Öffnen des Photon zur Sonne hin
- keine Schatten auf irgendeiner der Solarzellen
- Neigung des Photon senkrecht zur Sonne
- statische Bedingungen. Das Aufhängen des Photon an Ihrem Rucksack beim Wandern ist eine praktische Ladelösung, reduziert jedoch die Ladegeschwindigkeit, da sich das Photon bewegt und die Sonneneinstrahlung stark schwankt.
- perfekte Sonnenbedingungen (Sommerzeit, keine Wolken, ca. 15 °C)
- das Photon nicht hinter einem Fenster platzieren (dies kann die Solarladegeschwindigkeit um bis zu 90 % verringern)
- für Belüftung rund um das Produkt sorgen, um die Temperatur niedrig zu halten (hohe Temperaturen beeinträchtigen die Effizienz der Solarzellen)
Beim Aufladen des Photon in der Sonne:
Die Zeit, die benötigt wird, um eine dem Telefon entsprechende Ladung im Akku des Photon zu speichern, kann je nach zu ladendem Telefon variieren. Hier sind einige Beispiele.
Bitte beachten Sie, dass die Ladegeschwindigkeit des Photon in der Sonne stark von den Ladebedingungen abhängen kann. Die oben genannten Ladezeiten gelten für eine optimale Neigung und eine Umgebungstemperatur von 25 °C.
Bei übermäßiger Hitze, einem oder mehreren beschatteten Zellen, Bewegung, Positionierung hinter Glas usw. können diese Leistungen stark reduziert werden. Bitte beachten Sie die FAQ-Frage „Wie kann ich das optimale Ladeerlebnis erzielen?“
Beim Aufladen Ihres Geräts mit dem Photon (wenn das Photon vorab aufgeladen ist):
Die zum Aufladen Ihres Geräts mit dem Photon benötigte Zeit (wenn das Photon bereits zu 100 % vorab aufgeladen ist) variiert ebenfalls je nach Gerät. Man kann von einer ungefähren Ladegeschwindigkeit von 1,5 Stunden pro 2.000 mAh ausgehen.

Der Photon verfügt über 5 Ladeanzeige-LEDs, wie unten dargestellt.

Bitte beachten Sie, dass die ersten 4 BLAUEN LEDs (links) den Ladezustand der integrierten Powerbank des Photon anzeigen. Die fünfte GRÜNE LED (rechts) zeigt an, dass der Photon in der Sonne lädt.
Wenn die 4 blauen LEDs leuchten, bedeutet das, dass der Photon zu 100 % geladen ist.
Zusammenfassung (ungefähre Werte):
- 0 LED : 0%
- 1 LED : 1%-29%
- 2 LED : 30% - 69%
- 3 LED : 70%-99%
- 4 LED : 100%
Die vierte LED kann länger brauchen, um aufzugehen, da die Ladegeschwindigkeit am Ende des Ladezyklus langsamer wird. Bitte beachten Sie dies beim Laden in der Sonne, da die vierte LED lange brauchen kann, bis sie angeht.
Ja,
Sie müssen sich keine Sorgen um die Festigkeit der Lederbefestigungsschlaufe des Photon machen. Wir haben sie getestet und sie hält einer Zugkraft von 9 kg stand, ohne zu reißen. Klicken Sie hier, um den Test anzusehen.
Es tut uns leid. Es kommt manchmal vor, dass man den Teil des 3-in-1-Universal-Kabels des Photon verliert.
Sie können Ihren Photon weiterhin mit jedem anderen USB-Kabel verwenden. Falls Sie ein Kabel nachbestellen möchten, können Sie dies direkt auf unserer Website tun, indem Sie hier klicken.
Das universelle 3-in-1-Kabel, das dem Photon beiliegt, kann nicht alle iPads® aufladen. Mit iPad® sind die Tablets der Marke Apple® gemeint.
Falls dies bei Ihrem iPad® der Fall ist, versuchen Sie es bitte mit Ihrem üblichen Kabel.
Falls Ihr Photon eine Beschädigung aufweist (Aufblähung, Einstich, Riss im Akku), isolieren Sie es bitte von anderen entzündlichen Produkten und kontaktieren Sie uns unter service@sunslice-solar.com.
Wir erklären Ihnen, wie Sie es sicher und umweltgerecht entsorgen können.
No matching questions found.
Produit Test Geoff
Manuals & Downloads
Frequently Asked Questions
Bitte lesen Sie die BEDIENUNGSANLEITUNG sorgfältig durch. Eine ausführliche Erklärung zur Nutzung ist enthalten.
Die Bedienungsanleitungen finden Sie unten
No matching questions found.
PV200 - FOLDABLE SOLAR PANEL 200 WATTS
Manuals & Downloads
Frequently Asked Questions
No questions have been added for this product yet.
No matching questions found.
VOLTA WALLET
Manuals & Downloads
Frequently Asked Questions
No questions have been added for this product yet.
No matching questions found.
ZENITH
Manuals & Downloads
Frequently Asked Questions
Bitte lesen Sie die BEDIENUNGSANLEITUNG sorgfältig durch. Eine ausführliche Erklärung zur Nutzung ist enthalten.
Die Bedienungsanleitungen finden Sie unten
No matching questions found.
ELECTRON
Manuals & Downloads
Product Questions & Troubleshooting
No additional product-specific questions are currently listed.
No matching information found for this product.
EMPERION 45 MINI
Manuals & Downloads
Product Questions & Troubleshooting
No additional product-specific questions are currently listed.
No matching information found for this product.
EMPERION 65 PRO
Manuals & Downloads
Product Questions & Troubleshooting
No additional product-specific questions are currently listed.
No matching information found for this product.
PHOTON
Manuals & Downloads
Product Questions & Troubleshooting
Please read the USER MANUAL of the Photon carefully. A detailed explanation is given on how to use the Photon.
You can find the user manuals below
If you're experiencing trouble using your Photon to charge your phone, please follow the following instructions:
0. Press the POWER button
Connect your device to the Photon. If your device does not start charging automatically, please press the POWER button on the edge of the Photon.
1. Check if the battery works
First make sure the battery has some charge. Start by pressing the POWER button once on the side of the battery to see if some blue lights turn on.
If the battery doesn't turn on, try plugging it into a USB charger using the USB-C input, and check if the battery turns on. If you see little blue lights at some point, the battery works fine. If not, it could be an issue with your Sunslice cable. Please try with another USB-C cable (or make sure your Sunslice cable works well) before proceeding to the next step.
If despite these steps no lights appear at all, then please contact us at service@sunslice-solar.com and make sure notifying us you read carefully the FAQ before contacting us. We will help you further.
2. Cable position
Make sure the cable is inserted correctly in the USB port. It can happen that the USB port is more centered than it should be. The cable must be placed in the lower part of the receptacle, as shown in the picture below. The cable's metallic data pins should face upwards. Please look at the drawings carefully and replicate this with your Photon.
3. For iPhone users
Check that the cable is inserted correctly in your phone. If you have an iPhone, please note that the cable only works one way around. It is necessary as the other side of the cable charges micro-USB inputs. You may need to turn your phone over for it to charge.
4. Check if it works with a different cable
If you have tried using the Sunslice cable both ways following all the instructions above, please try using a different charging cable. If the phone now charges with your cable, it means your Sunslice cable is defaulting. If it still does not work, your device is defaulting and will be changed. Please contact us at service©sunslice-solar.com
The Photon has a little loop to secure the Sunslice cable on its side and avoid losing it. This loop has been specifically reinforced to serve as an attachement point for a backpack. You can easily slip a carabiner or a rope to fix it on your backpack or to other places.
A second loop has been added at the other side of the Photon that can be used as a second attachment point to stabilize the Photon.
The Photon is equipped with a standard USB output. That means that, essentially, if your device can be charged using a USB cable, it will work with the Photon.
We provide a complementary 3-in-1 cable that can charge any device with a USB-C, Lightning and Micro-USB port (Max 5V).
If you have any other type of port, you will have to use your own cable (Mini-USB, iPod, Nokia 3.5 etc.). Be aware that the Photon is limited to a 5V voltage.
In case you're not sure, send us a picture of your device and the charging ports, and we will get back to you as soon as possible !
Optimal solar charge experience can be obtained by :
- opening the Photon completely towards the sun
- no shading on any of the solar cells
- tilting the Photon perpendicularly to the sun
- static conditions. Hanging the Photon on your backpack whilst hiking is a handy charging solution but will reduce the charging speed as the Photon will move and the solar exposure will fluctuate a lot.
- perfect sun conditions (summer time, no clouds, +-15°C)
- not placing the Photon behind a window (this can reduce the solar charging speed up to 90%)
- allowing ventilation around the product in order to keep the temperature low (high temperatures affect the efficiency of the solar cells)
When charging the Photon in the Sun :
The time required to accumulate a phone equivalent charge in the Photon's battery may vary depending on the phone to be charged. Here are a few examples.
Please note that the charging speed of the Photon in the sun can vary greatly with charging conditions. The above charging times are given for optimal tilt and at an ambient temperature of 25°C.
In the case of excessive heat, one or more shaded cells, movement, positioning behind glass, ... these performances can be greatly reduced. Please refer to FAQ question "How can I get the optimal charge experience ?"
When charging your device with the Photon (if the Photon is pre-charged) :
The charging time needed to charge your device with the Photon (if the Photon is already 100% pre-charged) will also vary according to your device. One can assume an approximate 1h30 / 2'000 mAh charging speed.
The Photon has 5 charging indicator LEDs as depicted below.
Please be aware that the first 4 BLUE LED lights (on the left) indicate the charge status of the Photon's integrated powerbank. The fifth GREEN LED light (on the right) indicates that the Photon is charging in the sun.
When the 4 blue LED lights are on, it means the Photon is 100% charged.
To summarise (approximate figures) :
- 0 LED : 0%
- 1 LED : 1%-29%
- 2 LED : 30% - 69%
- 3 LED : 70%-99%
- 4 LED : 100%
The fourth LED light can take more time to light on as the charging speed slows down at the end of the charging cycle. Please consider this when charging in the sun as the fourth LED light can take a long time before going on.
Yes,
you do not have to worry about the strength of the leather attachment loop of the Photon. We have tested it and it withstands a 9kg traction without breaking. Click here to watch the test.
We are sorry for that. It occurs sometimes that one looses the part of the Photon's 3-in-1 universal cable.
You can still use your Photon with any other USB cable. In case you want to re-order a cable, you can order directly on our website by clicking here .
The universal 3-in-1 cable, included with the Photon, cannot charge all iPads®. By iPad®, one means the tablets from the Apple® brand.
In case this happens to your iPad®, please try with your usual cable.
In case your Photon presents a distortion (swelling, puncture, crack in the battery), please isolate it from other ingnitable products and contact us at service@sunslice-solar.com .
We will explain you how to get rid of it safely and ecologically.
No matching information found for this product.
FUSION FLEX 6
Manuals & Downloads
Product Questions & Troubleshooting
Please read the USER MANUAL carefully. A detailed explanation is given on how to use it.
You can find the user manuals below
No matching information found for this product.
FUSION FLEX 12
Manuals & Downloads
Product Questions & Troubleshooting
Please read the USER MANUAL carefully. A detailed explanation is given on how to use it.
You can find the user manuals below
No matching information found for this product.
FUSION FLEX 18
Manuals & Downloads
Product Questions & Troubleshooting
Please read the USER MANUAL carefully. A detailed explanation is given on how to use it.
You can find the user manuals below
No matching information found for this product.
FUSION FLEX 24
Manuals & Downloads
Product Questions & Troubleshooting
Please read the USER MANUAL carefully. A detailed explanation is given on how to use it.
You can find the user manuals below
The Fusion FLEX 24 can charge different products.
Hereunder is a table that explains the different compatibilities of the Fusion Flex 24.
Please consider the compatibility of the USB-C port is different than the compatibility of the USB-A port.
You need to use the USB-C to USB-A cable. Plug the USB-A end into the Fusion Flex 24 and then the USB-C end into the USB-C port of the Gravity 100. Please do NOT use the USB-C to USB-C cable supplied with the Gravity 100 to charge the Gravity 100 from the Fusion Flex 24's USB-C port. You can use it to charge the Gravity 100 with the Emperion fast charger or any other USB-C charger.
This image shows the setup :
No matching information found for this product.
FUSION FLEX 48
Manuals & Downloads
Product Questions & Troubleshooting
Please read the USER MANUAL carefully. A detailed explanation is given on how to use it.
You can find the user manuals below
The Fusion FLEX 48 can charge different products.
Hereunder is a table that explains the different compatibilities of the Fusion Flex 48.
Please consider the compatibility of the USB-C port is different than the compatibility of the USB-A ports and the DC 5521 port.
The DC 5521 is a non regulated output port that can mainly charge powerstations such as the Sunslice Gravity 144 and Sunslice Gravity 432.
You need to use the USB-C to USB-A cable. Plug the USB-A end into the Fusion Flex 48 and then the USB-C end into the USB-C port of the Gravity 100. Please do NOT use the USB-C to USB-C cable supplied with the Gravity 100 to charge the Gravity 100 from the Fusion Flex 48's USB-C port. You can use it to charge the Gravity 100 with the Emperion fast charger or any other USB-C charger.
This image shows the setup :
No matching information found for this product.
FUSION CORE 10
Manuals & Downloads
Product Questions & Troubleshooting
No additional product-specific questions are currently listed.
No matching information found for this product.
FUSION CORE 22
Manuals & Downloads
Product Questions & Troubleshooting
No additional product-specific questions are currently listed.
No matching information found for this product.
FUSION 40
Manuals & Downloads
Product Questions & Troubleshooting
No additional product-specific questions are currently listed.
No matching information found for this product.
FUSION 60
Manuals & Downloads
Product Questions & Troubleshooting
No additional product-specific questions are currently listed.
No matching information found for this product.
FUSION 100
Manuals & Downloads
Product Questions & Troubleshooting
Please read the USER MANUAL carefully. A detailed explanation is given on how to use it.
You can find the user manuals below
No matching information found for this product.
FUSION 150
Manuals & Downloads
Product Questions & Troubleshooting
No additional product-specific questions are currently listed.
No matching information found for this product.
FUSION 200
Manuals & Downloads
Product Questions & Troubleshooting
No additional product-specific questions are currently listed.
No matching information found for this product.
FUSION 440
Manuals & Downloads
Product Questions & Troubleshooting
No additional product-specific questions are currently listed.
No matching information found for this product.
JUNCTION BOX
Manuals & Downloads
Product Questions & Troubleshooting
No additional product-specific questions are currently listed.
No matching information found for this product.
ZENITH
Manuals & Downloads
Product Questions & Troubleshooting
Please read the USER MANUAL carefully. A detailed explanation is given on how to use it.
You can find the user manuals below
No matching information found for this product.
CYCLOTRON
Manuals & Downloads
Product Questions & Troubleshooting
Please read the USER MANUAL carefully. A detailed explanation is given on how to use it.
You can find the user manuals below
The Cyclotron allows wireless charging. How to use it ?
- First, place your phone on the Cyclotron, into the brackets.
- Push the POWER button to activate the wireless charging function.
- Your phone will start charging wirelessly.
In case it does not work , please check the following aspects :
- Be sure your phone allows wireless charging. Please refer to its user manual.
If your phone allows wireless charging :
- If your phone has a protective case, remove it and try again.
- If a metal plate is stuck to the back of your phone, remove it and try again.
- If the blue LED lights still do not turn on, please ensure you have pushed the POWER button on the right side of the Cyclotron.
The Cyclotron allows smartphones with dimensions :
Width : 70 to 105 mm
Length : no limit
Thickness : 1 to 12 mm
No matching information found for this product.
HADRON
Manuals & Downloads
Product Questions & Troubleshooting
Please read the USER MANUAL carefully. A detailed explanation is given on how to use it.
You can find the user manuals below
The Hadron automatically includes an EU plug . In case you need a US, CH or GB plug, please reach out to us at service@sunslice-solar.com .
In any case, the Hadron can be charged via its USB-C input with a standard USB-C cable.
No matching information found for this product.
GRAVITY 5
Manuals & Downloads
Product Questions & Troubleshooting
Please read the USER MANUAL carefully. A detailed explanation is given on how to use it.
You can find the user manuals below
No matching information found for this product.
GRAVITY 10
Manuals & Downloads
Product Questions & Troubleshooting
Please read the USER MANUAL carefully. A detailed explanation is given on how to use it.
You can find the user manuals below
No matching information found for this product.
GRAVITY 20
Manuals & Downloads
Product Questions & Troubleshooting
Please read the USER MANUAL carefully. A detailed explanation is given on how to use it.
You can find the user manuals below
No matching information found for this product.
GRAVITY 10 EXTREME
Manuals & Downloads
Product Questions & Troubleshooting
No additional product-specific questions are currently listed.
No matching information found for this product.
GRAVITY 20 EXTREME PRO
Manuals & Downloads
Product Questions & Troubleshooting
No additional product-specific questions are currently listed.
No matching information found for this product.
GRAVITY 100
Manuals & Downloads
Product Questions & Troubleshooting
Please read the USER MANUAL carefully. A detailed explanation is given on how to use it.
You can find the user manuals below
You can order the Gravity 100 with an adaptor set. This adaptor set will allow a universal compatibility with all laptops.
The adaptor set is available on the Gravity 100 product page (dropdown menu).
No matching information found for this product.
GRAVITY 27
Manuals & Downloads
Product Questions & Troubleshooting
No additional product-specific questions are currently listed.
No matching information found for this product.
GRAVITY 27 PRO
Manuals & Downloads
Product Questions & Troubleshooting
No additional product-specific questions are currently listed.
No matching information found for this product.
GRAVITY 40
Manuals & Downloads
Product Questions & Troubleshooting
No additional product-specific questions are currently listed.
No matching information found for this product.
GRAVITY 144
Manuals & Downloads
Product Questions & Troubleshooting
Please read the USER MANUAL carefully. A detailed explanation is given on how to use it.
You can find the user manuals below
No matching information found for this product.
GRAVITY 486
Manuals & Downloads
Product Questions & Troubleshooting
No additional product-specific questions are currently listed.
No matching information found for this product.
GRAVITY 432
Manuals & Downloads
Product Questions & Troubleshooting
Please read the USER MANUAL carefully. A detailed explanation is given on how to use it.
You can find the user manuals below
No matching information found for this product.
GRAVITY 756
Manuals & Downloads
Product Questions & Troubleshooting
Please read the USER MANUAL carefully. A detailed explanation is given on how to use it.
You can find the user manuals below
Quick Diagnosis :
You may not have activated the AC function (function that activates the sockets on the back). To do this, you need to press the G button for 3 seconds as indicated in the user manual. The necessary information about this are circled in green in the pictures below:
You will find the schematic on page 4 of the user manual.
If it still does not work, please read the user manual again carefully before contacting us.
No matching information found for this product.
LINKPOWER BACKPACK
Manuals & Downloads
Product Questions & Troubleshooting
No additional product-specific questions are currently listed.
No matching information found for this product.
LINKPOWER MINI FLIGHTCASE
Manuals & Downloads
Product Questions & Troubleshooting
No additional product-specific questions are currently listed.
No matching information found for this product.
LINKPOWER PRO FLIGHTCASE
Manuals & Downloads
Product Questions & Troubleshooting
No additional product-specific questions are currently listed.
No matching information found for this product.
FLIGHT CASE
Manuals & Downloads
Product Questions & Troubleshooting
No additional product-specific questions are currently listed.
No matching information found for this product.
VOLTA WALLET
Manuals & Downloads
Product Questions & Troubleshooting
No additional product-specific questions are currently listed.
No matching information found for this product.
GRAVITY 2232
Manuals & Downloads
Product Questions & Troubleshooting
No additional product-specific questions are currently listed.
No matching information found for this product.
BLUETTI AC200MAX- PORTABLE SOLAR GENERATOR
Manuals & Downloads
As an official distributor of Bluetti in Europe, Sunslice engineers have translated the official Bluetti manuals in French for the convenience of our french speaking clients.
This manual is available on demand, exclusively for Sunslice clients having purchased the corresponding Bluetti product.
Please contact us at contact@sunslice-solar.com with your order number, we will be happy to send you your copy.
Watch this video for a quick start :
https://www.youtube.com/watch?v=tk1oAASkuSU
More information is available in the USER MANUAL
Product Questions & Troubleshooting
Please read the USER MANUAL carefully. A detailed explanation is given on how to use it.
You can find the user manuals below
Please watch this video :
https://www.youtube.com/watch?v=Fl2f6yzv1NY
From 0.00 to 0.38 : Connecting 1 panel to the AC200 Max
From 0.38 to 1.04 : Connecting several panels to the AC200 Max
In case you want to connect the easy solar kit to your Bluetti generator, you can do it as described below.
If you want to use the Easy Solar Kit without the Bluetti generator, please check the FAQ on HOW TO USE MY EASY SOLAR KIT - QUICK INSTALLATION.
The first step below is in case you have already installed the Easy Solar Kit and plugged it into your wall socket.
In case the Easy Solar Kit is not installed yet, please go directly to the second step.
No matching information found for this product.
BLUETTI AC300- PORTABLE SOLAR GENERATOR
Manuals & Downloads
As an official distributor of Bluetti in Europe, Sunslice engineers have translated the official Bluetti manuals in French for the convenience of our french speaking clients.
This manual is available on demand, exclusively for Sunslice clients having purchased the corresponding Bluetti product.
Please contact us at contact@sunslice-solar.com with your order number, we will be happy to send you your copy.
Watch these videos for a quick start :
https://www.youtube.com/watch?v=kGKZG_HOFKQ
Product Questions & Troubleshooting
Please read the USER MANUAL carefully. A detailed explanation is given on how to use it.
You can find the user manuals below
Please watch this video :
https://www.youtube.com/watch?v=Fl2f6yzv1NY
From 0.00 to 0.38 : Connecting 1 panel to the AC200 Max
From 0.38 to 1.04 : Connecting several panels to the AC200 Max
In case you want to connect the easy solar kit to your Bluetti generator, you can do it as described below.
If you want to use the Easy Solar Kit without the Bluetti generator, please check the FAQ on HOW TO USE MY EASY SOLAR KIT - QUICK INSTALLATION.
The first step below is in case you have already installed the Easy Solar Kit and plugged it into your wall socket.
In case the Easy Solar Kit is not installed yet, please go directly to the second step.
1. Go to "settings" then "next" and confirm that the "Max Grid Input Current" is set to "15A".
2. Click on the central button and look at what it is to check that the central unit is detecting your B230 or B300 batteries in "battery information".
3. Navigate to "Alarm" and check that there is no current problem detected.
4. Navigate to "Data" and then "Alarm History" and check if there has been a recent problem recorded
These checks will allow you to establish whether something is wrong with the battery or if the problem lies somehwere else. After proceeding to these checks, if the problem persists, please contact us.
No matching information found for this product.
BLUETTI B230 - POWER PACK
Manuals & Downloads
Product Questions & Troubleshooting
Please read the USER MANUAL carefully. A detailed explanation is given on how to use it.
You can find the user manuals below
No matching information found for this product.
BLUETTI B300 - POWER PACK
Manuals & Downloads
Product Questions & Troubleshooting
Please read the USER MANUAL carefully. A detailed explanation is given on how to use it.
You can find the user manuals below
No matching information found for this product.
BLUETTI EP500 PRO - SOLAR GENERATOR
Manuals & Downloads
As an official distributor of Bluetti in Europe, Sunslice engineers have translated the official Bluetti manuals in French for the convenience of our french speaking clients.
This manual is available on demand, exclusively for Sunslice clients having purchased the corresponding Bluetti product.
Please contact us at contact@sunslice-solar.com with your order number, we will be happy to send you your copy.
Product Questions & Troubleshooting
Please read the USER MANUAL carefully. A detailed explanation is given on how to use it.
You can find the user manuals below
No matching information found for this product.
EASY SOLAR KIT
Manuals & Downloads
Product Questions & Troubleshooting
Please read the USER MANUAL carefully. A detailed explanation is given on how to use it.
You can find the user manuals below
The Easy Solar Kit has been designed in order to reduce the electricity bill of our Sunslice customers. It is a plug and play solar kit, very easy to install and to use.
The Easy Solar Kit on its own cannot store the energy that it produces. This energy is injected on the home-grid and needs to be consumed instantaneously by the devices connected to the grid. If no device is connected or if too much electricity is produced compared to the electricity that is consumed, this (surplus) energy is reinjected (for free) on the main grid.
So, which solution do we have to store this surplus energy ?
There is no automatic solution for this.
Though we can suggest a manual solution that will make you able to store the energy produced by the solar panel into a power station when you want (for example when you are away for a long time or when you want to store back up power in case of possible power outage)
The Bluetti power stations can store from 2kWh to 12.3 kWh energy. It is very easy to connect the Easy Solar Kits to these power stations.
How ?
1. Install your Easy Solar Kit in the initial setup (kit connected to the home-grid) : the user manual can be found here.
2. Disconnect the plug from the grid and also the MC4-cables from the micro-inverter.
3. Connect the MC4-cables to the Bluetti power station.
All the energy produced by the solar panel of the Easy Solar Kit will be stored into the power station.
When you want, you can connect your devices to the power station and you can also reconnect the Easy Solar Kit to the grid.
You can find a quick electronics installation guide for the Easy Solar Kit below.
Please also refer to the User Manual included in the packaging to set up the Easy Solar Kit .
No matching information found for this product.
PV200 - FOLDABLE SOLAR PANEL 200 WATTS
Manuals & Downloads
Product Questions & Troubleshooting
No additional product-specific questions are currently listed.
No matching information found for this product.
GRAVITY 1024
Manuals & Downloads
Product Questions & Troubleshooting
No additional product-specific questions are currently listed.
No matching information found for this product.
GRAVITY 2048
Manuals & Downloads
Product Questions & Troubleshooting
No additional product-specific questions are currently listed.
No matching information found for this product.
General Questions & Answers
Abrechnung & Rechnungen
Sie sollten in Ihrer Bestellbestätigungs-E-Mail einen Link zu Ihrer Online-Rechnung erhalten haben:
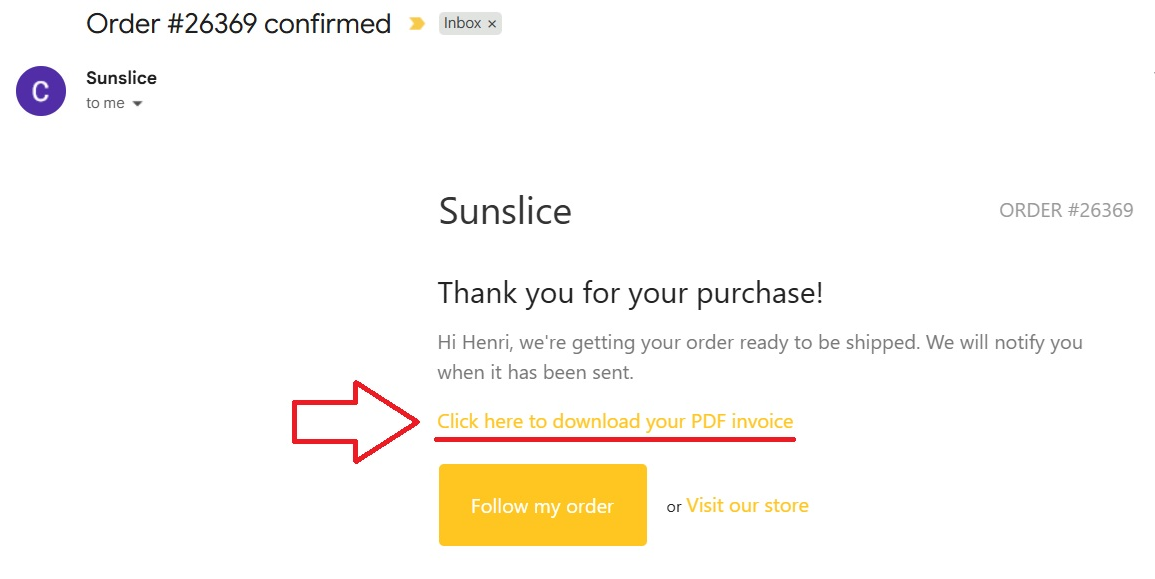
Wenn Sie die Bestätigungs-E-Mail nicht finden können:
- Überprüfen Sie Ihren Spam-Ordner
- Stellen Sie sicher, welche E-Mail-Adresse Sie beim Checkout auf unserer Website verwendet haben
Sie können Ihre Rechnung auch direkt von unserer Website herunterladen, wenn Sie ein Kundenkonto erstellt haben:
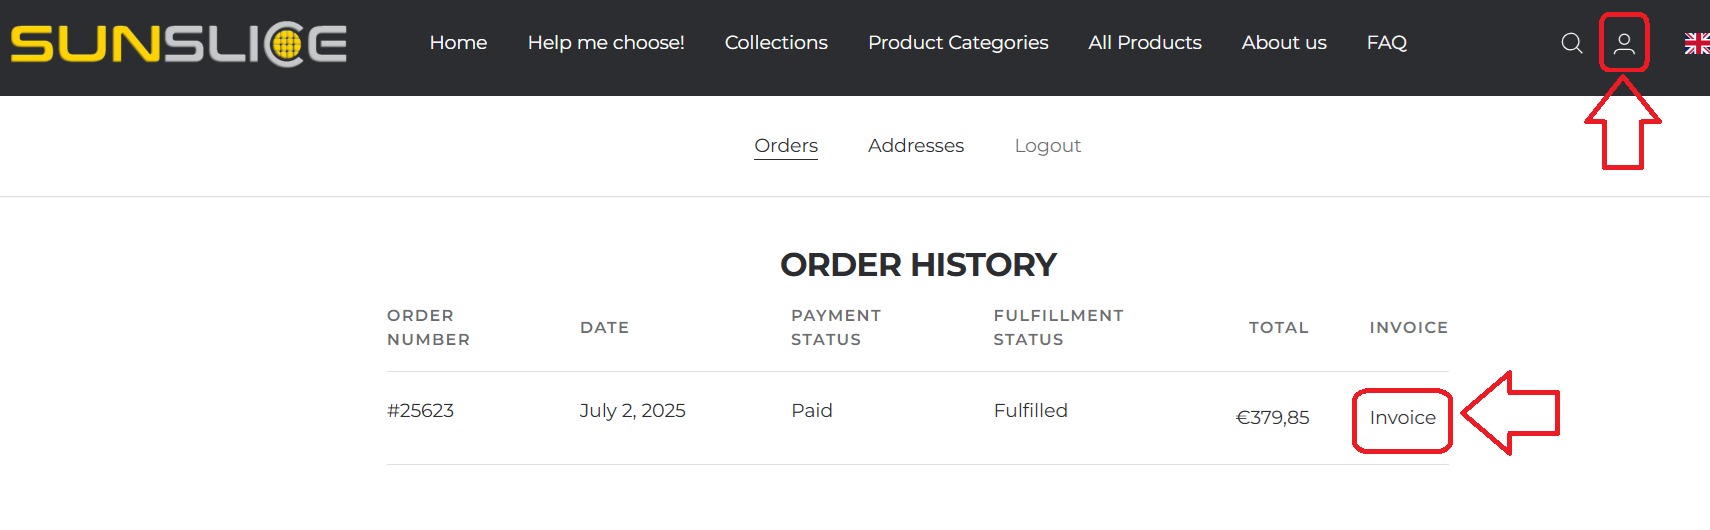
Bitte geben Sie Ihre Umsatzsteuer-Identifikationsnummer direkt nach Ihrem Firmennamen (im selben Feld) ein, getrennt durch ein "-".
Zum Beispiel:
Firmenname: "Sunslice SRL - BE0680474695"
Bitte kontaktieren Sie uns unter: sales@sunslice-solar.com
mit folgenden Informationen:
- Ihre Bestellung (Produkte, Farbe)
- Firmendaten (Firmenname + Ansprechpartner, USt-IdNr., Adresse)
- Normale oder Expresslieferung
Wir senden Ihnen eine Rechnung per E-Mail zu. Ihre Bestellung kann nach Erhalt der Rechnung bezahlt werden.
Das kann tatsächlich vorkommen.
In der Regel können bei Empfang zwei Arten von Steuern verlangt werden:
- Mehrwertsteuer
- Einfuhrzölle
Bitte kontaktieren Sie uns vor der Bestellung unter sales@sunslice-solar.com bevor Sie mit Ihrer Bestellung mit den folgenden Informationen fortfahren:
- Ihre Bestellung (Produkte, Farbe)
- Firmendaten (Firmenname + Ansprechpartner, Mehrwertsteuernummer, Adresse)
- Normale oder Expressversand
Wir senden Ihnen eine belgische Mehrwertsteuerbefreite Rechnung.
Bitte beachten Sie, dass die Mehrwertsteuer (mit dem Satz Ihres eigenen Landes) und Einfuhrzölle bei Empfang Ihrer Bestellung noch erhoben werden.
Unsere Website ermöglicht:
- Kreditkartenzahlungen (VISA / MASTERCARD)
- Bancontact
- Paypal. Wir bitten Sie höflich, zunächst die beiden oben genannten Optionen zu prüfen, bevor Sie die Zahlung über Paypal vornehmen. Für Paypal-Zahlungen fallen uns nämlich sehr hohe Transaktionsgebühren an... Vielen Dank!
Für Banküberweisungen kontaktieren Sie uns bitte unter sales@sunslice-solar.com bevor Sie mit Ihrer Bestellung mit den folgenden Informationen fortfahren:
- Ihre Bestellung (Produkte, Farbe)
- Firmendaten (Firmenname + Ansprechpartner, USt-IdNr., Adresse)
- Normale oder Expressversand
Wir senden Ihnen die Rechnung per E-Mail zu. Ihre Bestellung kann nach Erhalt der Rechnung bezahlt werden.
Allgemeine Fragen
Sie möchten ein bestimmtes Gerät aufladen, wissen aber nicht, welches Sunslice-Produkt (Solar-Ladegerät, Generator, Powerbank, ...) Sie kaufen sollten, um dies zu ermöglichen?
Keine Sorge:
1. Bitte sehen Sie sich die technischen Spezifikationen der Produkte auf deren Produktseiten an
2. Prüfen Sie, ob Sie die Antwort auf Ihre Frage in diesem FAQ finden können
3. Wenn Sie es immer noch nicht wissen, können Sie uns eine E-Mail senden an contact@sunslice-solar.com
BITTE fügen Sie ein Bild des Ladegeräts/der Ladegeräte des Geräts/der Geräte hinzu, die Sie mit Strom versorgen möchten. Ihr Ladegerät sieht zum Beispiel so aus, und wir müssen die auf dem Ladegerät geschriebenen Spezifikationen klar lesen können.

Im Allgemeinen sind alle Sunslice-Produkte wasserabweisend. Das bedeutet, dass sie bei Regenwetter für eine angemessene Zeit verwendet werden können.
Keines unserer Produkte kann rechtlich als wasserdicht (IP67) eingestuft werden, da wir in der Regel die erforderlichen Tests für diese Zertifikate nicht bestanden haben. Warum nicht? Aufgrund des hohen Budgets bevorzugen wir es, die Mittel in die Forschung und Entwicklung zu investieren, um die Wasserbeständigkeit unserer Produkte effektiv zu verbessern. Unsere Produkte können jedoch bei Regen verwendet werden, sofern im Benutzerhandbuch nichts anderes angegeben ist.
Im Allgemeinen gilt:
- Produkte mit eingebauter Batterie
- Dürfen nicht ins Wasser getaucht werden. Falls dies doch passiert und Sie Ihr Produkt zurückbekommen, trocknen Sie es bitte vollständig, bevor Sie es wieder einschalten oder verwenden. Wenn das Ladegerät nach dem Trocknen weiterhin funktioniert, werden die Geräte, die Sie mit dem Sunslice-Ladegerät aufladen, keinen Schaden nehmen. Die Lebensdauer des Sunslice-Ladegeräts könnte jedoch beeinträchtigt sein.
- Können bei Regen verwendet werden, machen Sie sich also keine Sorgen, wenn Ihr Gerät beim Wandern im Regen eine Weile an Ihrem Rucksack hängt. Bitte trocknen Sie das Produkt anschließend, um seine Lebensdauer zu erhalten.
- Produkte ohne Batterie
- Brauchen keine Angst vor Wasser zu haben. Bitte trocknen Sie die Produkte anschließend, um ihre Lebensdauer zu erhalten.
Falls Ihr Gerät länger benötigt, um mit einem Sunslice-Ladegerät zu 100 % aufgeladen zu werden, kann dies entweder an einem defekten Ladegerät oder an den technischen Spezifikationen Ihres Geräts liegen.
Ein Smartphone mit einem größeren Akku benötigt beispielsweise länger zum Aufladen als ein Smartphone mit einem kleinen Akku. Im Laufe der Zeit integrieren Smartphones immer größere Akkus, was zu längeren Ladezeiten bei aktuellen Smartphones führt.
Wir bemühen uns ständig, durch verbesserte Forschung und Entwicklung unsere Produkte an die elektronischen Entwicklungen auf dem Markt anzupassen.
Die von Sunslice angegebenen quantitativen Merkmale seiner Produkte basieren auf Standardgeräten (Smartphones, Kameras, Tablets, ...) zum Vergleich, wie es die meisten Akteure in der Ladebranche tun.
Beachten Sie, dass einige (neuere) Geräte leicht oder deutlich von den Vergleichsgeräten abweichen können. Zum Beispiel haben iPhones andere Spezifikationen als Android-Geräte, abhängig von ihrem integrierten Akku, dem Energieverbrauch bei der Nutzung des Telefons, der Ladegeschwindigkeit usw. Auch verschiedene Modelle derselben Marke unterscheiden sich in diesen Spezifikationen.
Diese Tabelle gibt eine Vorstellung davon, wie viele Ladezyklen für ein 4.000 mAh (z. B. das Photon) Powerbank je nach Telefonmodell möglich sind.

Beachten Sie, dass einige neuere Smartphones nicht vollständig (100 %) vom Photon aufgeladen werden können, da sie eine sehr hohe interne Akkukapazität besitzen.
Wenn ein Kratzer auf Ihrem Solarpanel erscheint, machen Sie sich keine Sorgen. Die meisten Kratzer beeinträchtigen die Ladegeschwindigkeit der Solarzellen nicht.
Falls Sie eine drastische Veränderung der Solarleistung feststellen, können Sie uns unter service@sunslice-solar.com kontaktieren.
Es kommt darauf an.
Wir vermeiden es, unnötige Kabel mitzuliefern, da dies zur Elektronikmüllbelastung beiträgt. Wenn also nicht ausdrücklich angegeben ist, dass ein Kabel bei der Bestellung oder auf der Produktseite enthalten ist, wird kein Kabel zu Ihrer Bestellung hinzugefügt.
Falls Sie ein bestimmtes Kabel auf unserer Website kaufen, fügen wir es selbstverständlich Ihrer Bestellung hinzu.
Die Unterschiede zwischen der Nennkapazität und der tatsächlichen Kapazität einer Powerbank ergeben sich aus mehreren technischen und praktischen Faktoren:
1. Spannungsumwandlung: Die Nennkapazität einer Batterie wird üblicherweise in Milliamperestunden (mAh) bei einer bestimmten Spannung angegeben (oft 3,7 V, was die Standardspannung für Lithium-Ionen-Zellen ist). Um jedoch Geräte aufzuladen, muss diese Spannung auf 5 V umgewandelt werden, was die Standard-Ausgangsspannung von USB-Anschlüssen ist. Diese Umwandlung verursacht Energieverluste und reduziert die effektiv verfügbare Kapazität.
2. Wirkungsgrad der Umwandlung: Die internen Schaltkreise der Powerbank wandeln die Energie der Batterie von 3,7 V auf 5 V um. Diese Umwandlung ist nicht 100 % effizient und führt zu einem Energieverlust von 5–15 % oder mehr bei Modellen geringerer Qualität.
3. Innenwiderstand: Die internen Komponenten der Powerbank, einschließlich Kabel und Anschlüsse, verursachen aufgrund des elektrischen Widerstands Energieverluste, besonders bei hohen Strömen. Dies verringert die für das zu ladende Gerät verfügbare Energie.
4. Temperatur: Während des Ladens oder Entladens kann die Batterie sich erwärmen, was zusätzliche Energieverluste verursacht, insbesondere wenn die Powerbank in sehr heißen oder kalten Umgebungen verwendet wird.
5. Natürliche Batteriealterung: Mit der Zeit verschleißen die Batteriezellen und ihre maximale Kapazität nimmt ab. Eine ältere Powerbank hat daher eine geringere tatsächliche Kapazität als ihre ursprüngliche Nennkapazität.
Diese Faktoren führen dazu, dass die tatsächliche Kapazität oft niedriger ist als die angegebene Nennkapazität.
- Immer geladen lagern
- Mindestens alle 3 Monate aufladen, um Batterieschäden zu vermeiden
- An einem trockenen Ort bei Raumtemperatur
Verständnis der Ladezeiten bei Solarenergie
Beim Laden eines Geräts mit einem tragbaren Solarpanel beeinflussen mehrere Faktoren die gesamte Ladezeit. Unsere Berechnungen berücksichtigen die Leistung des Solarpanels, Umweltbedingungen und die Ladecharakteristika jedes Geräts. Nachfolgend eine Übersicht der wichtigsten Elemente, die die Solar-Ladeleistung beeinflussen.
0. Perfekte theoretische Bedingungen
In einer perfekten und theoretischen Welt ist die Berechnung der Ladezeit sehr einfach:
Ladezeit = Kapazität (Wh) / Solarleistung.
mit Kapazität (Wh) = Kapazität (Ah) * 3,7V (Beispiel für Smartphone: 3(000 m)Ah * 3,7V = 11 Wh)
Seien Sie sich jedoch bewusst, dass dies zwar eine sehr schnelle Methode ist, um eine Schätzung der Ladezeit zu erhalten, sie aber nicht korrekt ist, da wir nicht in einer perfekten theoretischen Welt leben :-) Um diesen Fehler zu vermeiden und vor allem um bestmöglich zu erklären, warum dies nicht korrekt ist, haben wir den folgenden kleinen Artikel geschrieben. Keine Panik, wenn Sie trotz Lesen des Artikels die Ladezeiten nicht selbst berechnen können: Schätzungen der Ladezeiten werden unter dem Artikel angezeigt.
1. Leistungsausgabe des Solarpanels
Jedes Solarpanel hat eine Spitzenleistungsangabe (z. B. 18W), aber die tatsächlich an ein Gerät abgegebene Leistung hängt von den realen Bedingungen ab. Die wichtigsten begrenzenden Faktoren sind:
Verluste bei der Sonnenlichteffizienz
Nicht das gesamte Sonnenlicht, das die Erde erreicht, wird in nutzbare Energie umgewandelt. Verluste entstehen durch:
- Atmosphärische Filterung: Der Sonnenwinkel, die Ozonschicht und andere atmosphärische Effekte verringern die Sonnenintensität. Wir schätzen einen 10%igen Verlust.
- Interne Ineffizienzen: Die Leistung wird weiter reduziert durch USB-Wandlung (8% Verlust) und Kabelwiderstand (2% Verlust).
Da diese Verluste multiplikativ sind, beträgt der gesamte Effizienzfaktor:
(1−0,10)×(1−0,08)×(1−0,02)=0,81(1 - 0.10) \times (1 - 0.08) \times (1 - 0.02) = 0.81(1−0.10)×(1−0.08)×(1−0.02)=0.81
Das bedeutet, dass die effektive Leistung, die vom Solarpanel zur Verfügung steht, ist:
Spitzenleistung×0,81\text{Spitzenleistung} \times 0,81Spitzenleistung×0,81
Verluste durch Wolkenbedeckung
An bewölkten Tagen erreicht weniger Sonnenlicht das Panel, was die Effizienz weiter reduziert. Wir schätzen einen 50%igen Verlust durch Wolken, der sich mit internen Ineffizienzen kombiniert:
(1−0,50)×(1−0,08)×(1−0,02)=0,44(1 - 0.50) \times (1 - 0.08) \times (1 - 0.02) = 0.44(1−0.50)×(1−0.08)×(1−0.02)=0.44
Die unter bewölkten Bedingungen verfügbare effektive Leistung beträgt also:
Spitzenleistung×0,44\text{Spitzenleistung} \times 0,44Spitzenleistung×0,44
2. Geräte-Ladebeschränkungen
Jedes Gerät hat eine maximale Eingangsleistung, das heißt, es kann nur eine bestimmte Leistung gleichzeitig aufnehmen.
- Eine GoPro mit einem 1.500mAh Akku (5,5Wh) hat eine maximale Eingangsleistung von 5W. Selbst wenn das Solarpanel mehr Leistung liefert, lädt die GoPro nicht schneller als mit 5W.
- Ein Smartphone kann je nach Schnellladefähigkeit bis zu 10-18W akzeptieren.
- USB-Anschluss-Ausgangsbeschränkung: Selbst wenn ein Solarpanel eine hohe Gesamtleistung hat, hat jeder USB-Anschluss eine maximale Ausgangsleistung. Zum Beispiel hat das Fusion Flex 18 zwei USB-A-Ausgänge, jeweils begrenzt auf 13,5W (5V/2,7A). Ein Gerät, das mehr Leistung benötigt, wird durch die Ausgangsleistung des Anschlusses begrenzt.
3. Praktisches Ladebeispiel
Beispiel 1: Laden einer GoPro
Nehmen wir das Fusion Flex 18 Solarpanel (18W), das eine GoPro mit einem 1.500mAh Akku (5,5Wh) und einer maximalen Eingangsleistung der GoPro von 5W lädt.
Schritt 1: Tatsächliche Solarleistung nach Effizienzverlusten durch Sonneneinstrahlung berechnen
Die gesamten Verluste durch Sonnenlichteffizienz umfassen:
- Atmosphärische Filterverluste: 10%
- Interne Ineffizienzen (USB-Wandlung + Kabelwiderstand): 8% und 2%
Da diese Verluste multiplikativ und nicht additiv sind, beträgt der gesamte Wirkungsgradfaktor:
(1−0,10)×(1−0,08)×(1−0,02)=0,81% --> 19% Verluste.
Das bedeutet, die effektive Solarleistung beträgt:
18W × 0,81 = 14,58W
Schritt 2: USB-Port-Ausgangsbegrenzung prüfen
- Jeder USB-A-Anschluss am Fusion Flex 18 hat eine maximale Ausgangsleistung von 13,5W.
- Da 14,58W > 13,5W sind, ist die tatsächlich verfügbare Leistung pro USB-Anschluss auf 13,5W begrenzt.
Schritt 3: Bestimmung der Ladeleistung für die GoPro
- Die GoPro hat eine maximale Ladeeingangsleistung von 5W, das heißt, sie kann nicht schneller als mit 5W geladen werden.
- Da 5W niedriger als die verfügbaren 13,5W sind, lädt die GoPro mit 5W.
Schritt 4: Ladezeit berechnen
- Ladezeit bei voller Sonneneinstrahlung: 5,5Wh/5W=1,1 Stunden5,5Wh / 5W = 1,1 \text{ Stunden}5,5Wh/5W=1,1 Stunden
Schritt 5: Anpassung an bewölkte Bedingungen
Bewölkung führt zu zusätzlichen 50% Verlusten, die sich mit internen Ineffizienzen kombinieren. Der gesamte Wirkungsgradfaktor beträgt:
(1−0,50)×(1−0,08)×(1−0,02)=0,44
Effektive Solarleistung bei bewölkten Bedingungen=18W×0,44=7,92W
- Die USB-Port-Begrenzung von 13,5W gilt weiterhin, aber da 7,92W < 13,5W ist, beträgt die tatsächlich verfügbare Leistung 7,92W.
- Da 7,92W > 5W ist, lädt die GoPro weiterhin mit 5W.
- Ladezeit bleibt: ~1,1 Stunden.
Beispiel 2: Smartphone laden
Nehmen wir nun den Fusion Flex 12 (12W), der ein Smartphone mit 3.000mAh Akku (11,1Wh) und einer maximalen Ladeeingangsleistung von 18W lädt.
Schritt 1: Tatsächliche Solarleistung nach Effizienzverlusten durch Sonneneinstrahlung berechnen
Der Fusion Flex 12 hat eine Spitzenleistung von 12W. Anwendung des Gesamteffizienzfaktors von 0,81 (unter Berücksichtigung atmosphärischer und interner Verluste):
Effektive Solarleistung=12W×0,81=9,72W
Schritt 2: USB-Port-Ausgangsbegrenzung prüfen
- Jeder USB-A-Port am Fusion Flex 12 hat eine maximale Ausgangsleistung von 12W (5V/2,4A).
- Da 9,72W < 12W ist, bleibt die tatsächlich verfügbare Leistung bei 9,72W (begrenzt durch Sonnenlichteffizienz, nicht den Port).
Schritt 3: Ladeleistung für das Smartphone bestimmen
- Das Smartphone hat eine maximale Ladeeingangsleistung von 18W, das heißt, es kann mit bis zu 18W laden, wenn genügend Leistung verfügbar ist.
- Die verfügbare Leistung beträgt nur 9,72W, was weniger als die 18W sind, die das Smartphone aufnehmen kann.
- Endgültige Ladeleistung: 9,72W (begrenzt durch verfügbare Solarleistung).
Schritt 4: Ladezeit berechnen
- Ladezeit bei voller Sonneneinstrahlung: 11,1Wh / 9,72W = 1,14 Stunden
Schritt 5: Anpassung an bewölkte Bedingungen
Verwendung des Gesamteffizienzfaktors von 0,44 (Bewölkung + interne Verluste):
Effektive Solarleistung=12W×0,44=5,28W
-
Die USB-Port-Begrenzung (12W) gilt weiterhin, aber da 5,28W < 12W ist, beträgt die tatsächlich verfügbare Leistung 5,28W.
-
Das Smartphone kann mehr als 5,28W aufnehmen, lädt also mit 5,28W.
-
Ladezeit bei bewölkten Bedingungen:
11,1Wh / 5,28W = 2,1 Stunden
Da die Sonnenbedingungen nie wirklich 100 % sind, kann man davon ausgehen, dass die Ladezeit für ein Smartphone zwischen 1,14 und 2,1 Stunden liegt.
Versand
Wir können dank BPOST, unserem vertrauenswürdigen Vertriebspartner, weltweit versenden.
Bitte beachten Sie, dass für verschiedene Regionen unterschiedliche Versandtarife gelten und Einfuhrsteuern anfallen können.
Afghanistan, Åland-Inseln, Albanien, Algerien, Amerikanisch-Samoa, Andorra, Angola, Anguilla, Antarktis, Antigua und Barbuda, Argentinien, Armenien, Aruba, Ascension, Asien/Mittlerer Osten, Asien/Mittlerer Osten/Nordafrika, Australien, Österreich, Aserbaidschan, Bahamas, Bahrain, Bangladesch, Barbados, Belarus, Belgien, Belize, Benin, Bermuda, Bhutan, Bolivien, Bonaire, Saint Eustatius und Saba, Bosnien und Herzegowina, Botswana, Bouvetinsel, Brasilien, Britisches Territorium im Indischen Ozean, Brunei Darussalam, Bulgarien, Burkina Faso, Burundi, Kambodscha, Kamerun, Kanada, Kanarische Inseln, Kap Verde, Kaimaninseln, Zentralafrikanische Republik, Ceuta, Tschad, Chile, China, Weihnachtsinsel, Kokosinseln (Keeling), Kolumbien, Komoren, Kongo, Demokratische Republik Kongo, Cookinseln, Costa Rica, Kroatien, Kuba, Curaçao, Zypern, Tschechische Republik, Dänemark, Dschibuti, Dominica, Dominikanische Republik, Ecuador, Ägypten, El Salvador, Äquatorialguinea, Eritrea, Estland, Äthiopien, Europäische Union, Falklandinseln (Malvinas), Färöer, Fidschi, Finnland, Frankreich, Französisch-Guayana, Französisch-Polynesien, Französische Süd- und Antarktisgebiete, Gabun, Gambia, Georgien, Deutschland, Ghana, Gibraltar, Großbritannien, Griechenland, Grönland, Grenada, Guadeloupe, Guam, Guatemala, Guernsey, Guinea, Guinea-Bissau, Guyana, Haiti, Heard- und McDonald-Inseln, Heiliger Stuhl (Vatikanstadt), Honduras, Hongkong, Ungarn, Island, Indien, Indonesien, Iran, Irak, Irland, Isle of Man, Israel, Italien, Elfenbeinküste, Jamaika, Japan, Jersey, Jordanien, Kasachstan, Kenia, Kiribati, Nordkorea, Südkorea, Kosovo, Kuwait, Kirgisistan, Demokratische Volksrepublik Laos, Lettland, Libanon, Lesotho, Liberia, Libysch-Arabische Dschamahirija, Liechtenstein, Litauen, Livigno, Luxemburg, Macao, Mazedonien, Madagaskar, Malawi, Malaysia, Malediven, Mali, Malta, Marshallinseln, Martinique, Mauretanien, Mauritius, Mayotte, Melilla, Mexiko, Mikronesien, Föderierte Staaten von, Moldawien, Monaco, Mongolei, Montenegro, Montserrat, Marokko, Mosambik, Myanmar, Namibia, Nauru, Nepal, Niederlande, Niederländische Antillen, Neukaledonien, Neuseeland, Nicaragua, Niger, Nigeria, Niue, Nicht-EU, Norfolkinsel, Nordafrika, Nördliche Marianen, Norwegen, Oman, Pakistan, Palau, Palästinensisches Gebiet, Panama, Papua-Neuguinea, Paraguay, Peru, Philippinen, Pitcairn, Polen, Portugal, Puerto Rico, Katar, Rest von Afrika, Rest von Europa, Rest der Welt, Réunion, Rumänien, Russland, Ruanda, St. Helena, St. Kitts und Nevis, St. Lucia, St. Martin, St. Pierre und Miquelon, St. Vincent und die Grenadinen, Samoa, San Marino, São Tomé und Príncipe, Saudi-Arabien, Senegal, Serbien, Seychellen, Sierra Leone, Singapur, Slowakei, Slowenien, Salomonen, Somalia, Südafrika, Südgeorgien und die Südlichen Sandwichinseln, Spanien, Sri Lanka, Sudan, Südsudan, Suriname, Svalbard und Jan Mayen, Swasiland, Schweden, Schweiz, Syrische Arabische Republik, Taiwan, Provinz China, Tadschikistan, Tansania, Vereinigte Republik, Thailand, Timor-Leste, Togo, Tokelau, Tonga, Trinidad und Tobago, Tunesien, Türkei, Turkmenistan, Turks- und Caicosinseln, Tuvalu, Uganda, Ukraine, Vereinigte Arabische Emirate, Vereinigte Staaten, US-Außengebiete, Uruguay, Usbekistan, Vanuatu, Venezuela, Vietnam, Britische Jungferninseln, US-Jungferninseln, Wallis und Futuna, Westsahara, Jemen, Sambia, Simbabwe
Wir geben unser Bestes, um Ihre Bestellungen so schnell wie möglich zu versenden!
Für Lieferungen nach Belgien beträgt die Lieferzeit in der Regel zwischen 24 und 72 Stunden.
Für andere europäische Länder variieren die Lieferzeiten je nach Schnelligkeit der örtlichen Dienste zwischen 3 und 7 Tagen.
In die USA dauern die Lieferzeiten normalerweise zwischen 4 und 7 Tagen.
Bitte beachten Sie, dass Verzögerungen durch Postdienste auftreten können und trotz unserer besten Bemühungen außerhalb unserer Kontrolle liegen!
Während der Hochsaison (insbesondere zum Jahresende) können die Lieferzeiten aufgrund des hohen Aufkommens bei unseren Logistikpartnern und Transporteuren länger sein.
Um unseren Kunden die günstigsten Versandkosten anzubieten, verwenden wir hauptsächlich den internationalen Versandservice von BPost. Für Expressversand oder „genaue Fristlieferung“ wählen Sie bitte im Checkout die Option „UPS Expresslieferung“ oder „beschleunigter Versand“ aus.
Nachdem Sie Ihre Bestellung aufgegeben haben, sollten Sie eine automatische Bestätigungs-E-Mail von uns erhalten haben.
In dieser E-Mail können Sie auf den Link „Meine Bestellung verfolgen“ klicken, um Zugriff auf den Bestellstatus und Sendungsverfolgungs-Updates zu erhalten.
Wir entschuldigen uns sehr für die Verzögerung.
Bitte warten Sie 2-3 Tage, bevor Sie sich Sorgen machen. In der Regel versenden wir innerhalb von 24 Stunden nach Bestelleingang, aber manchmal kann es zu zusätzlichen Verzögerungen kommen.
Bitte prüfen Sie zunächst den Sendungsverfolgungslink, der in der Bestätigungs-E-Mail enthalten ist, die Sie beim Versand Ihrer Bestellung erhalten haben sollten. Dieser könnte auch in einer anderen E-Mail von uns oder unserem Transport- bzw. Logistikpartner gesendet worden sein.
Bitte überprüfen Sie auch Ihren Spam-Ordner, falls Sie keine E-Mail mit dem Sendungsverfolgungslink finden können.
Falls Ihr Sendungsverfolgungslink anzeigt, dass die Sendung seit mehr als 10 Werktagen nicht weiterbewegt wurde, kontaktieren Sie uns bitte unter service@sunslice-solar.com.
No matching questions found.
Still need help?
Contact the Sunslice team and we'll be happy to help.